¶ STRATISYSTEM - INSTALLATION GUIDE - REV 4.1
¶ OPERATING SYSTEM INSTALLATION
Each StratiSYSTEM node requires an initial installation of the StratiSYSTEM OS. Each node can be booted using this ISO with the respective out–of-band management interface (e.g., Dell DRAC, HPE iLO, Supermicro IPMI, or any other IPMI system).
The platform can also be deployed in large scale deployments using Clonezilla and other third-party image deployment software platforms.
Once the ISO is mounted in the IPMI management interface, power the system on and force the system to boot to ISO or Virtual CD-ROM. You should see the following screen:
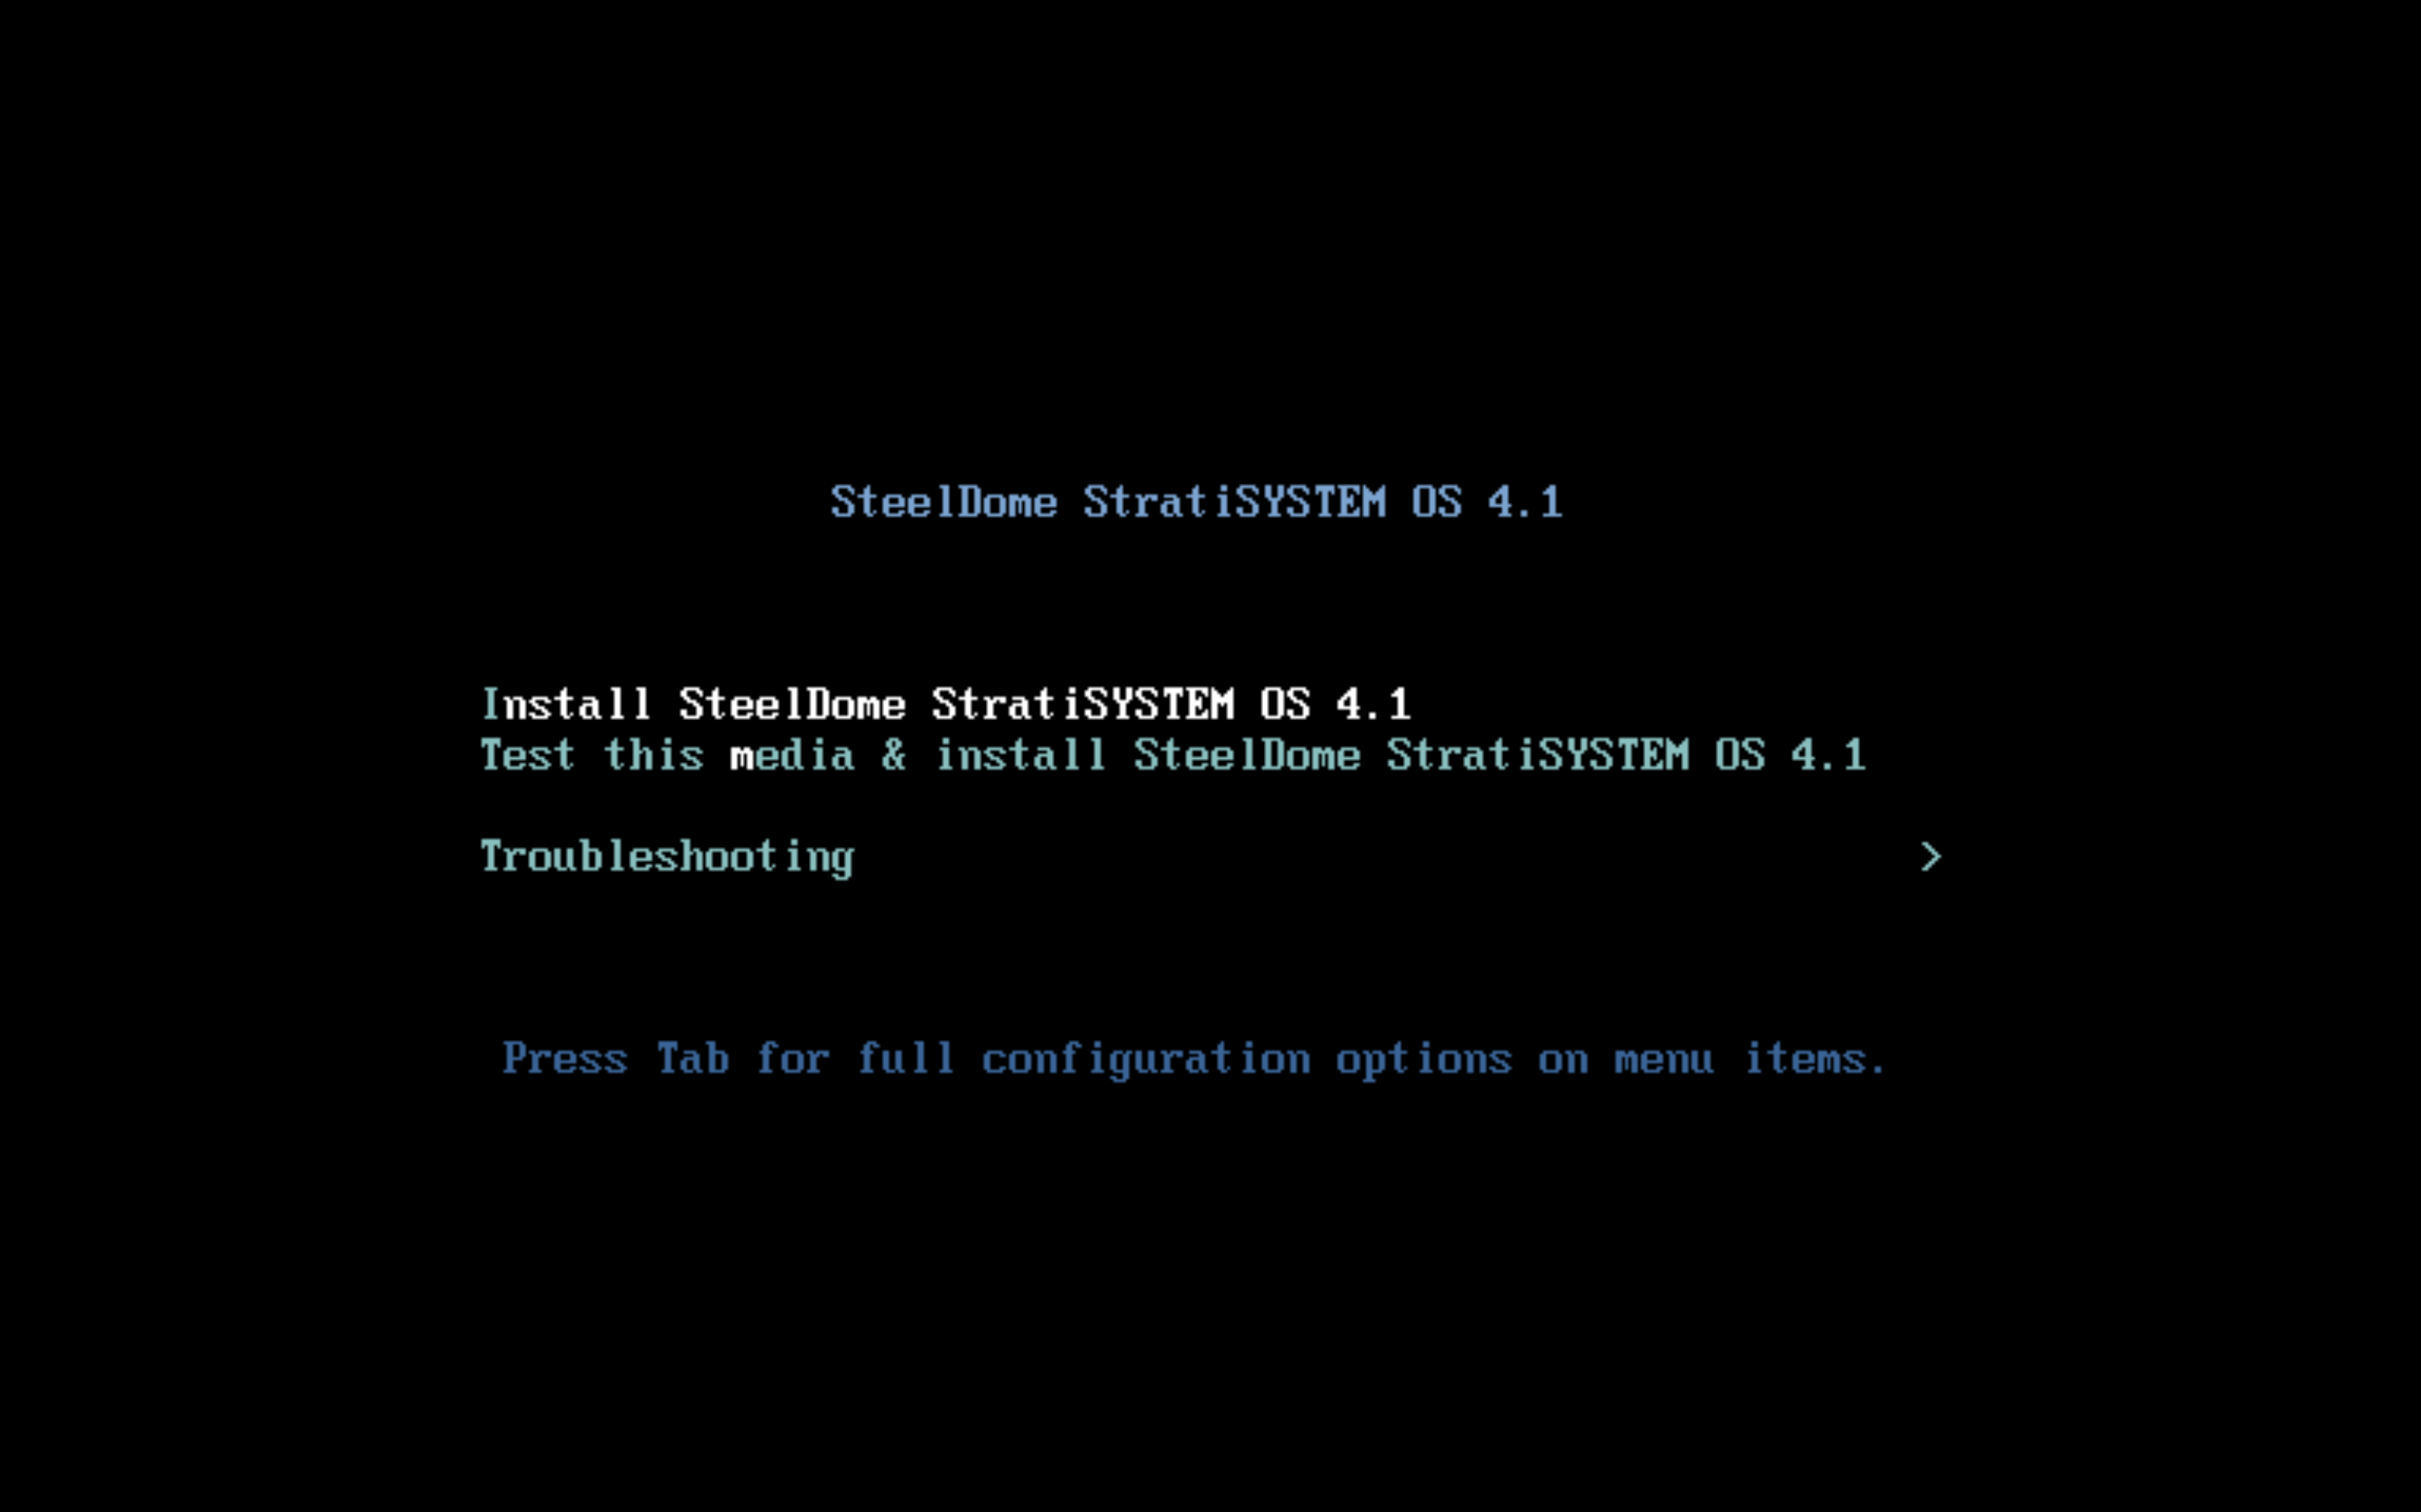
Select option #1: Install SteelDome StratiSYSTEM OS
After a few moments, you should now be presented with the main installation screen.
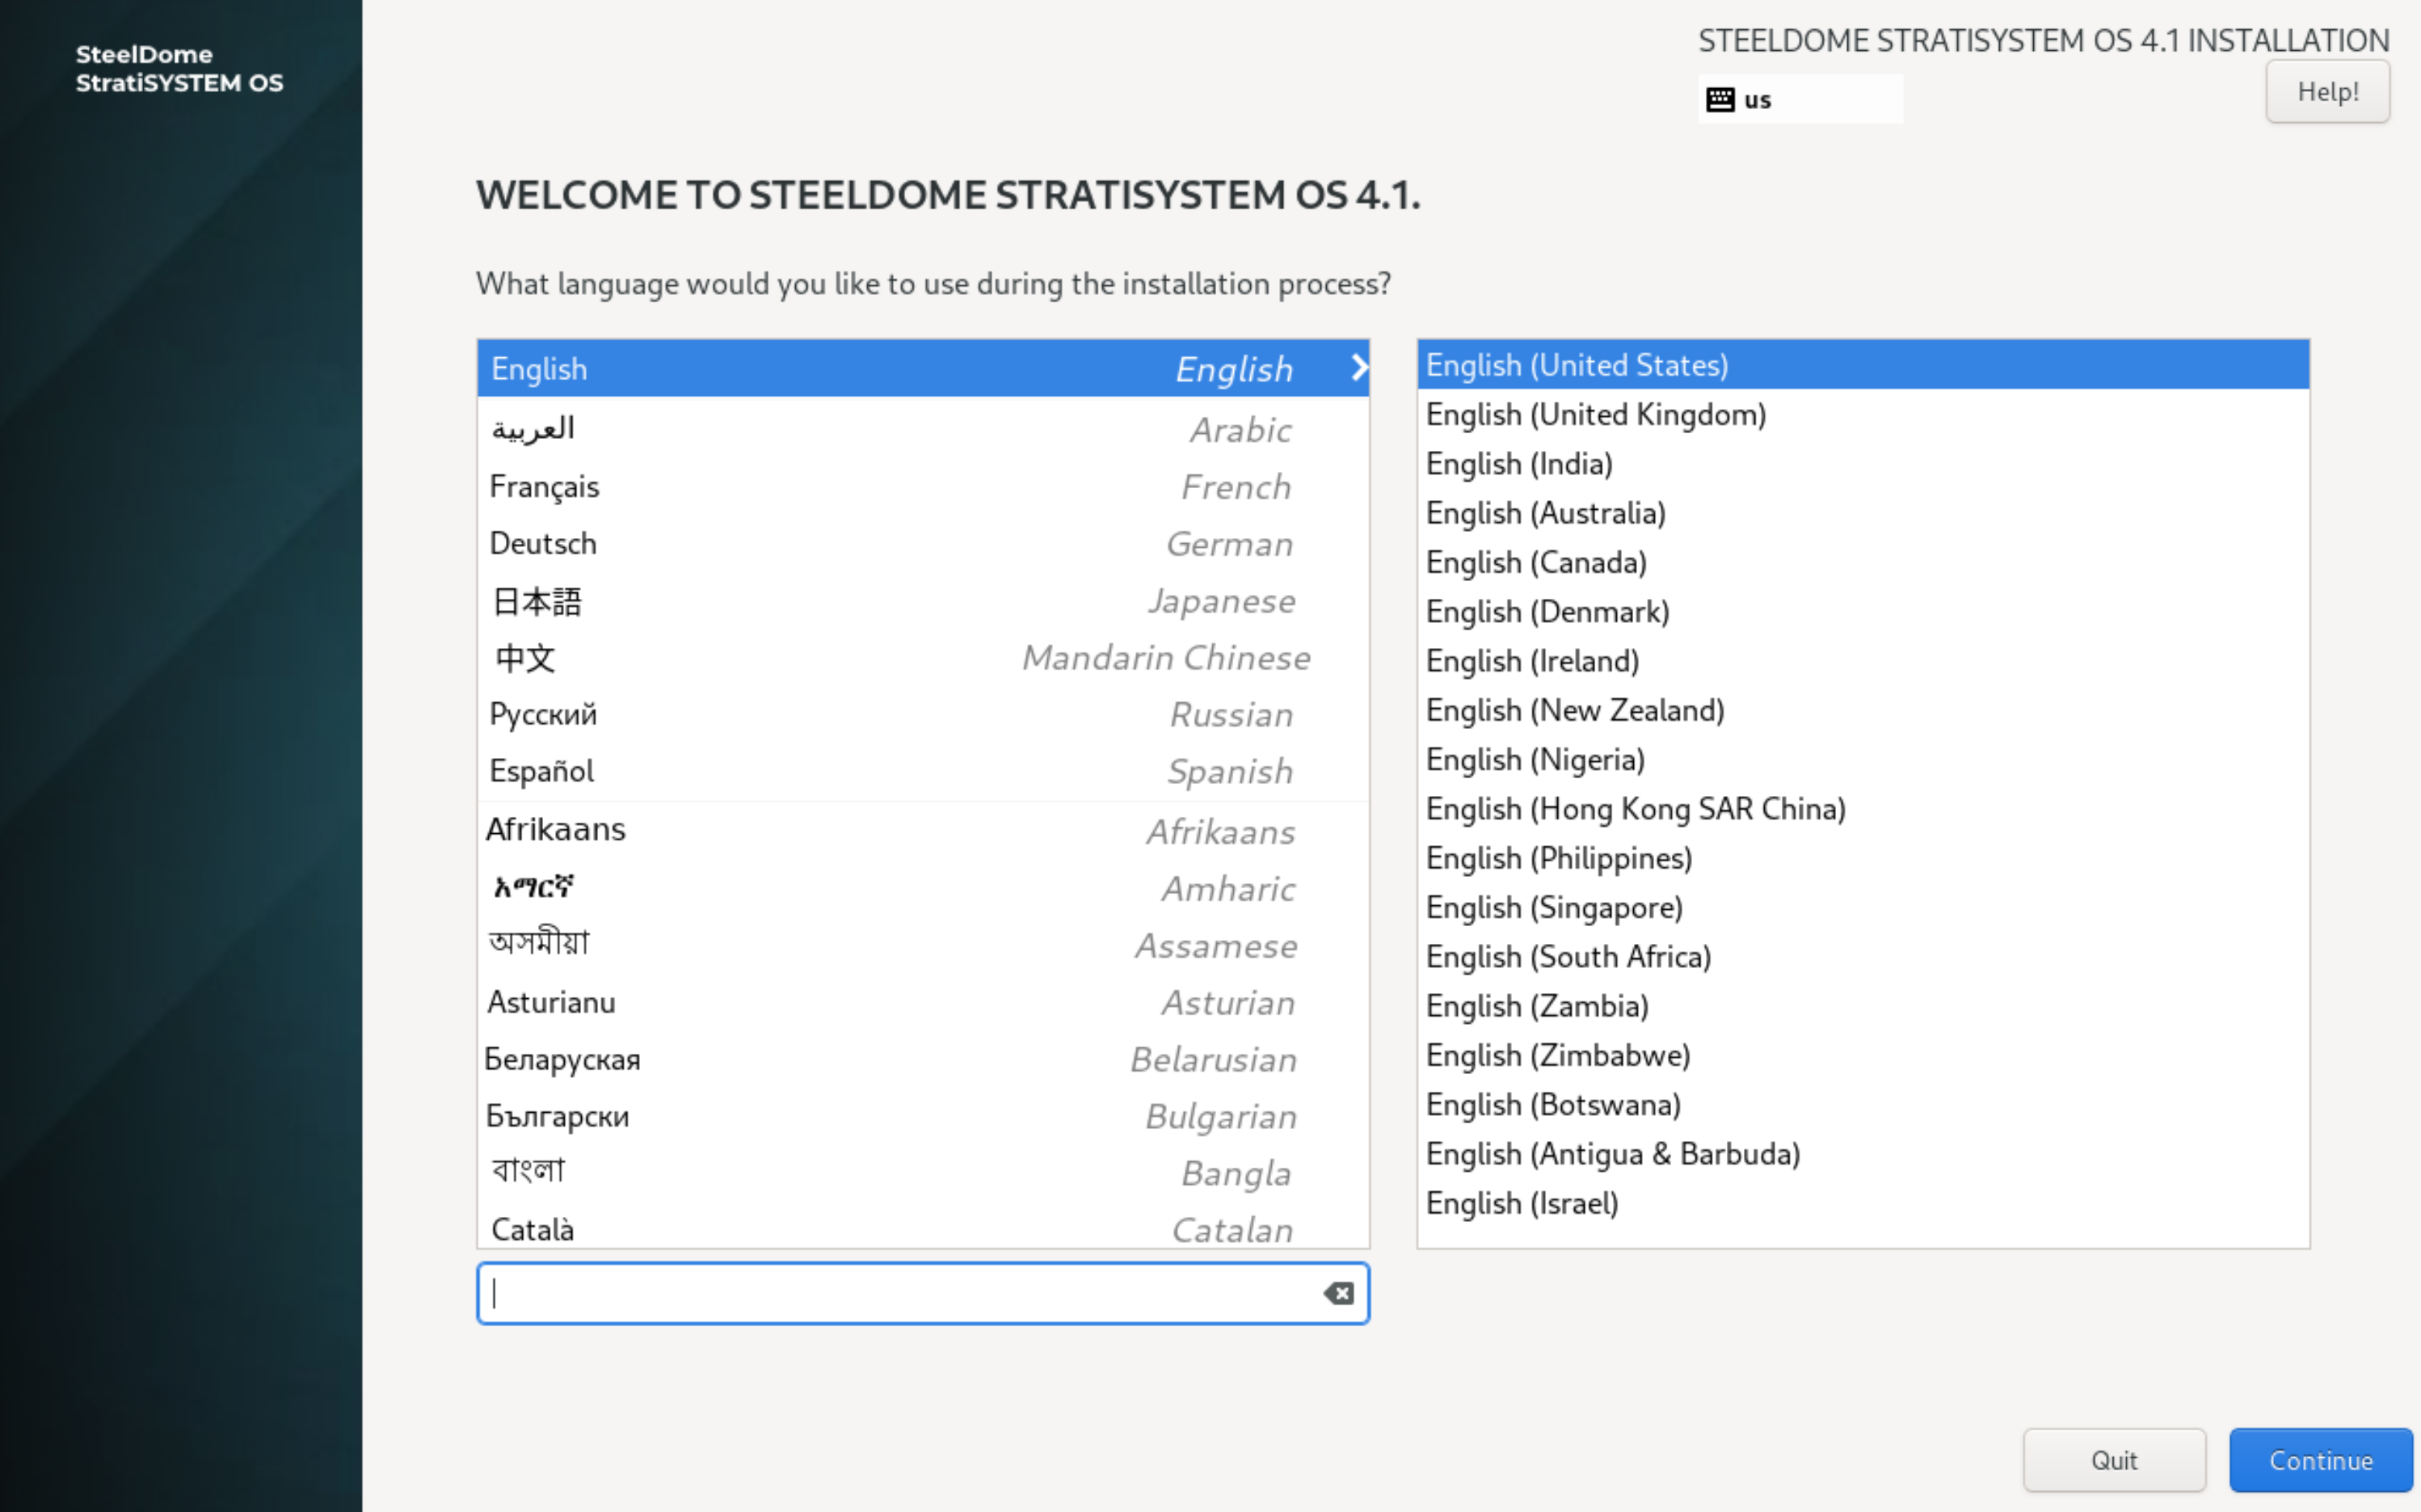
Select the appropriate language and click on CONTINUE.
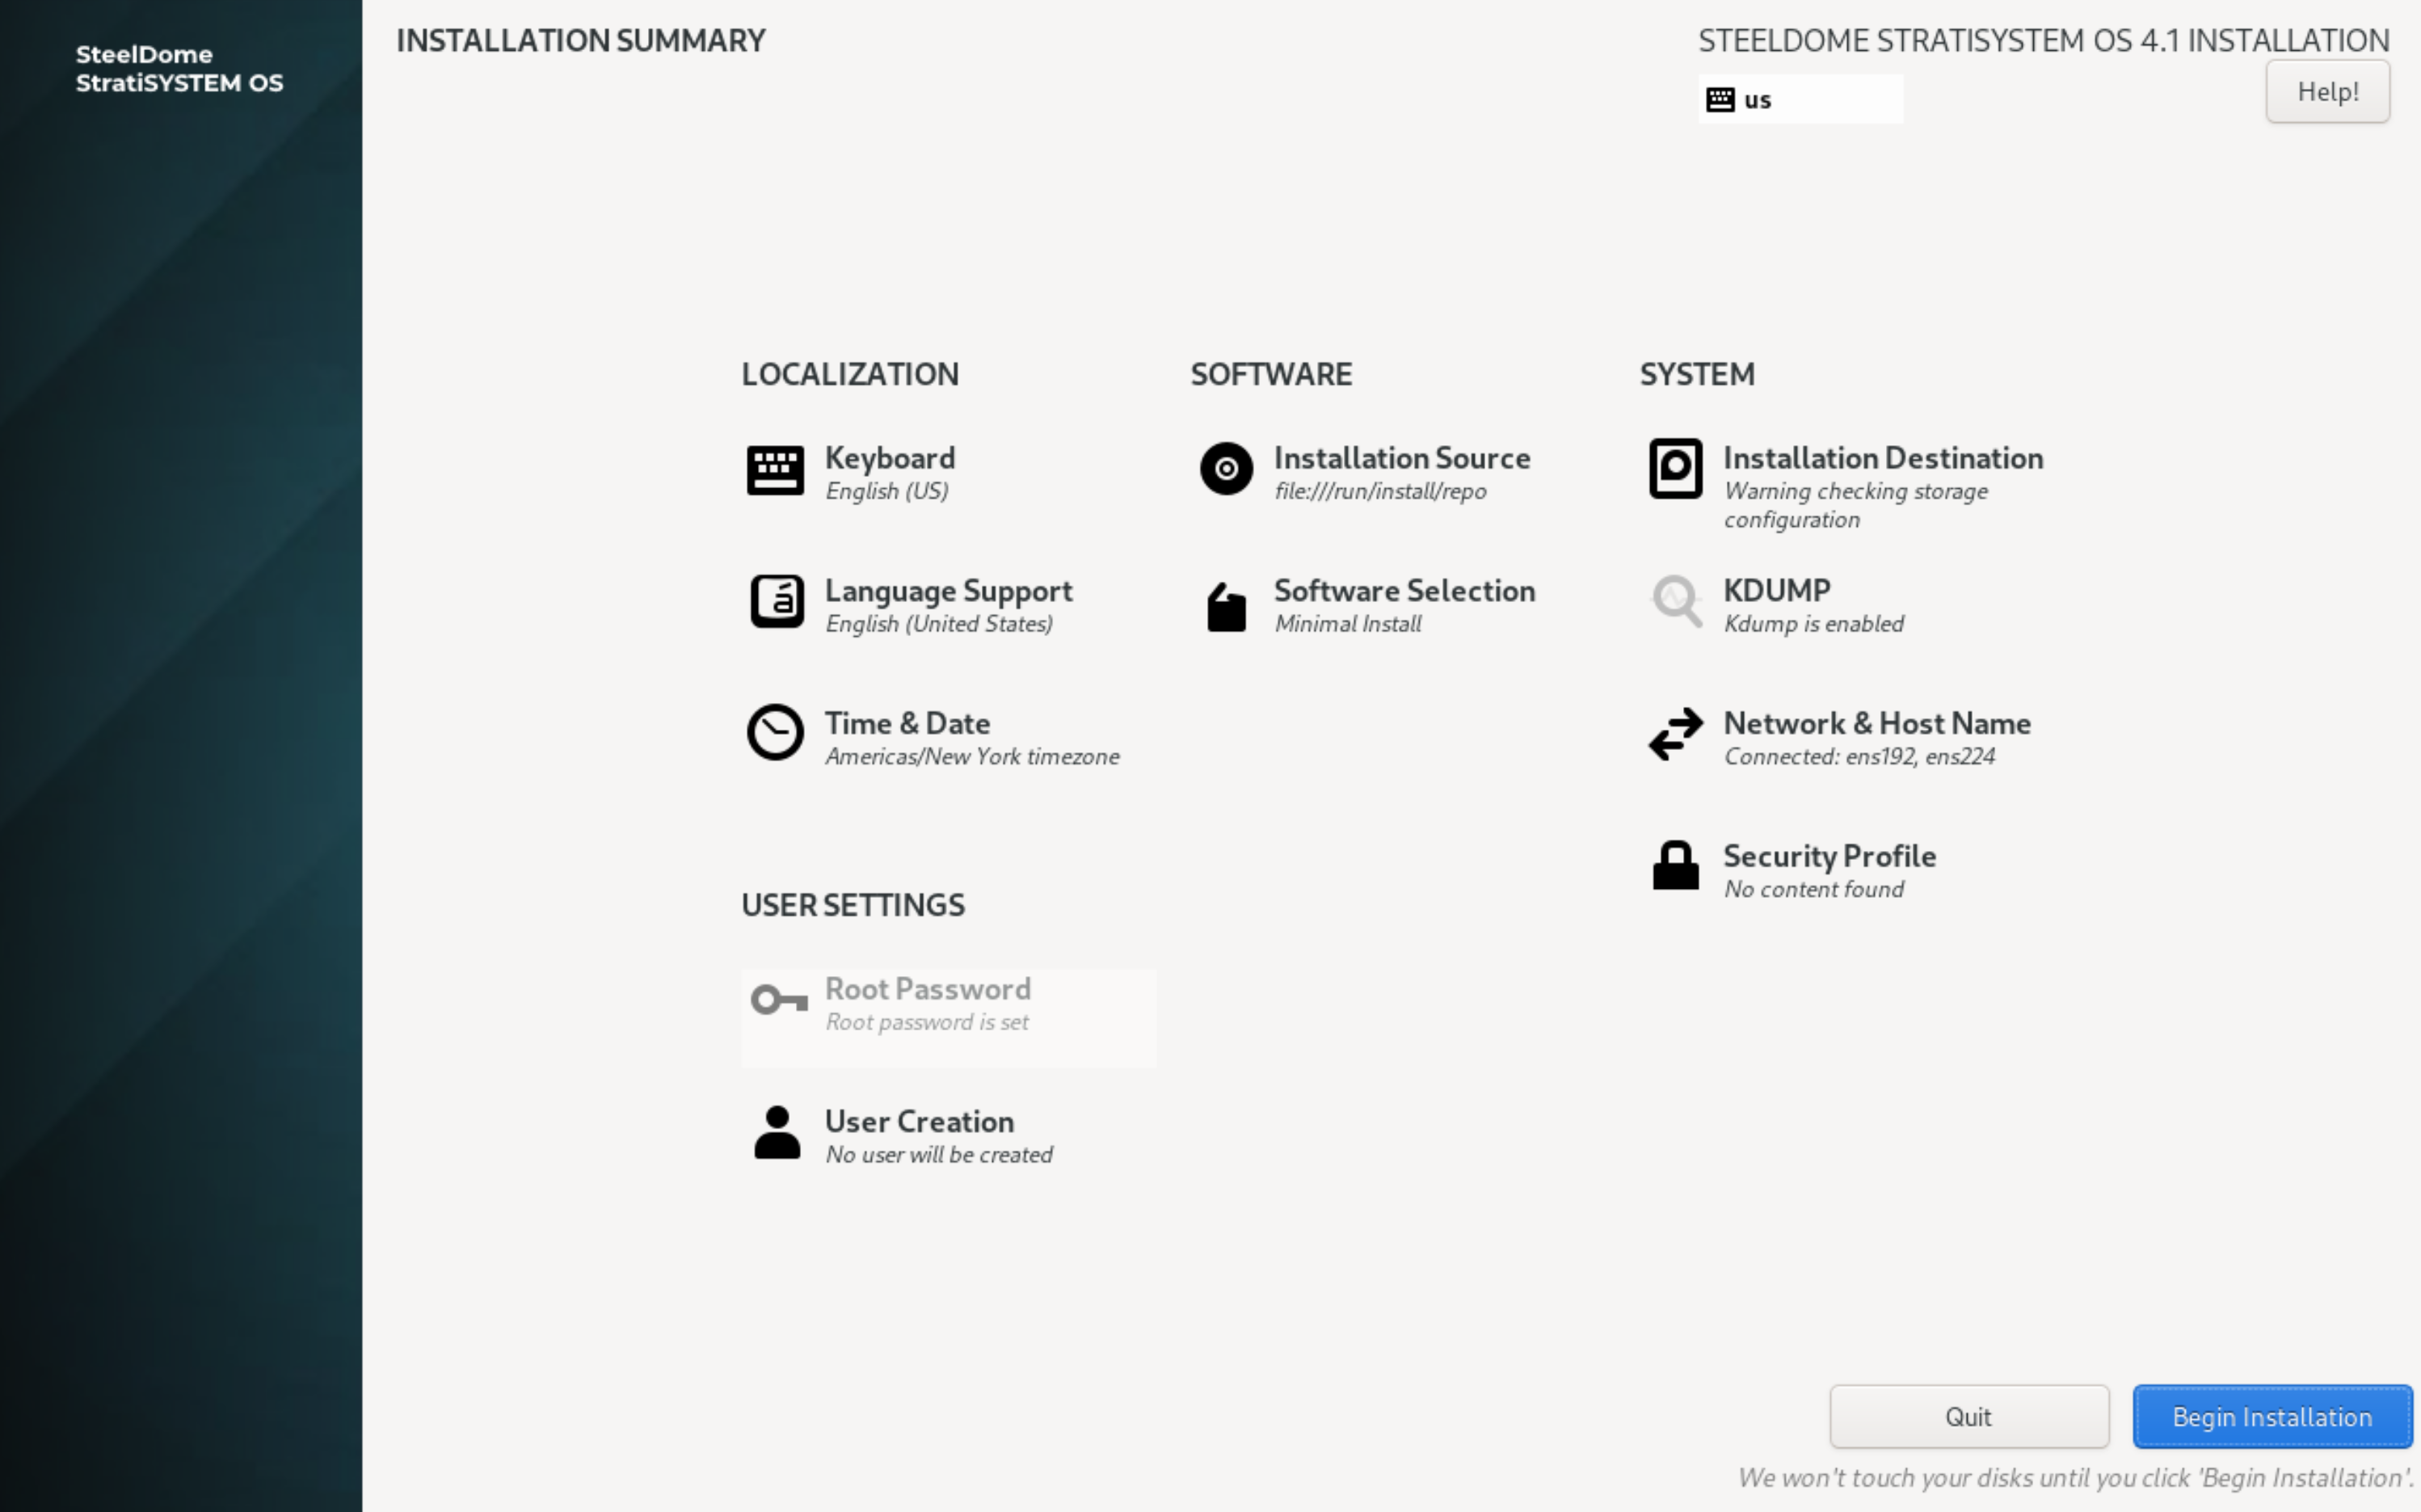
The next screen presents all major components of the installation which must be completed by the operator. The first test is to configure the disk used by the operating system.
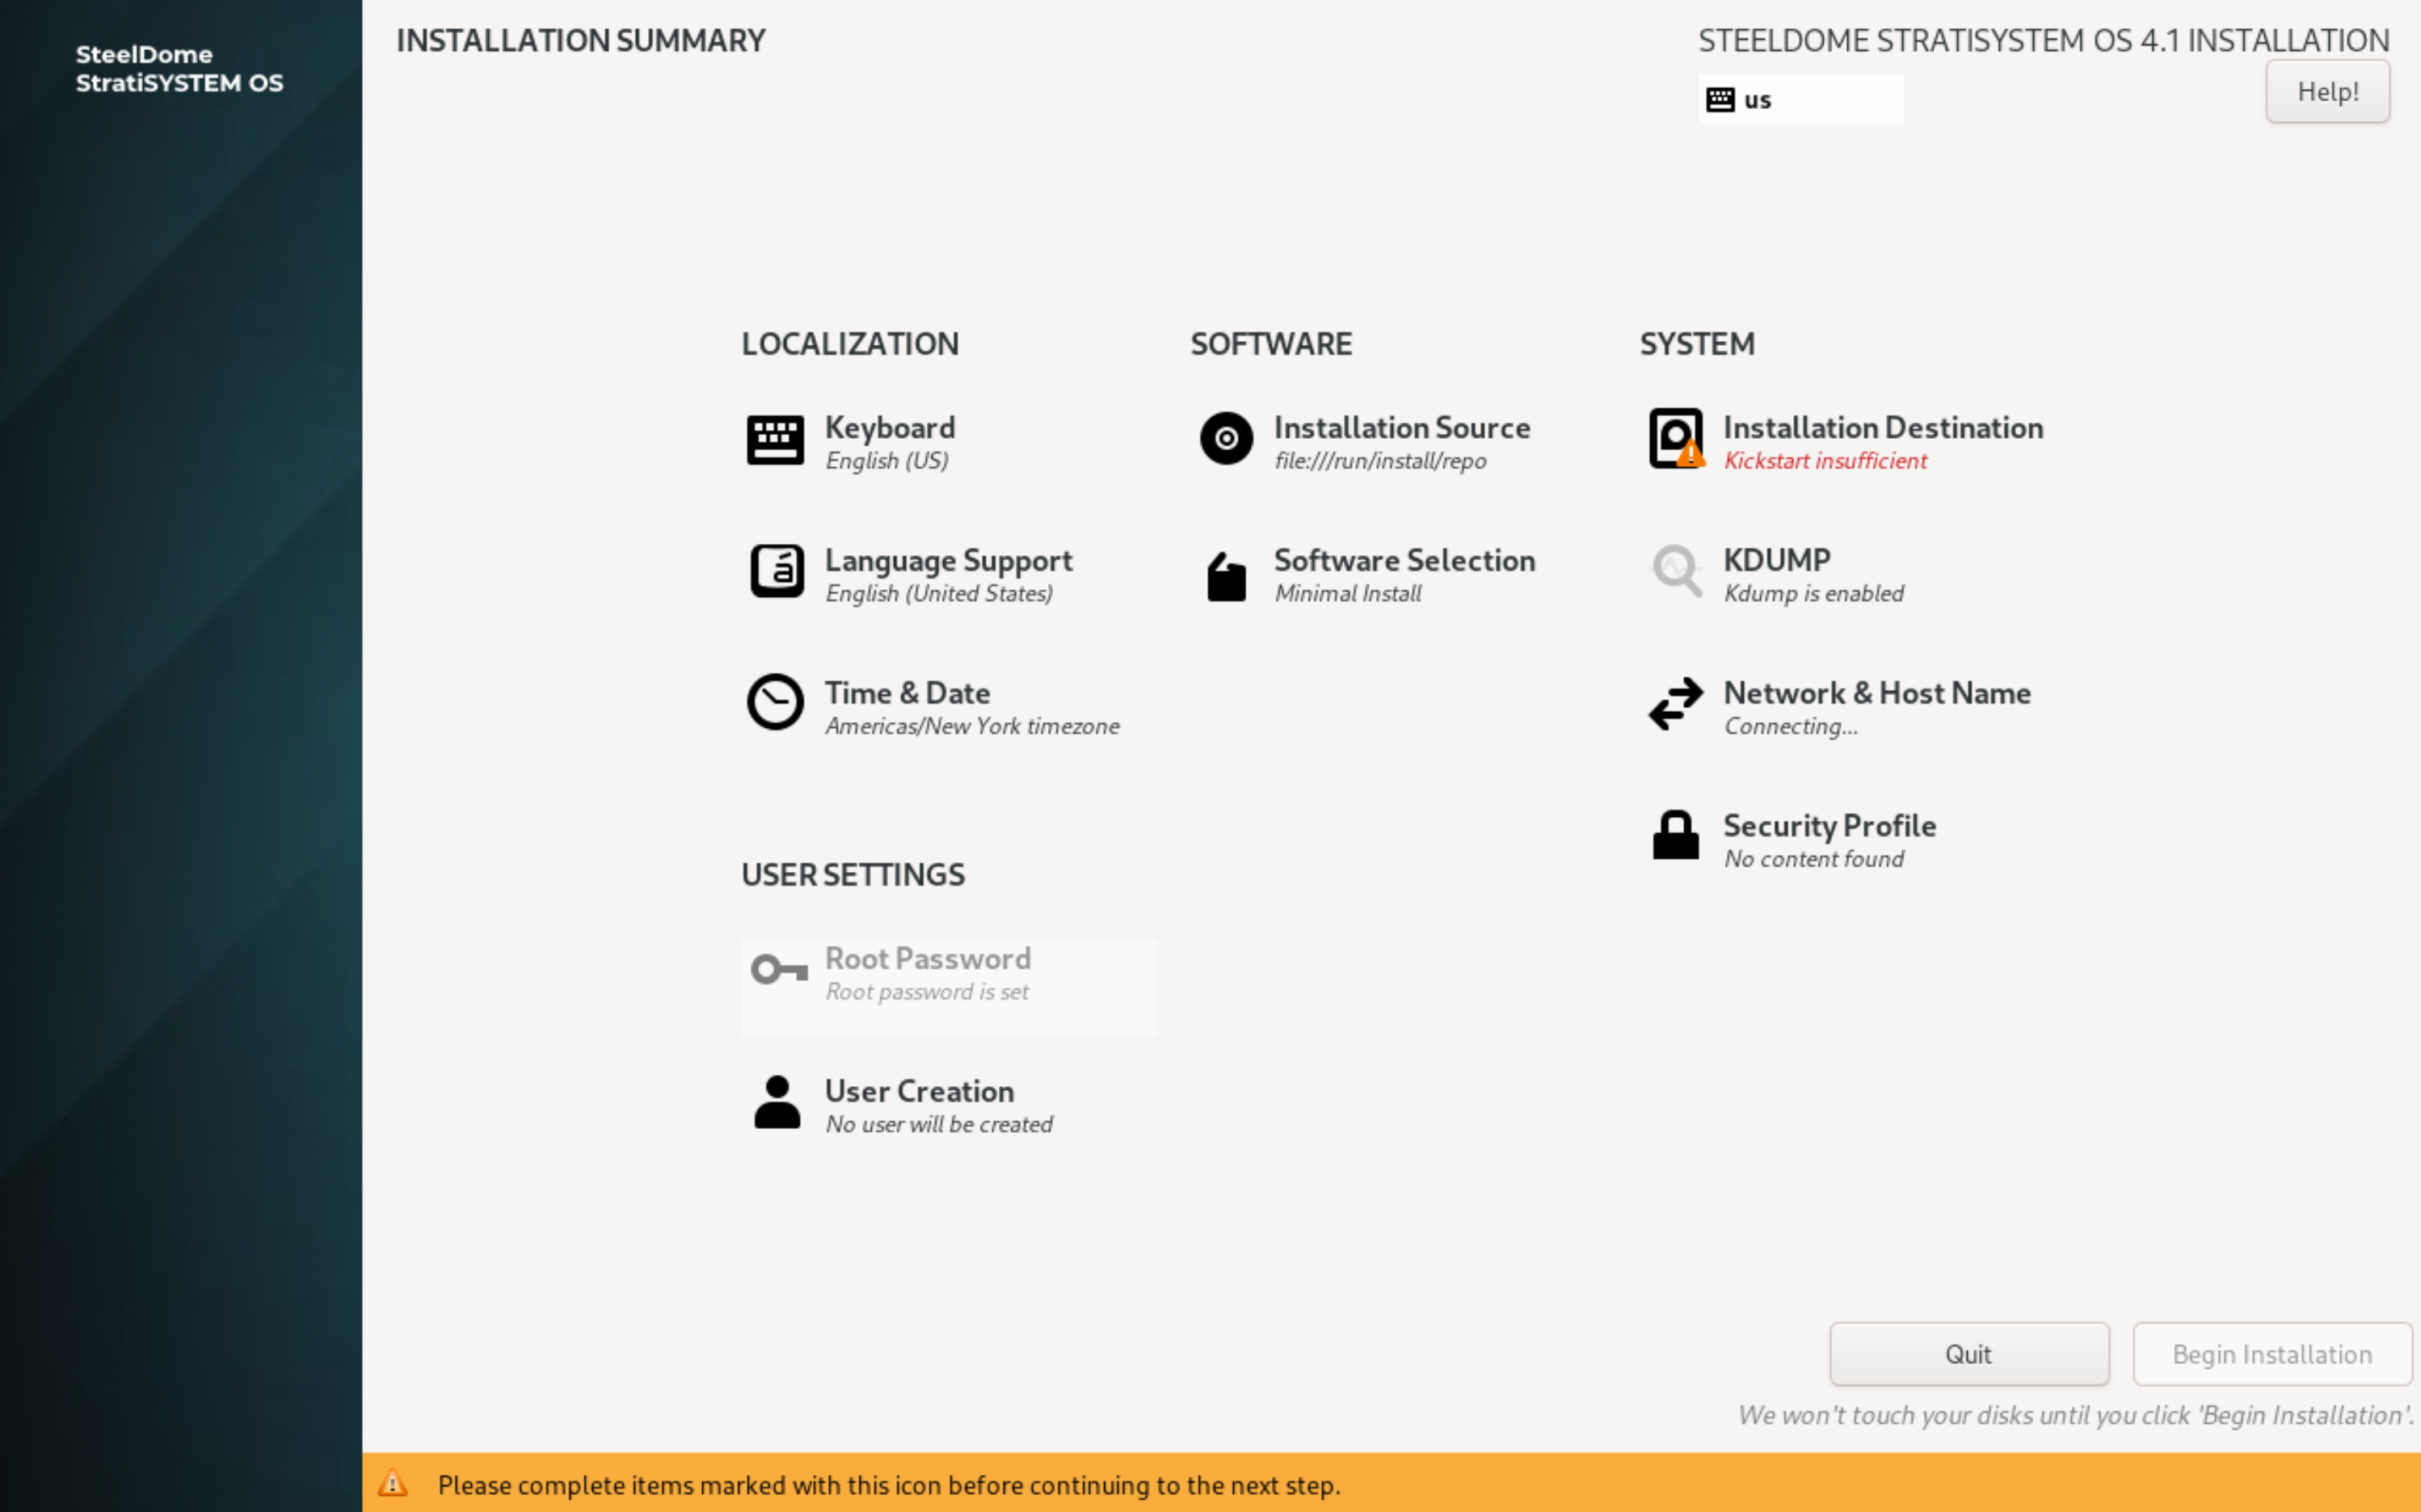
Click on INSTALLATION DESTINATION.
SINGLE DISK (HARDWARE RAID) INSTALLATION
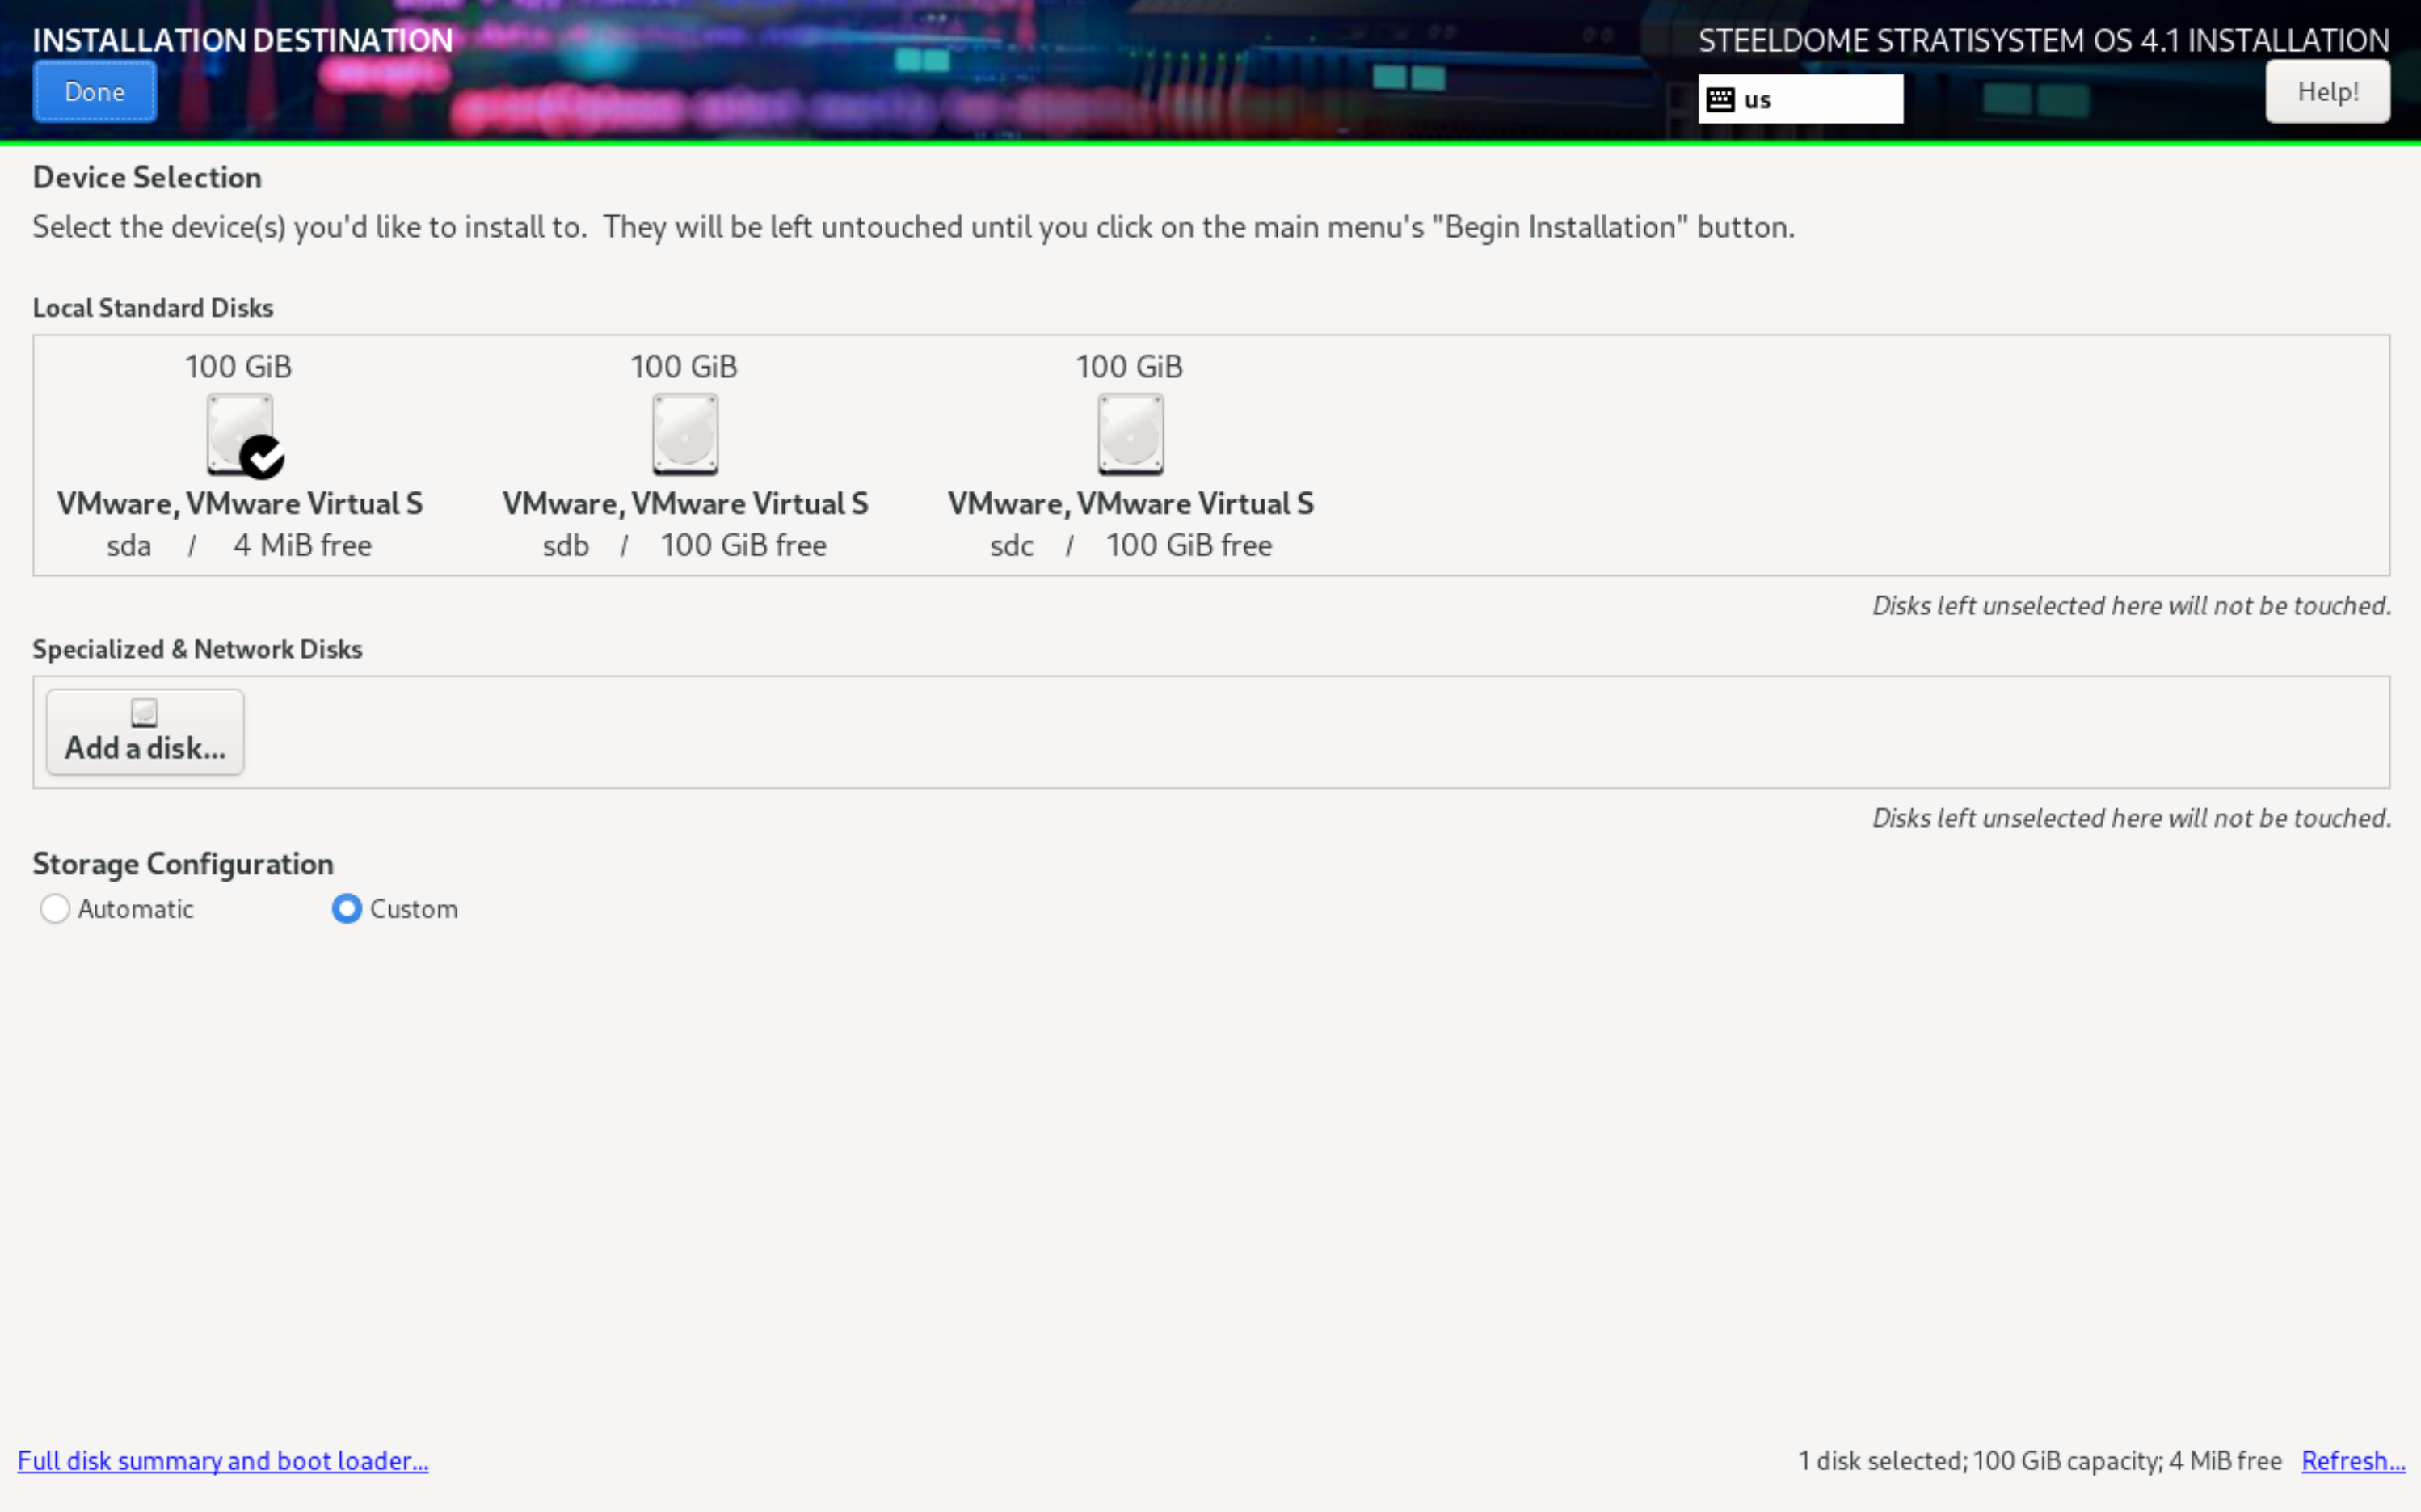
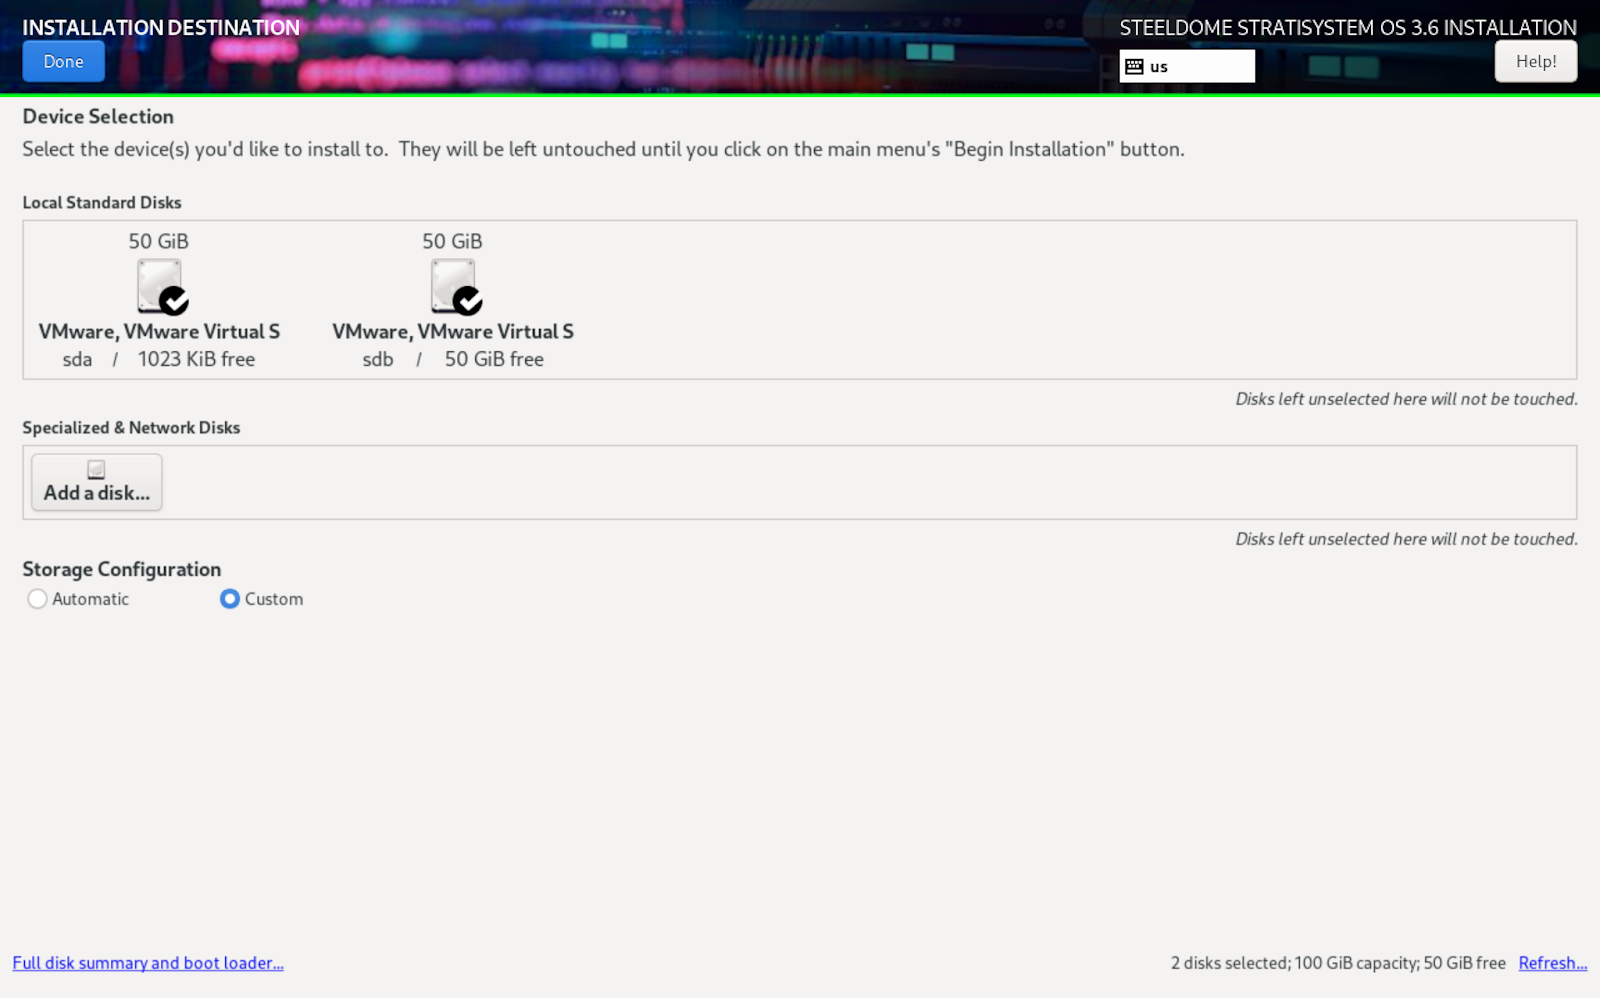
If the hardware platform has either a single (or RAID-1) disk to be used with the operating system, simply ensure that the main disk is “checked” under Local Standard Disks, select CUSTOM in the Storage Configuration section, and click DONE to continue.
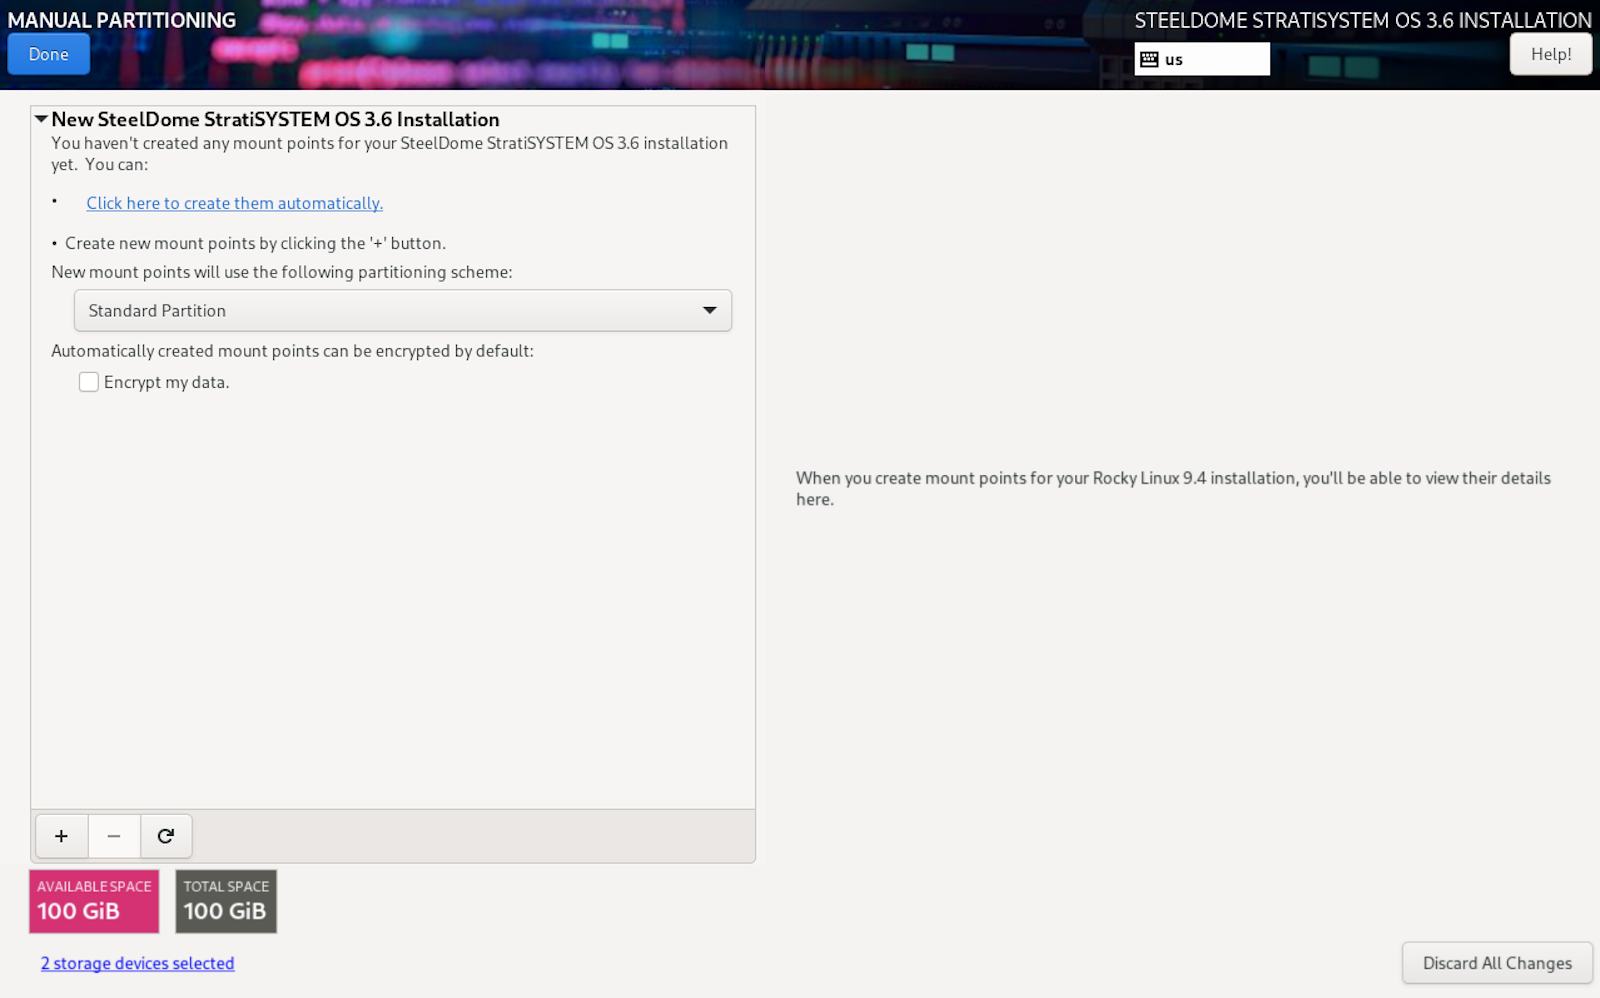
The next screen will present all available partition options. If there are any pre-existing partitions on the disk(s), you can remove them by using the (-) button at the bottom of the partition window. Otherwise, select Standard Partition as the partitioning scheme and then click on “Click here to create them automatically”.
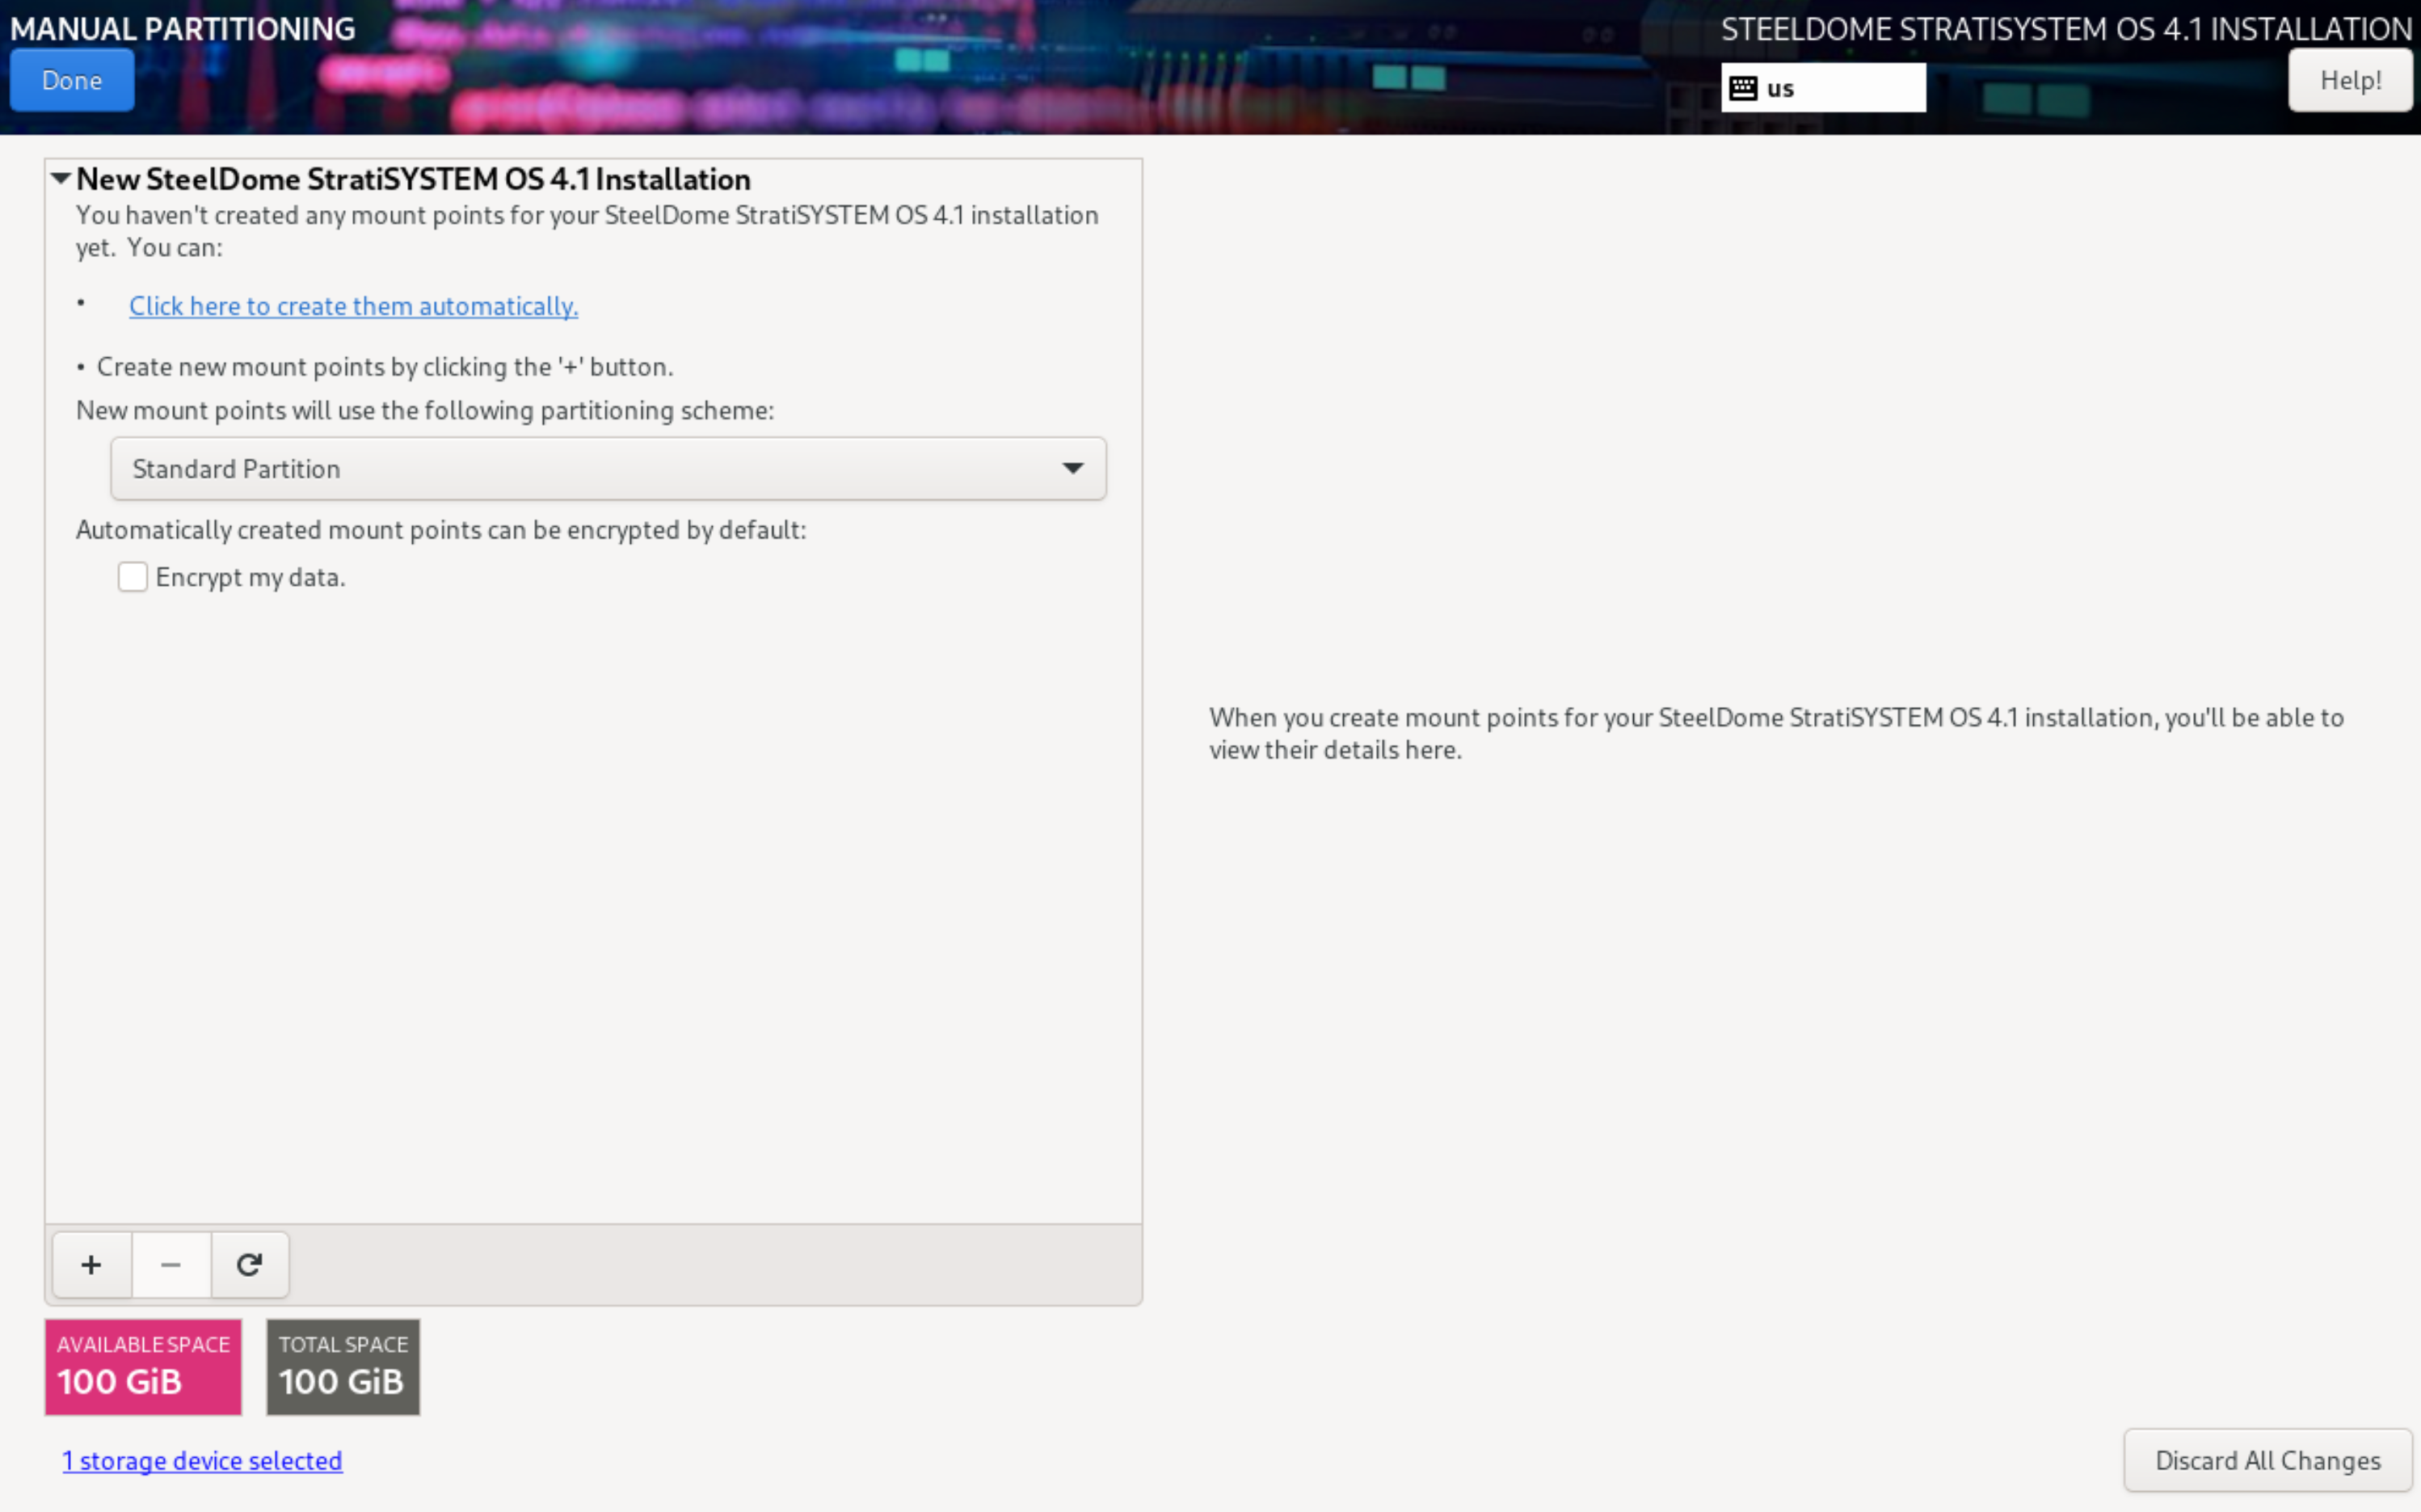
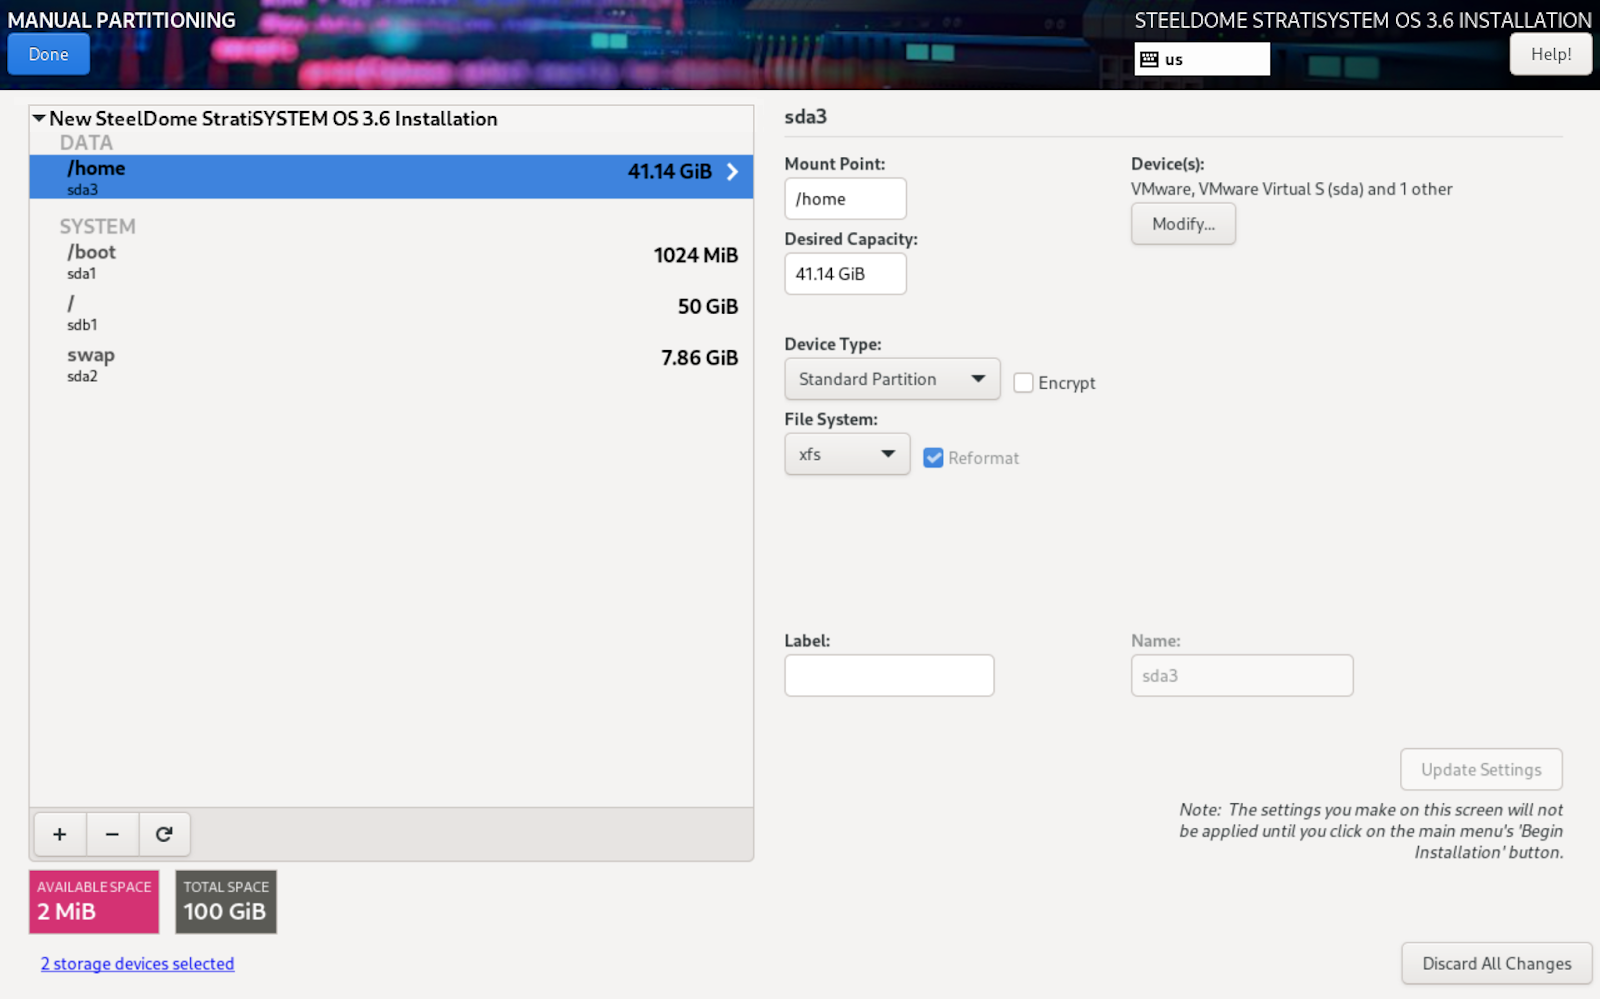
The next screen will allow the operator to designate the sizes of each of the partitions used by the operating system. If the available disk space is over 50GB, a HOME partition will be designated. This can be safely removed and allocated to the root (/) partition.
- The /boot (and /boot/efi, if present) partitions should be left as default.
- The home and swap partitions should be completely removed.
- The root (/) partition should take the remaining capacity. You can enter 1 PiB in the desired capacity field and the system will allocate the maximum remaining space to the root partition.
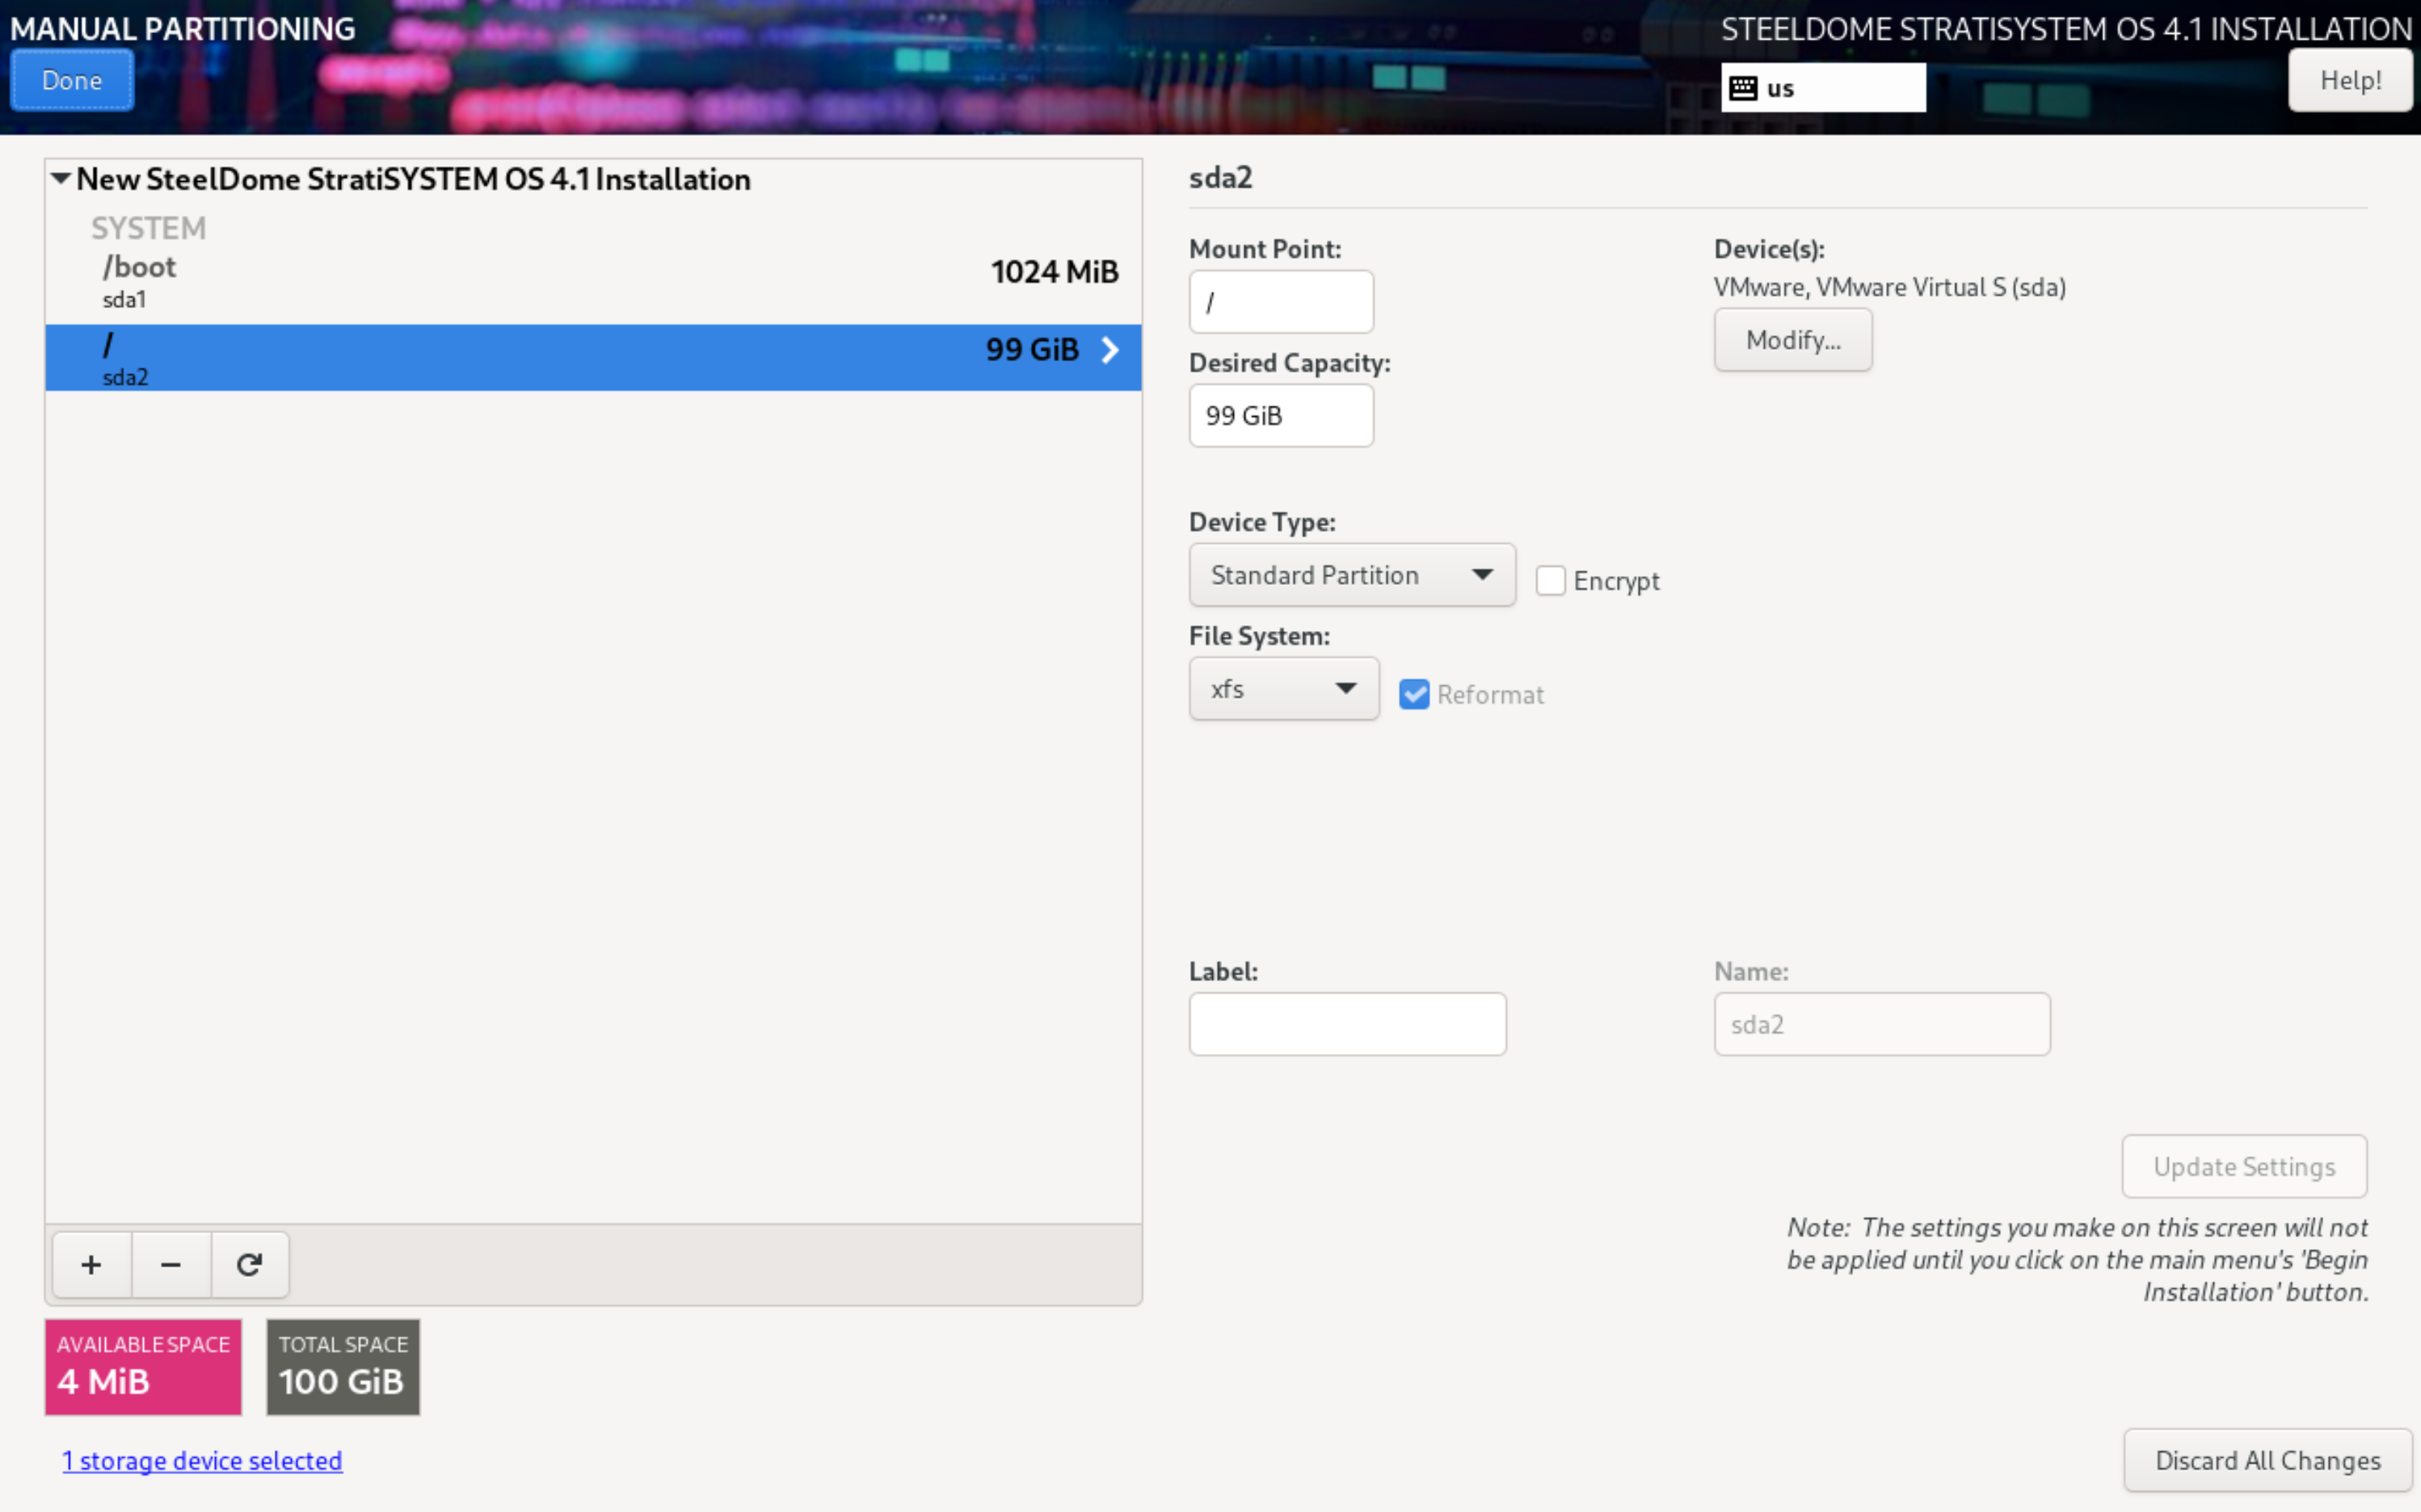
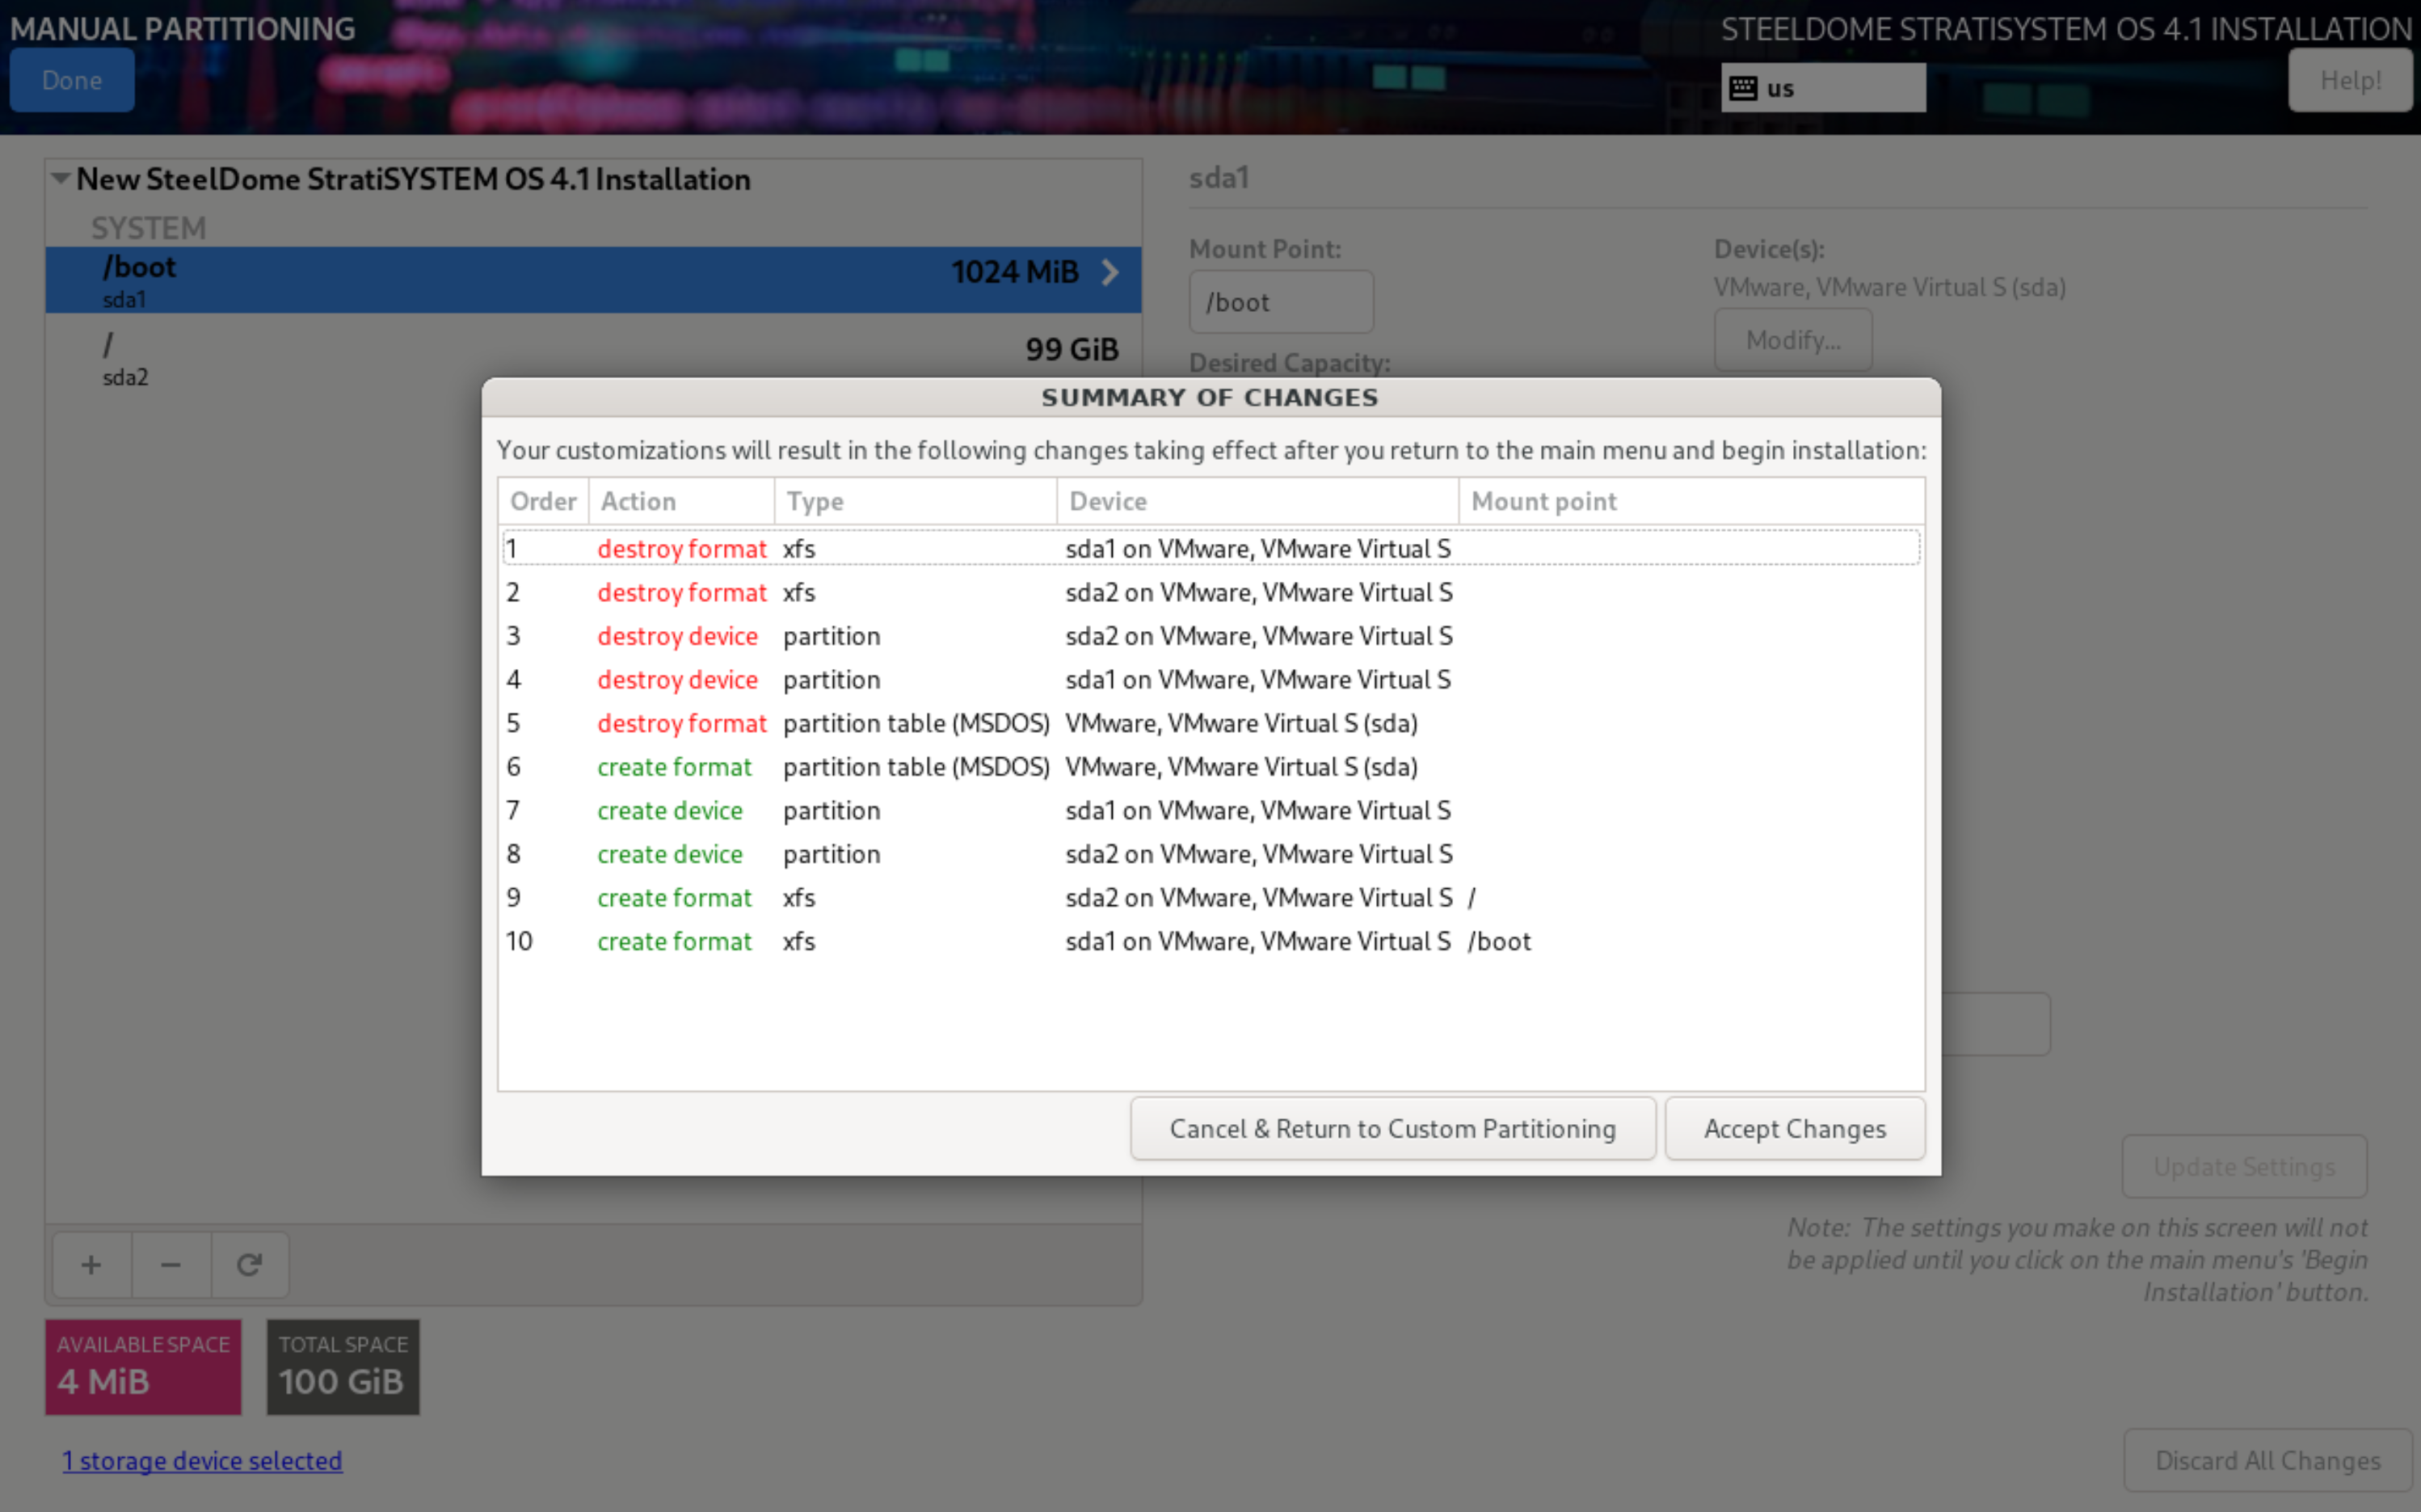
When complete, click on DONE to commit the changes. Commit the changes by clicking on Accept Changes.
MULTIPLE DISK (SOFTWARE RAID-1) INSTALLATION
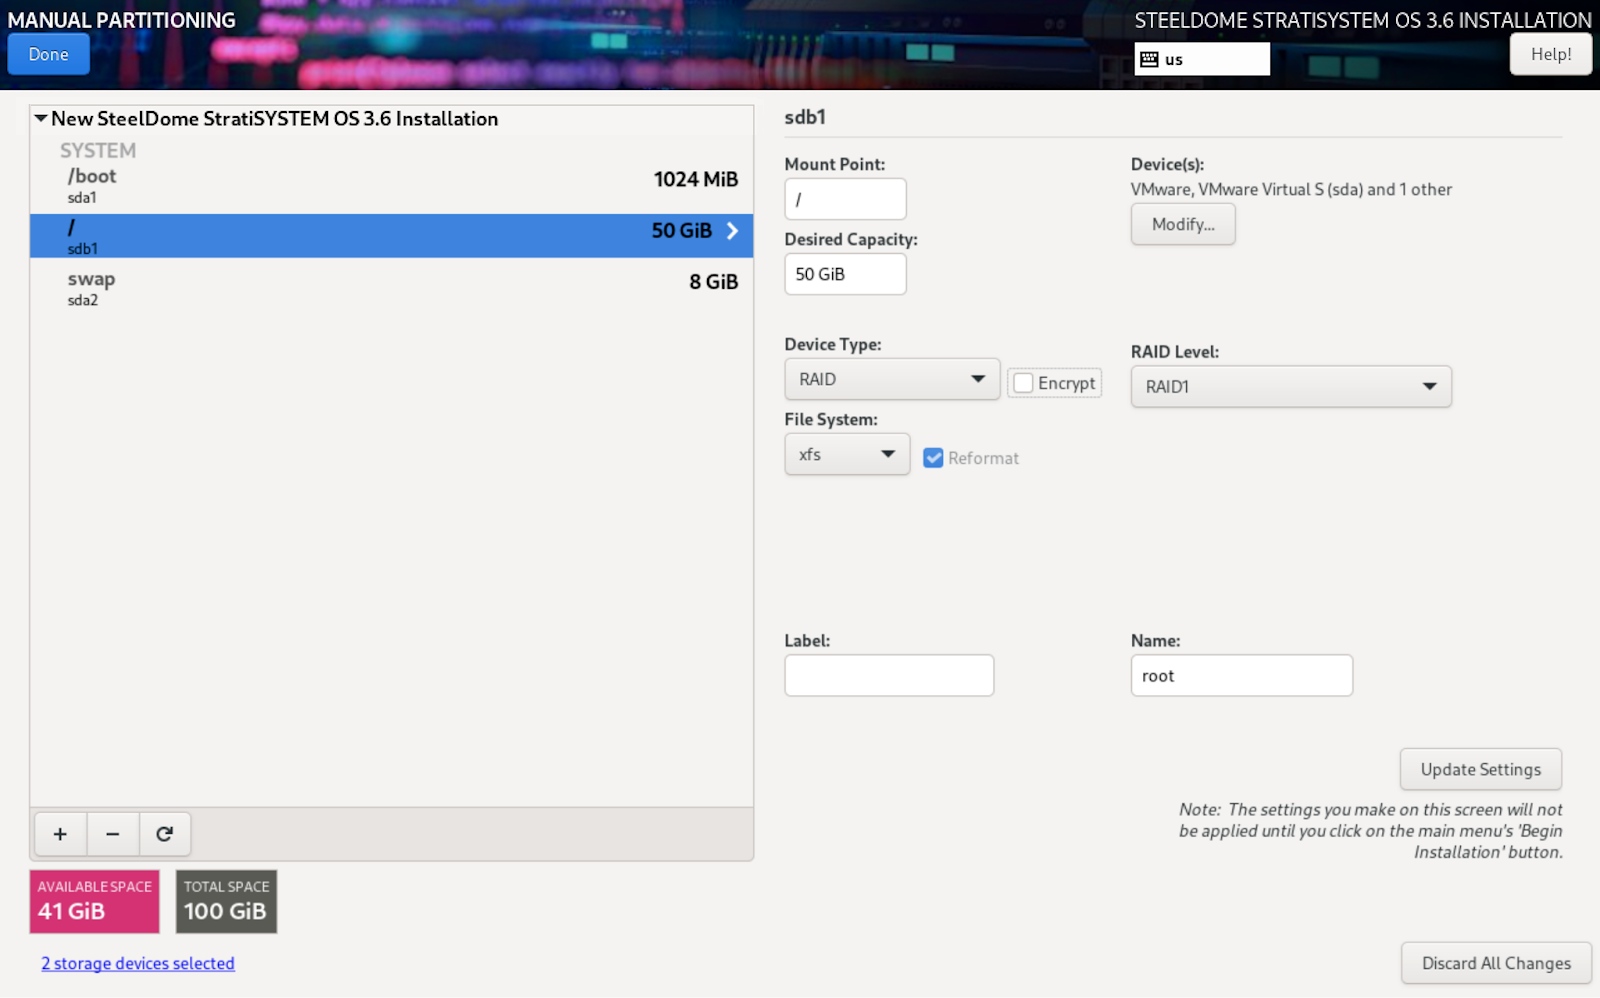
If the hardware platform has multiple disks available and the operator wants to leverage software RAID to be used with the operating system, simply ensure that the main disks are “checked” under Local Standard Disks, select CUSTOM in the Storage Configuration section, and click DONE to continue.
The next screen will present all available partition options. If there are any pre-existing partitions on the disk(s), you can remove them by using the (-) button at the bottom of the partition window. Otherwise, select Standard Partition as the partitioning scheme and then click on “Click here to create them automatically”.
The next screen will allow the operator to designate the sizes of each of the partitions used by the operating system. If the available disk space is over 50GB, a HOME partition will be designated. This can be safely removed and allocated to the root (/) partition.
- The /boot (and /boot/efi, if present) partitions should be left as default.
- The home and swap partitions should be completely removed.
- The root (/) partition should take the remaining capacity. You can enter 1 PiB in the desired capacity field and the system will allocate the maximum remaining space to the root partition.
Once each disk’s capacity has been configured, now each partition needs to be designated as a RAID device type. Click on the Device Type drop-down and select RAID and then select RAID1 in the RAID Level drop-down. Do this for all three partitions.
OPTIONAL ENCRYPTION
Encryption can be enabled on all partitions except the /boot partition. Simply click the Encrypt checkbox to enable encryption. Select LUKS2 as the LUKS Version from the drop-down. Perform this on the root (/) and /swap partitions.
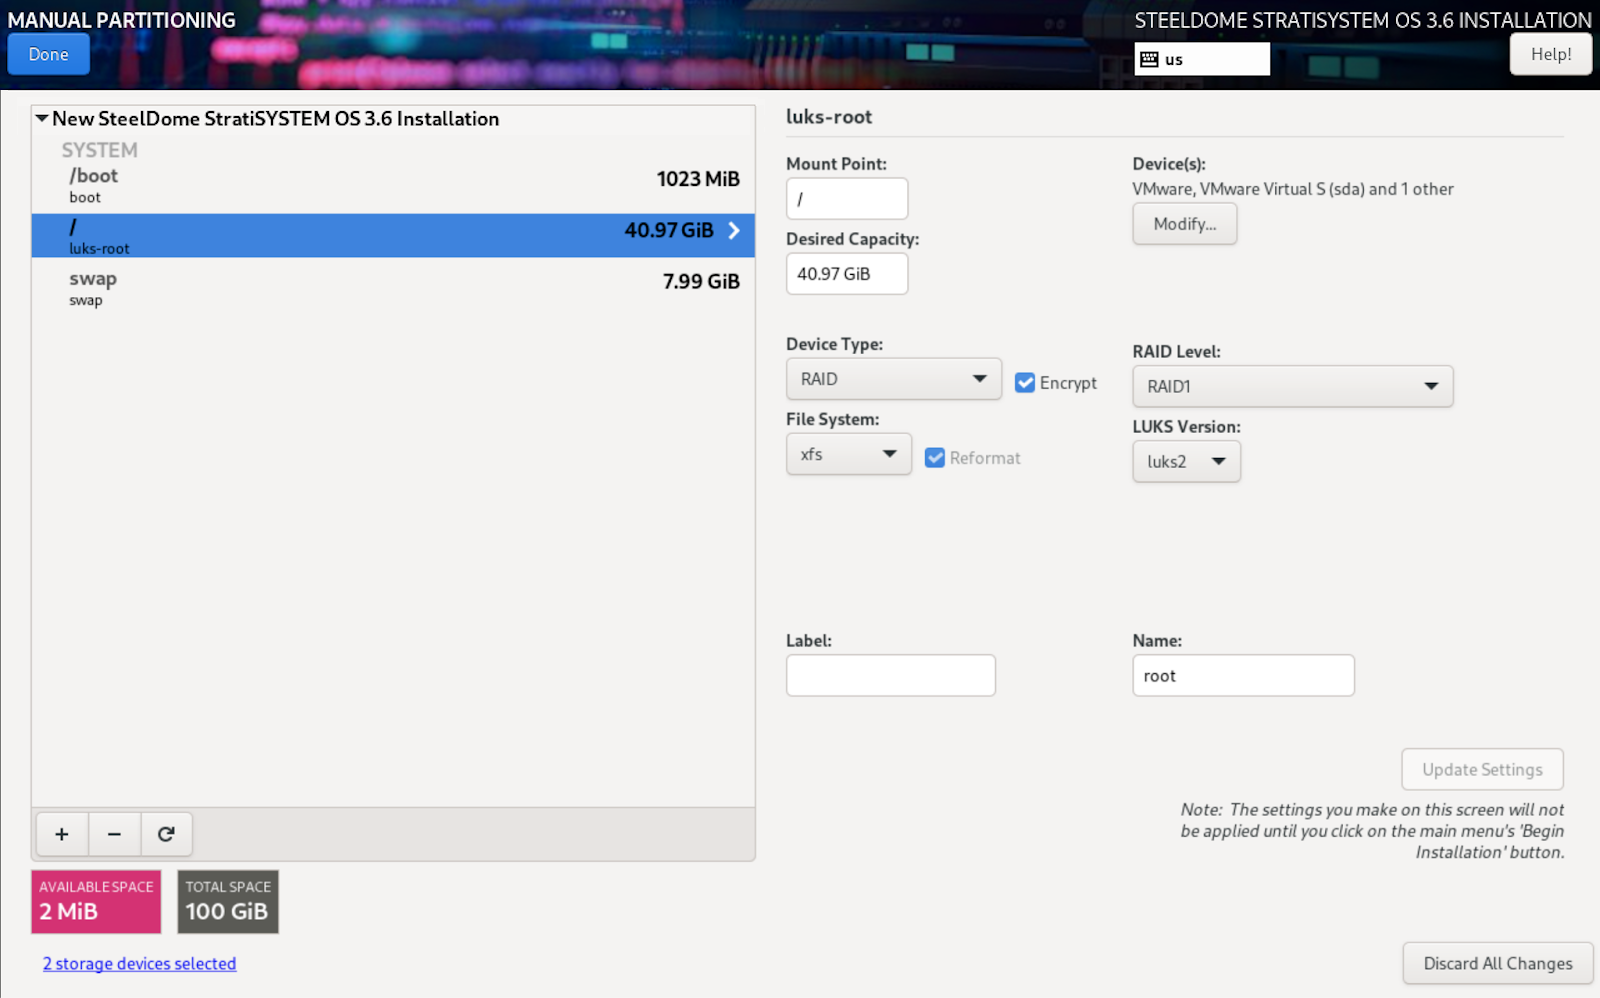
When complete, click on DONE to commit the changes.
If encryption was enabled, the next screen will present an encryption passphrase option. You will need this for the StratiSTOR preparation phase. Store this passphrase in a secure location.
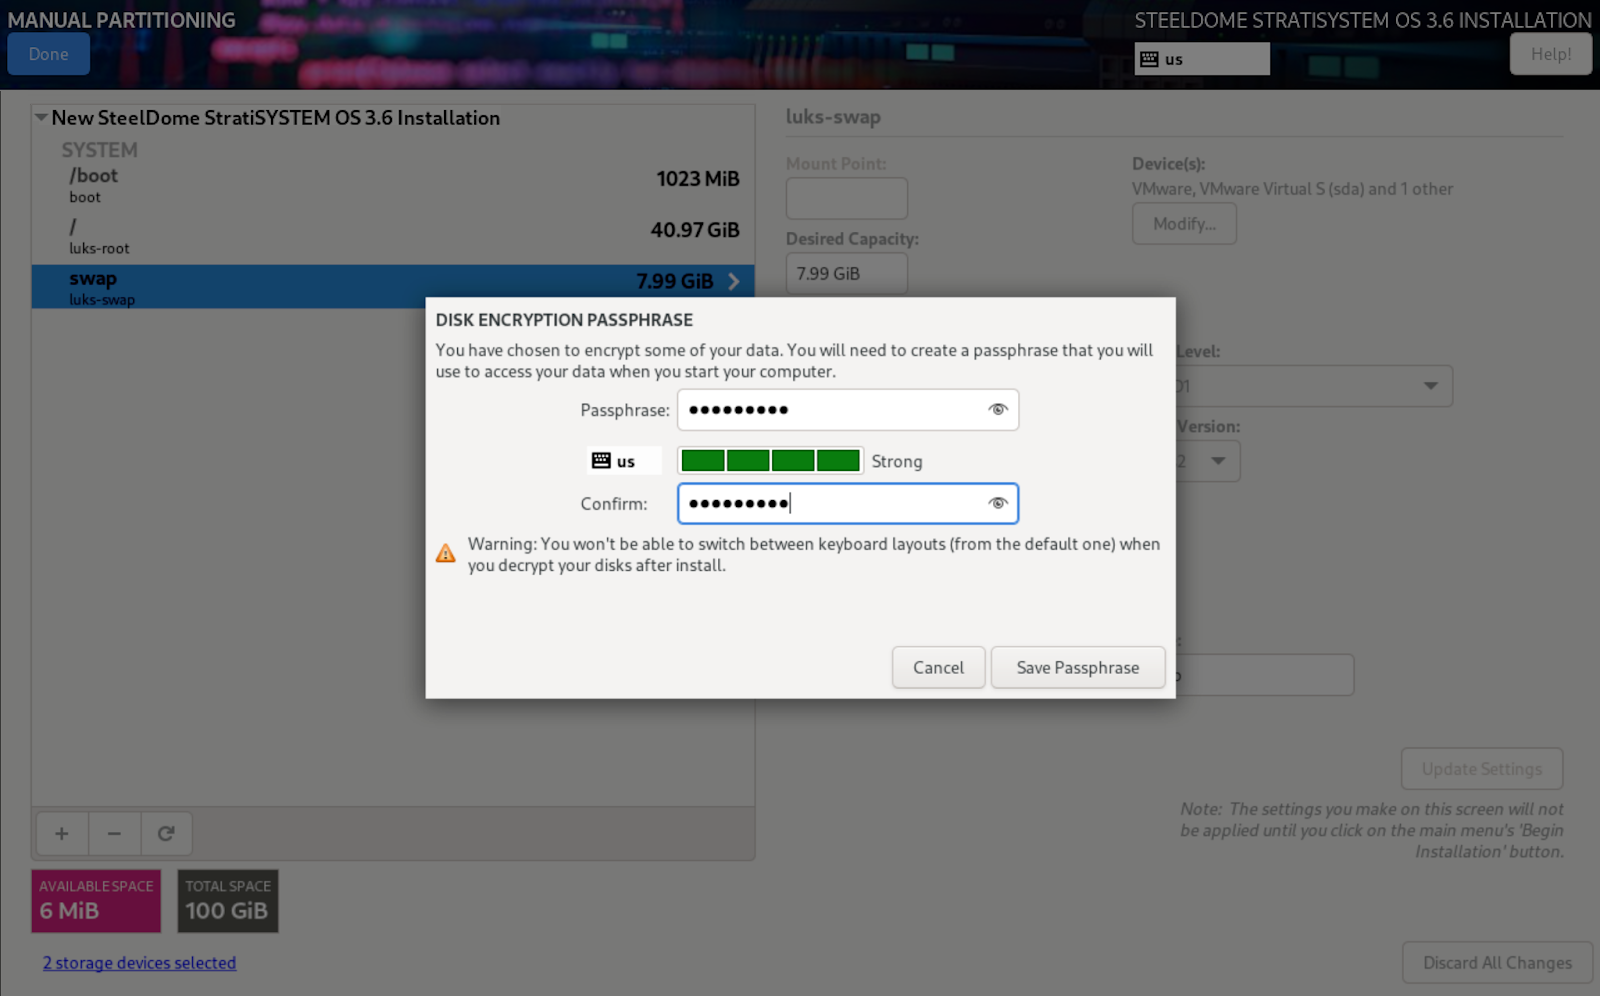
When ready, click on Save Passphrase to commit the changes.
Once the installation disk configuration phase is complete, proceed to the Network and Host Name section.
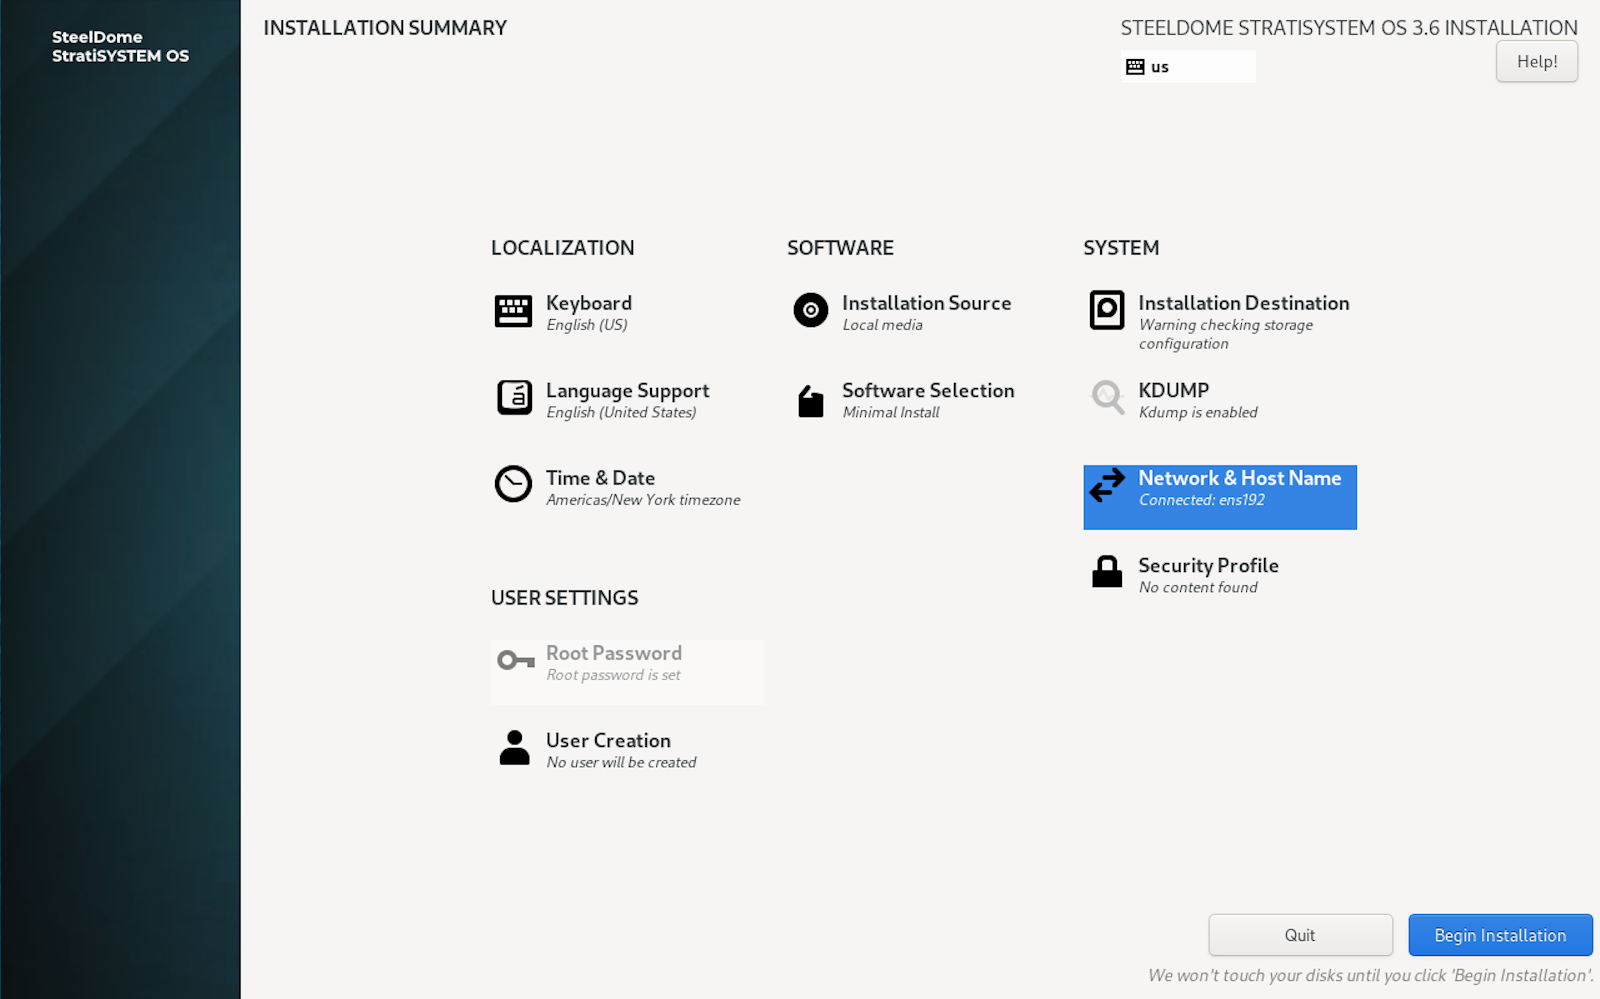
The next screen will present options to configure the ethernet adapters and the hostname. First, ensure that both adapters are enabled by clicking on the adapter name and noting the state in the status section. If the adapter is not enabled, click on the toggle button on the right hand side of the status section to enable it.
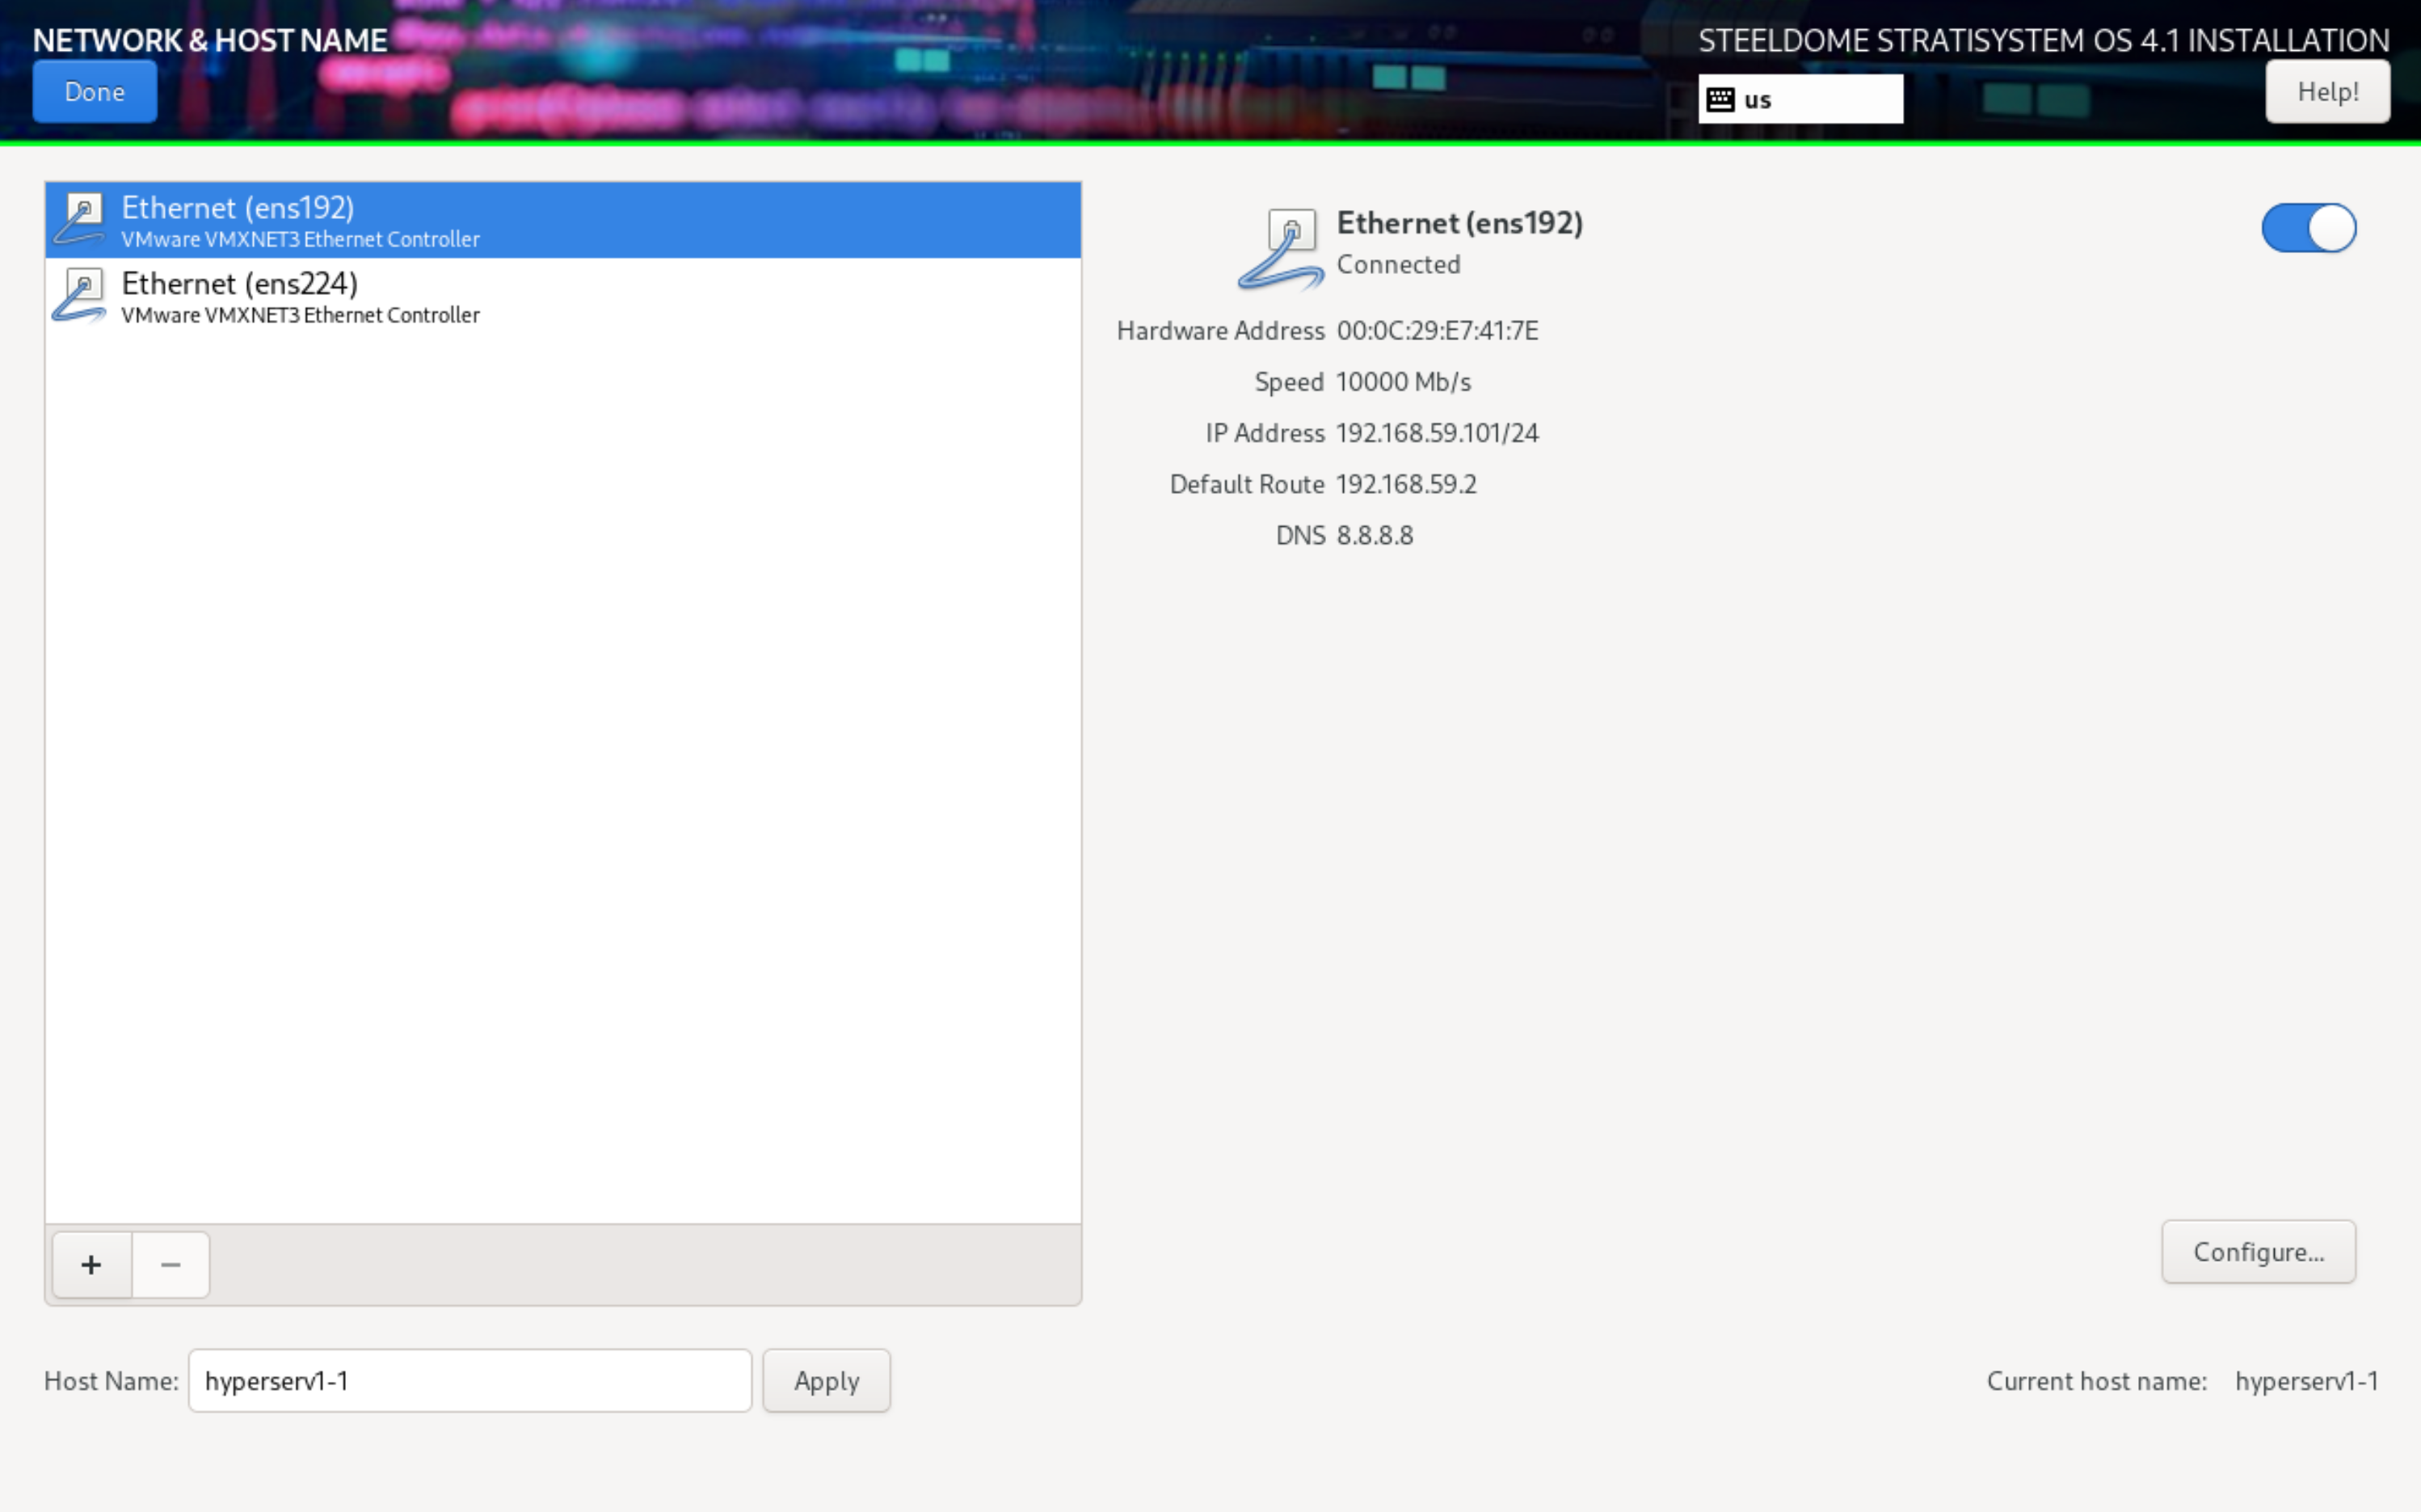
Next, proceed with assigning the hostname at the bottom by typing the desired host name into the field and clicking APPLY.
Last, click on the first adapter and then click on CONFIGURE. This will open a window to allow you to statically set the IP address, gateway, subnet and DNS configuration for the adapter. Do this for both ethernet interfaces. If you’d prefer to leave the settings DHCP, the StratiSYSTEM provisioning engine will handle the static IP address assignment later on in the installation process. When ready, click on DONE.
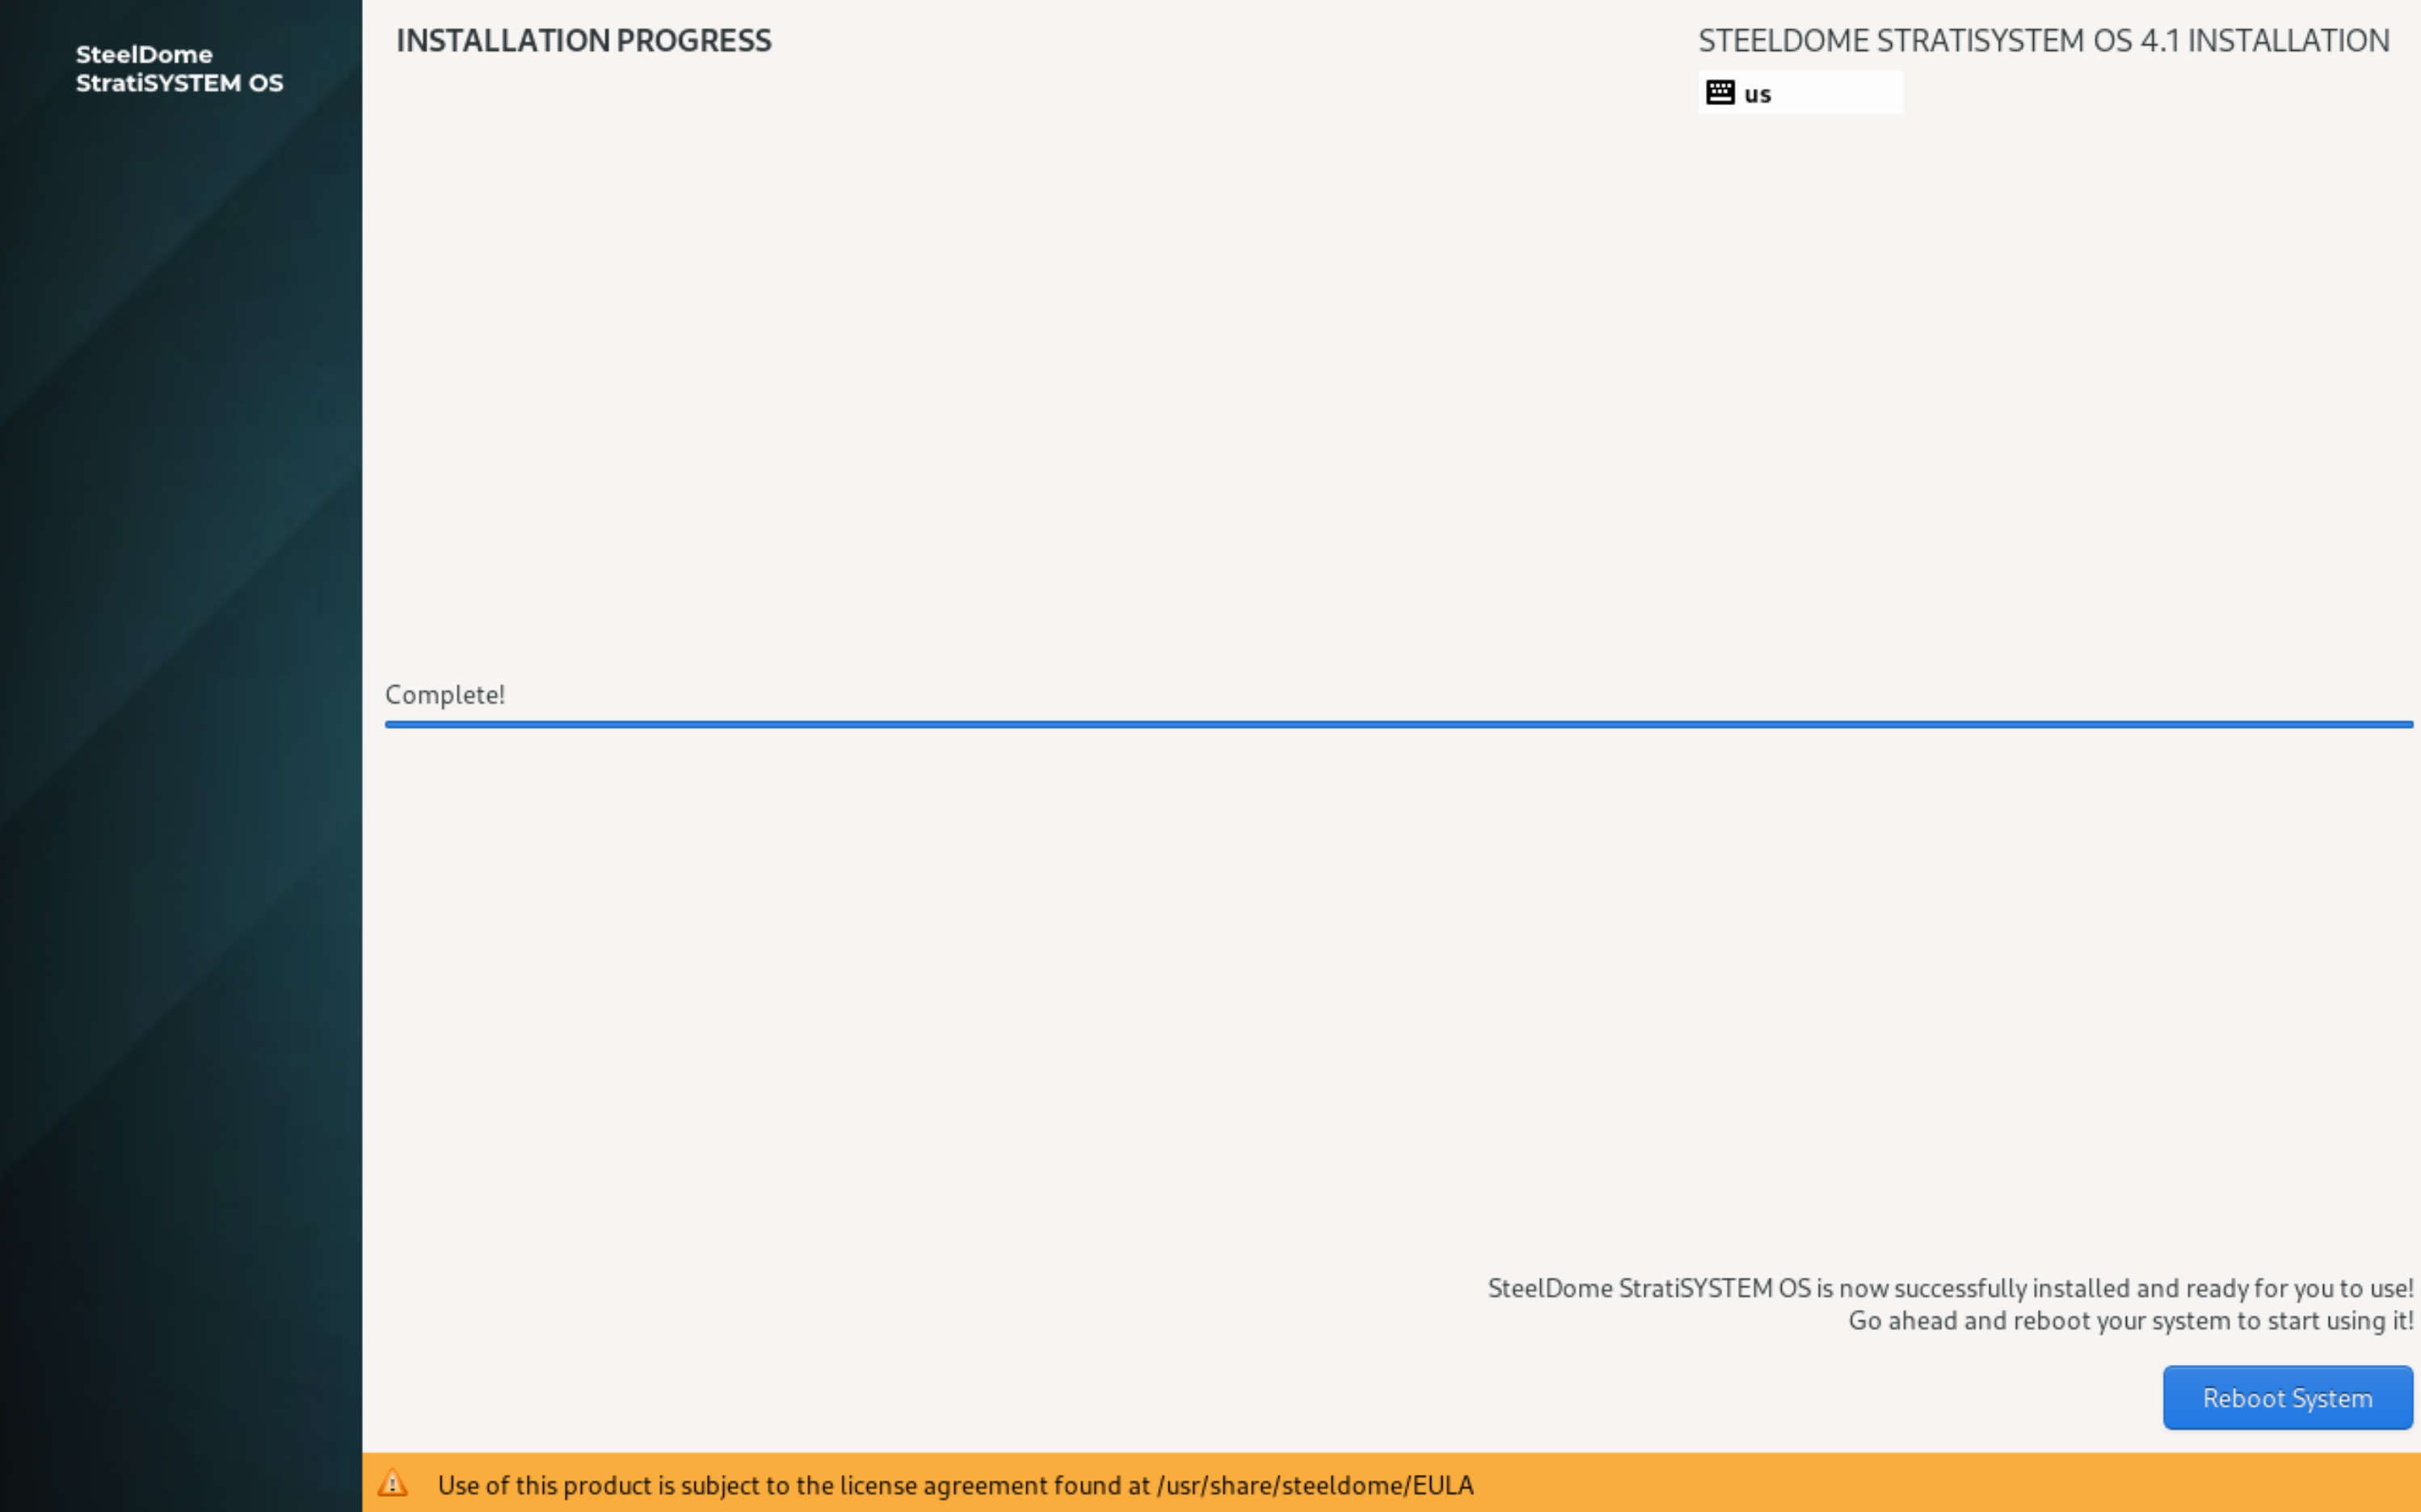
You are now ready to begin the installation process. When ready, click on BEGIN INSTALLATION.
This will take between 5-10 minutes to complete.
When completed, you will see an option to reboot. Click on Reboot System to proceed.
Ensure all of these steps have been completed on each StratiSYSTEM node in the cluster before proceeding with the StratiSYSTEM preparation phase.
¶ PREPARATION PHASE
After successfully installing the StratiSYSTEM OS on nodes in the cluster, ensure all nodes have been rebooted and are showing the console screen.
IMPORTANT - PLEASE READ
Before proceeding, modify the /stratisystem-prep/stratistor/config/deployment/current_deployment.json file to properly match the configuration of the cluster you are about to deploy. Ensure this file is the same on all nodes being deployed during this phase.
- Within the ClusterConfig section:
- FrontendAccessSubnet: defines the subnet value for the front-end management network.
- ClusterPrivateNetwork and ClusterPrivateSubnet values: these define the private cluster network used for inter-node communications.
- Within the NodeConfig section:
- FrontendAccessInterface: defines the network interface to use for the front-end management network. This can be a physical interface, team interface, or VLAN interface.
- FrontendAccessIpAddr: defines the front-end management network static IP address.
- FrontendAccessGwAddr (optional, if you have a separate in-band management interface): defines the front-end management network default gateway address.
- FrontendAccessDnsAddrs (optional, if you have a separate in-band management interface): defines the front-end management network DNS addresses (comma-delimited).
- ClusterPrivateInterface: defines the network interface to use for the cluster network. If you only have a single ethernet interface on the system, this field should be empty which will force the system to place the cluster network address on the front-end network interface.
- ClusterPrivateBridge (optional): defines the network bridge name (e.g. br1) to use for the cluster network. This is typically left blank unless you need to attach VMs to this network (unusual).
- ClusterPrivateIpAddr: defines the cluster network static IP address. This is used for communications between the nodes only.
- ClusterPrivateGwAddr (optional): defines the cluster network gateway address. This is typically left blank unless deploying stretch clustering support.
- ClusterPrivateDnsAddrs (optional): defines the cluster network DNS addresses (comma-delimited). This is typically left blank unless deploying stretch clustering support.
- SmbPrimaryInterface: defines the network interface to use for presenting the SMB file sharing protocol. Typically this is ‘br0', but can also be a physical, team, or VLAN interface.
NOTE: The network interface names can be obtained by typing: ip -br a at the command prompt. You will also have an opportunity to verify the network configuration settings.
NOTE: Time synchronization is critical for proper operation of the cluster. If a NTP time source is not available, any of the nodes can be configured as an authoritative time source. This will require modifying the /etc/chrony.conf file as follows:
- Open another SSH window to the first node in the cluster
- Edit the config file: vi /etc/chrony.conf
- Add or modify the line the allow line: allow 192.168.1.0/24 (change to match your local network configuration)
- Add or modify the line: bindaddress 0.0.0.0 (to listen on all interfaces)
- Add or modify the line: local stratum 10
- Save the changes by pressing ESC, and type :wq! to save and close
- Resume with the Preparation Engine SSH session using the first node's IP address as the NTP time source
NOTE: Optionally, if electing to enable SDCache, ensure that the /stratisystem-prep/stratistor/config/sdcache/sdcache_devices.json file has been modified to match the drive configuration currently present on each node in the cluster (if SDCache is to be activated). This can also be handled post-installation.
Type the following commands into the command line:
cd /stratisystem-prep/stratisystem-prep
source start.sh
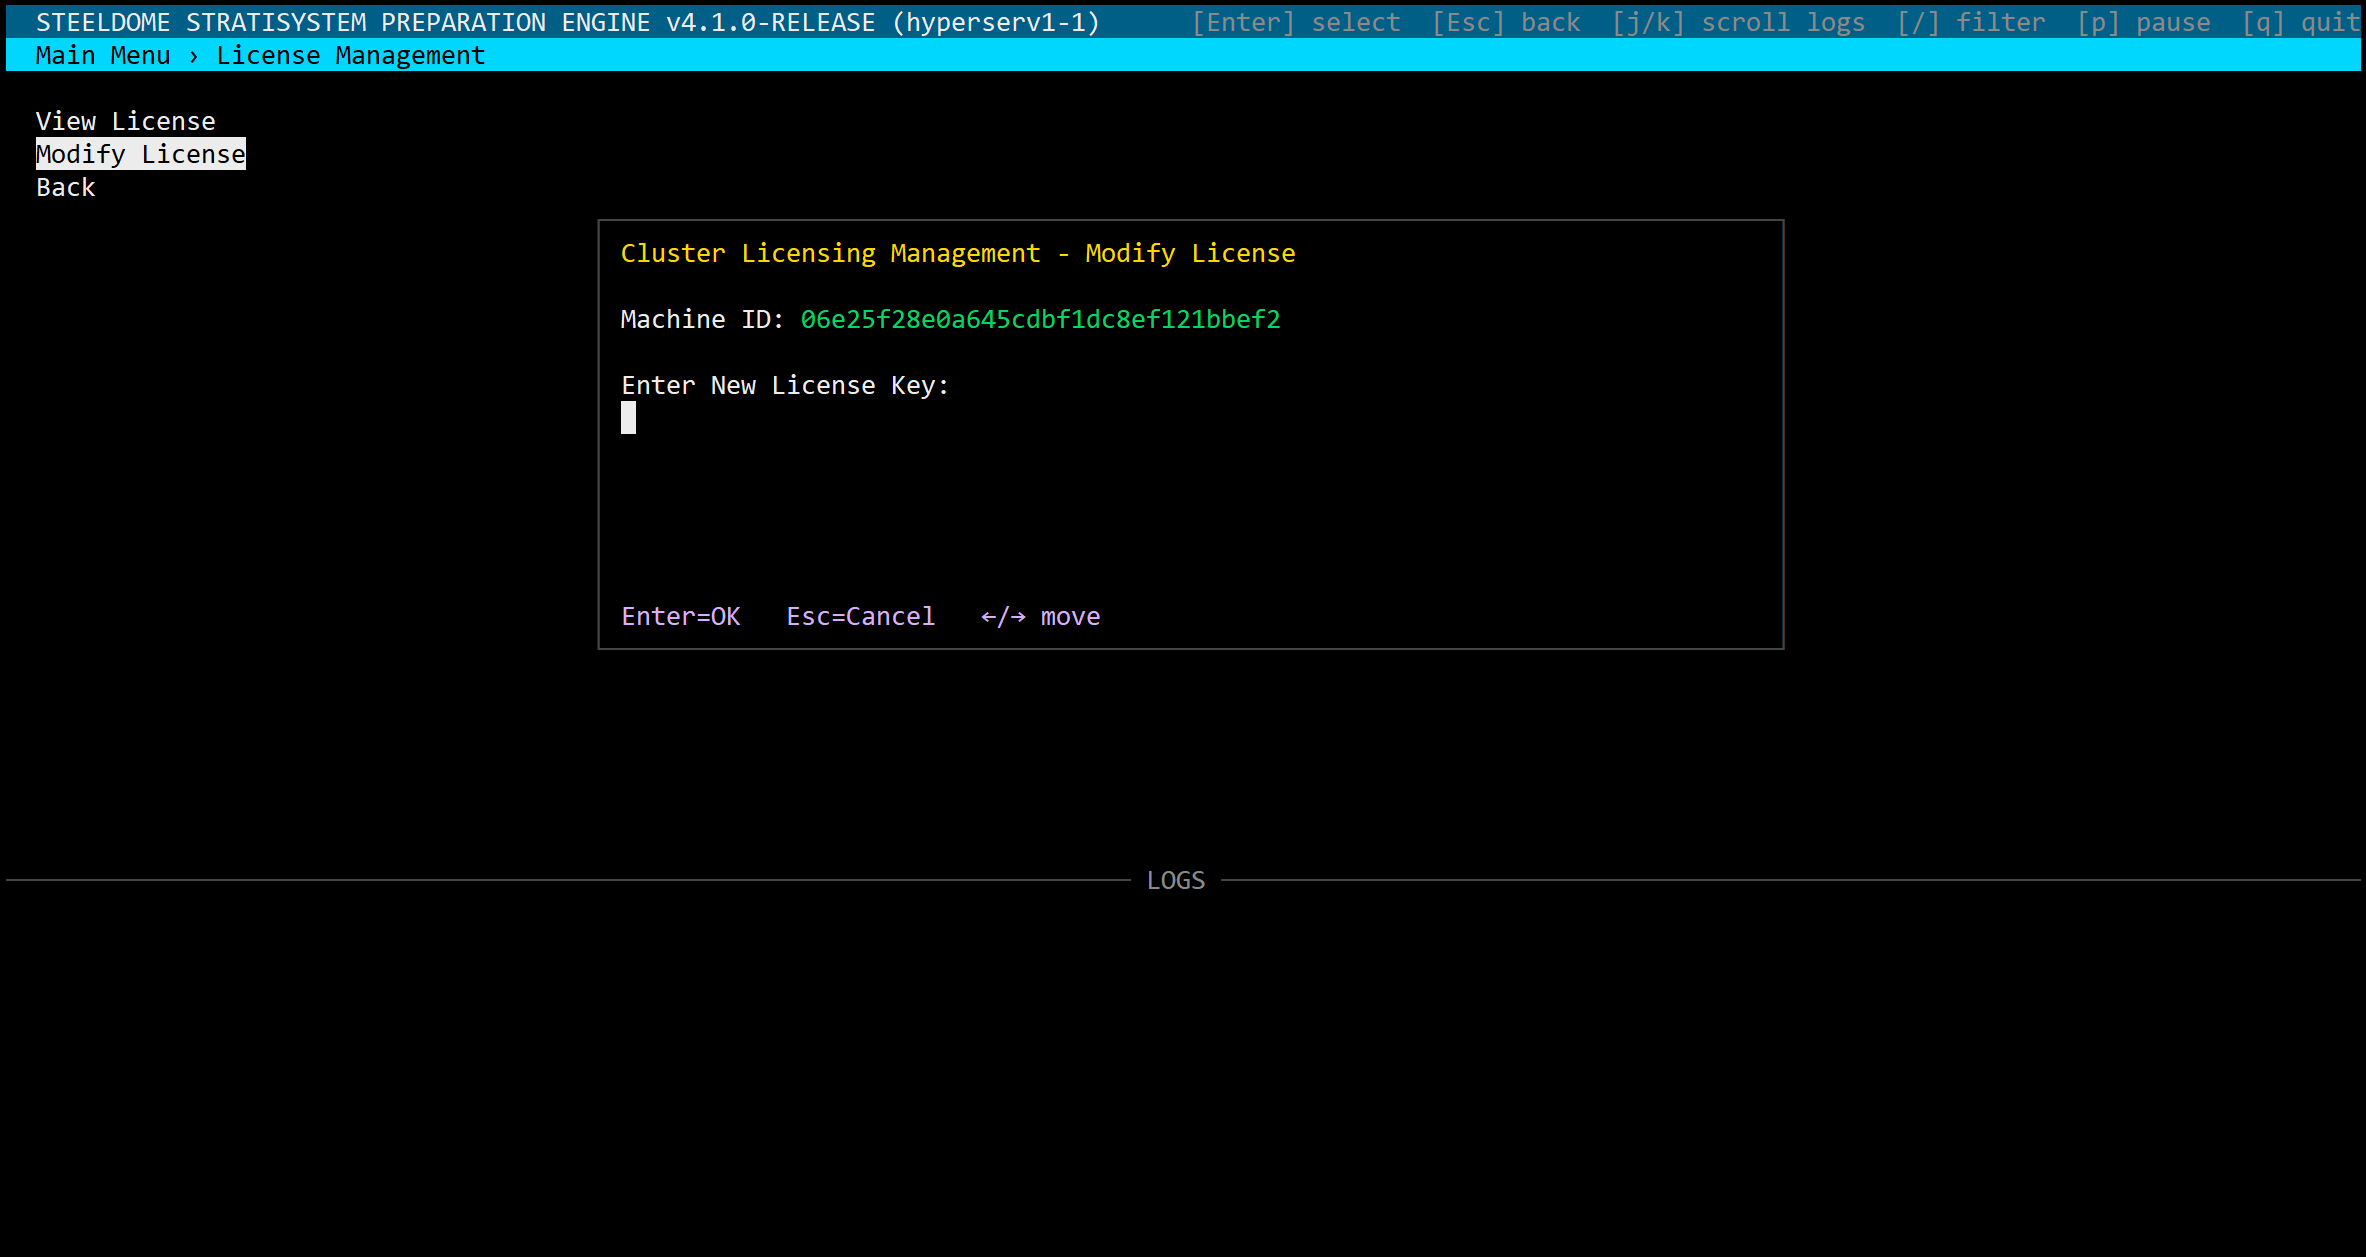
LICENSE ACTIVATION
License activation is required before any preparation steps can be initiated. You must provide the Machine ID to SteelDome support personnel and in return they will provide the license key appropriate for your service level. Simply paste the value into the New License Key field. If successful, the license window will display a summary of the license details. Ensure all license components are correct before accepting.
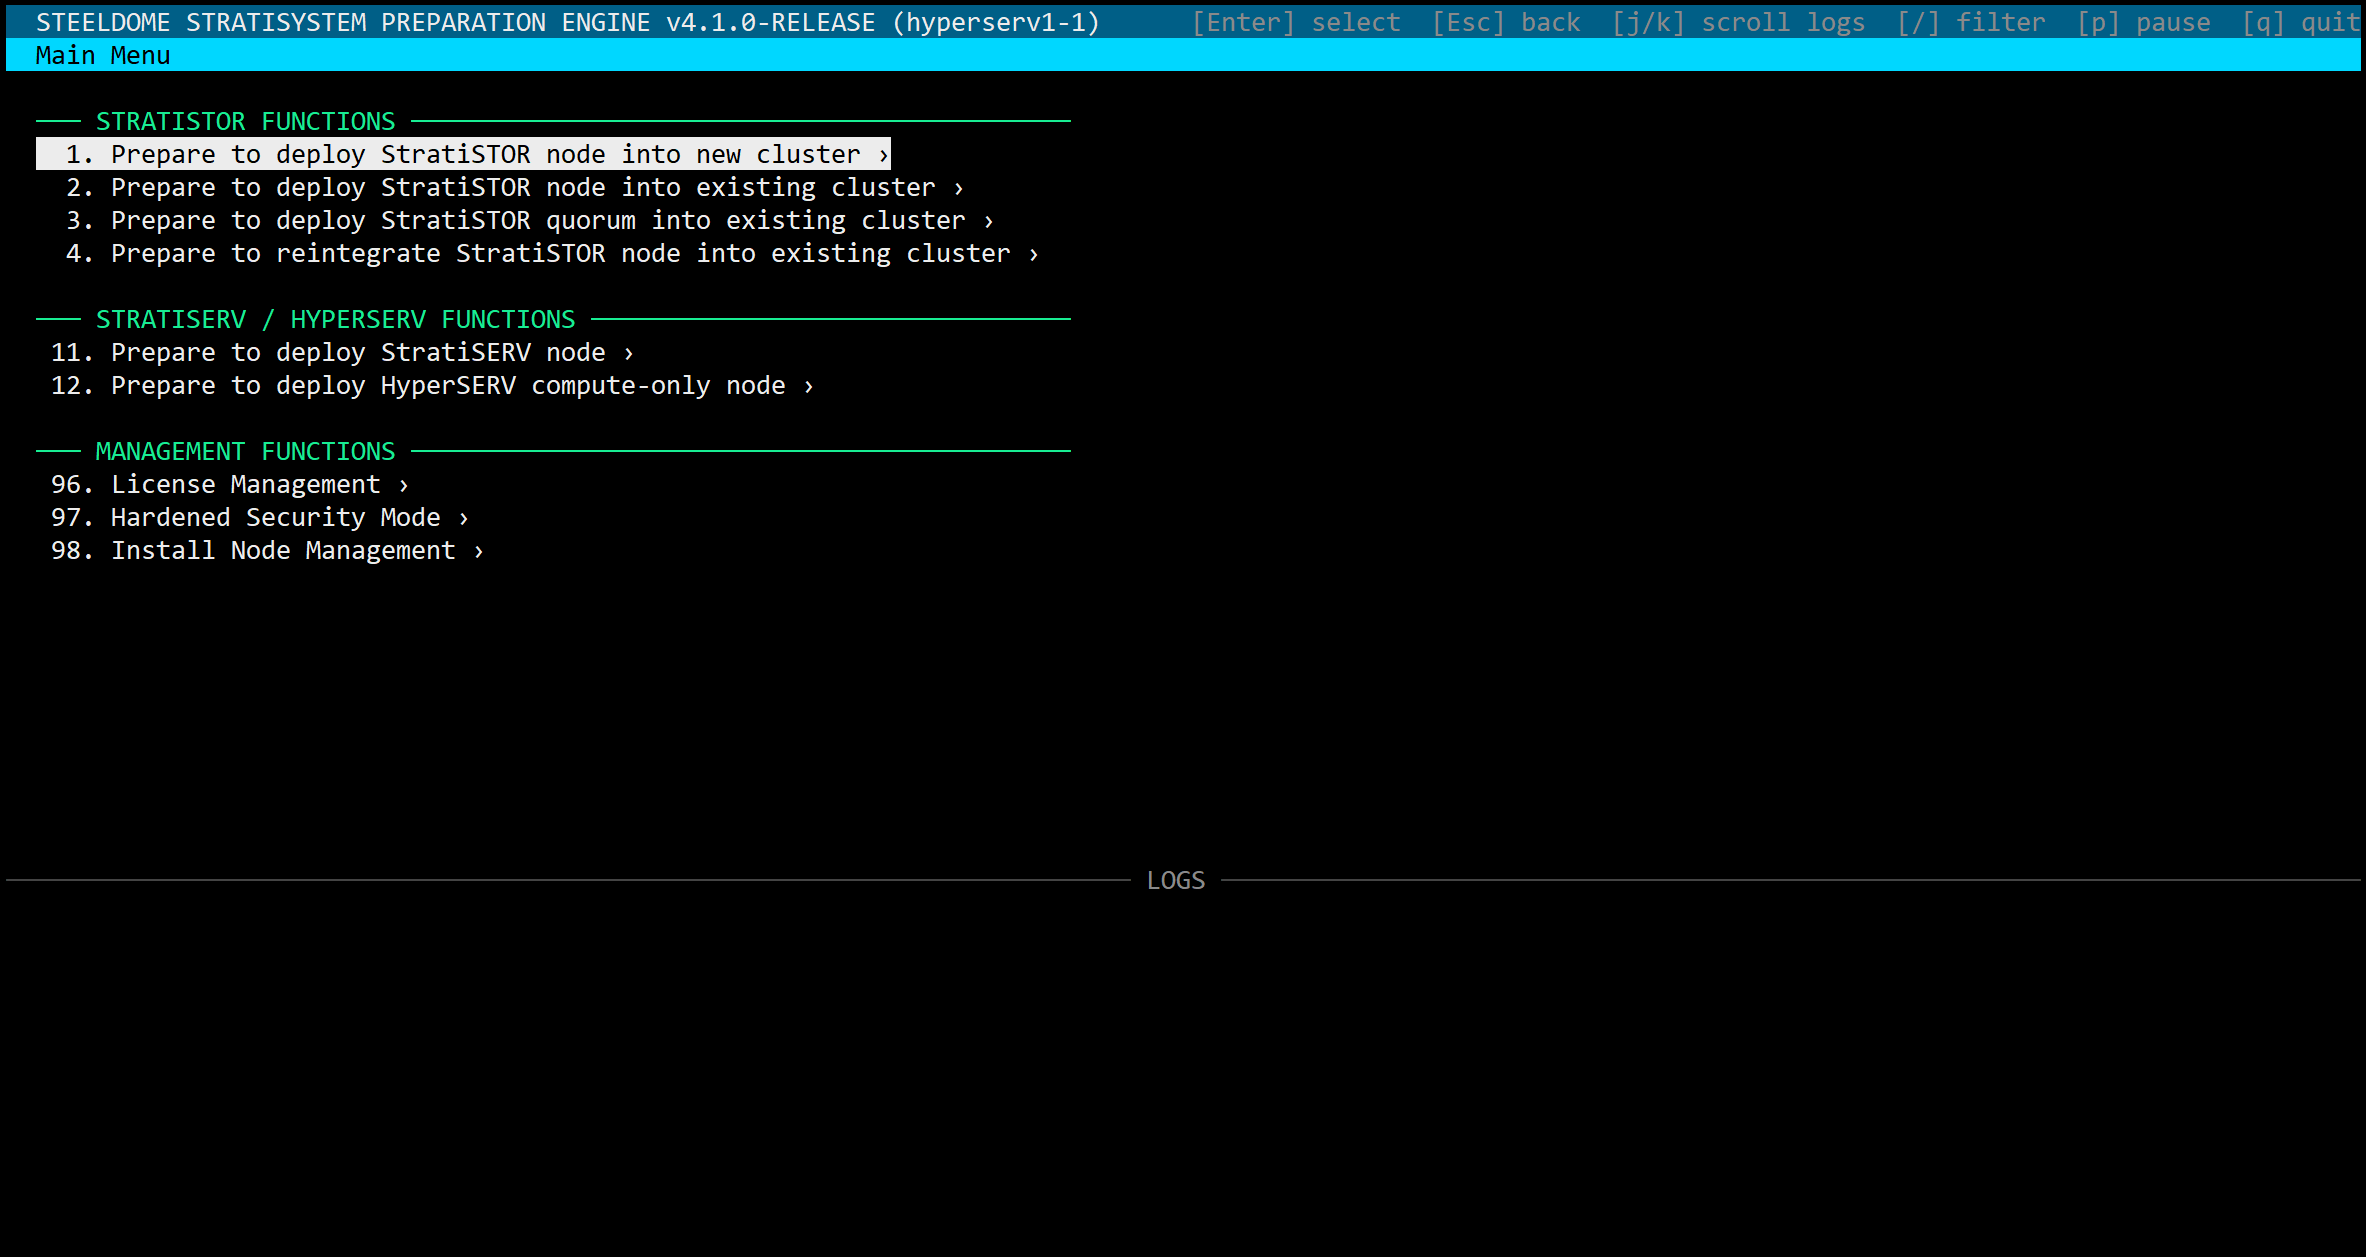
NODE PREPARATION SELECTION
- If you are installing a new cluster: select option 1. Do this on all nodes which will be members of the new cluster.
- If installing nodes into an existing cluster: select option 2.
- If installing a quorum for an existing cluster: select option 3.
- If installing a previously operational node into an existing cluster: select option 4.
- If the nodes need to be installed in hardened mode: select option 97.
- If special network configurations need to be deployed: select option 98.
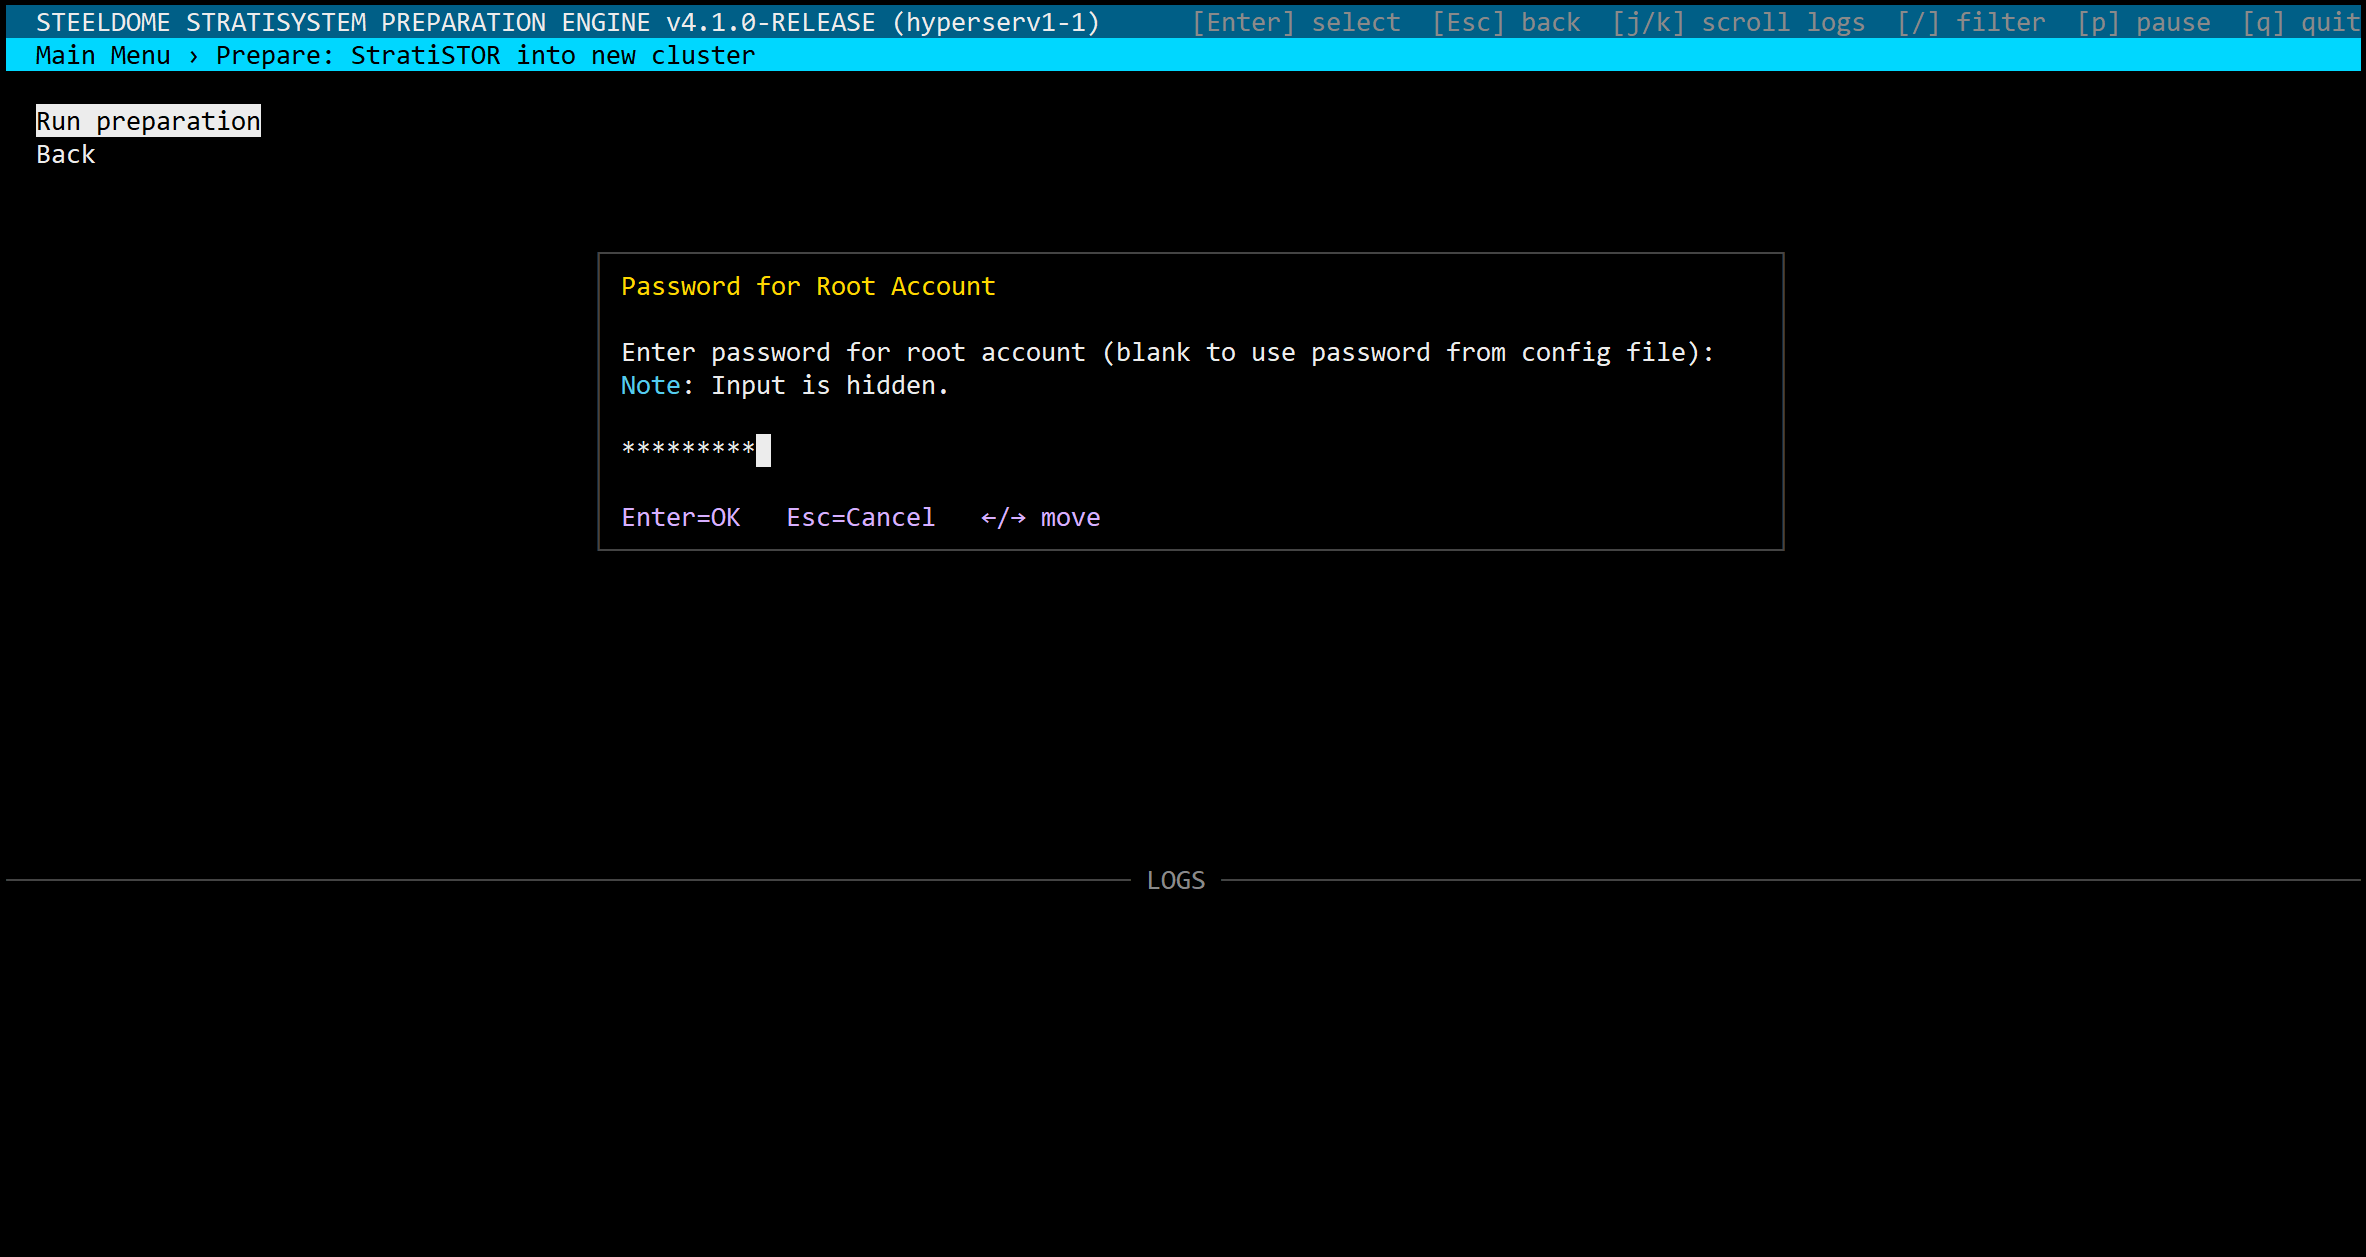
ROOT ACCOUNT PASSWORD
The first step in the wizard is to provide the password used during OS installation to authorize the installation to proceed on this node.
NVIDIA GPU DRIVER SUPPORT / AMD INSTINCT GPU DRIVER SUPPORT
Once confirmed, you will be asked if the installation should include the Nvidia/AMD GPU support framework. This is selected for deployments which intend on using Nvidia/AMD GPUs for either VDI or AI based workloads.
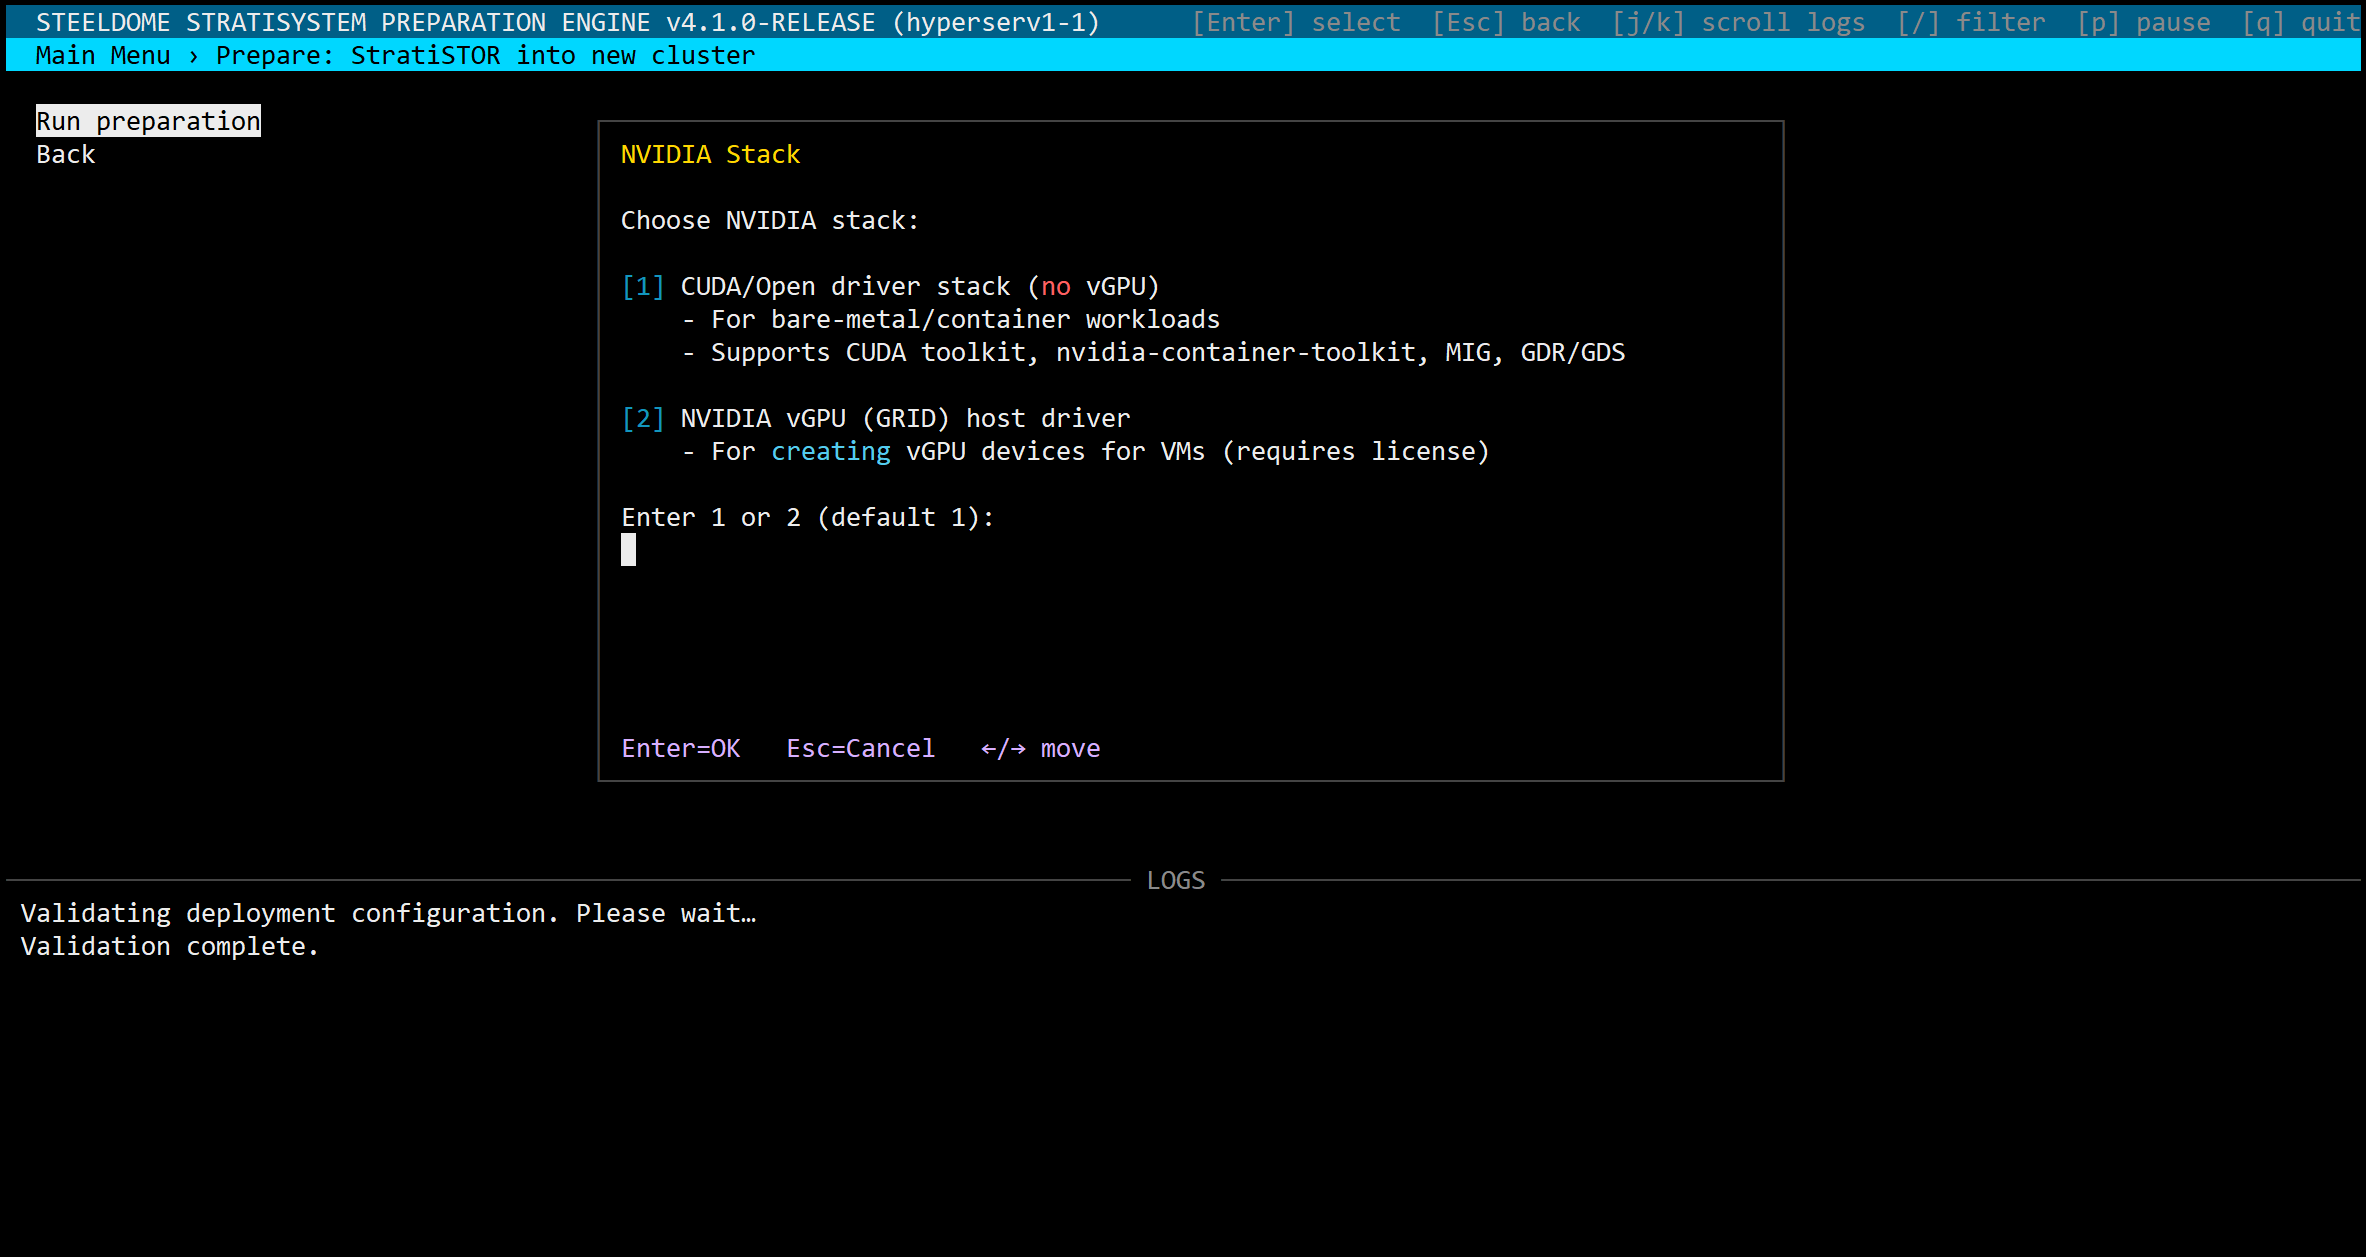
NOTE: If selecting the NVIDIA vGPU GRID driver support option, you will need to obtain a separate NVIDIA GRID license through an authorized reseller.
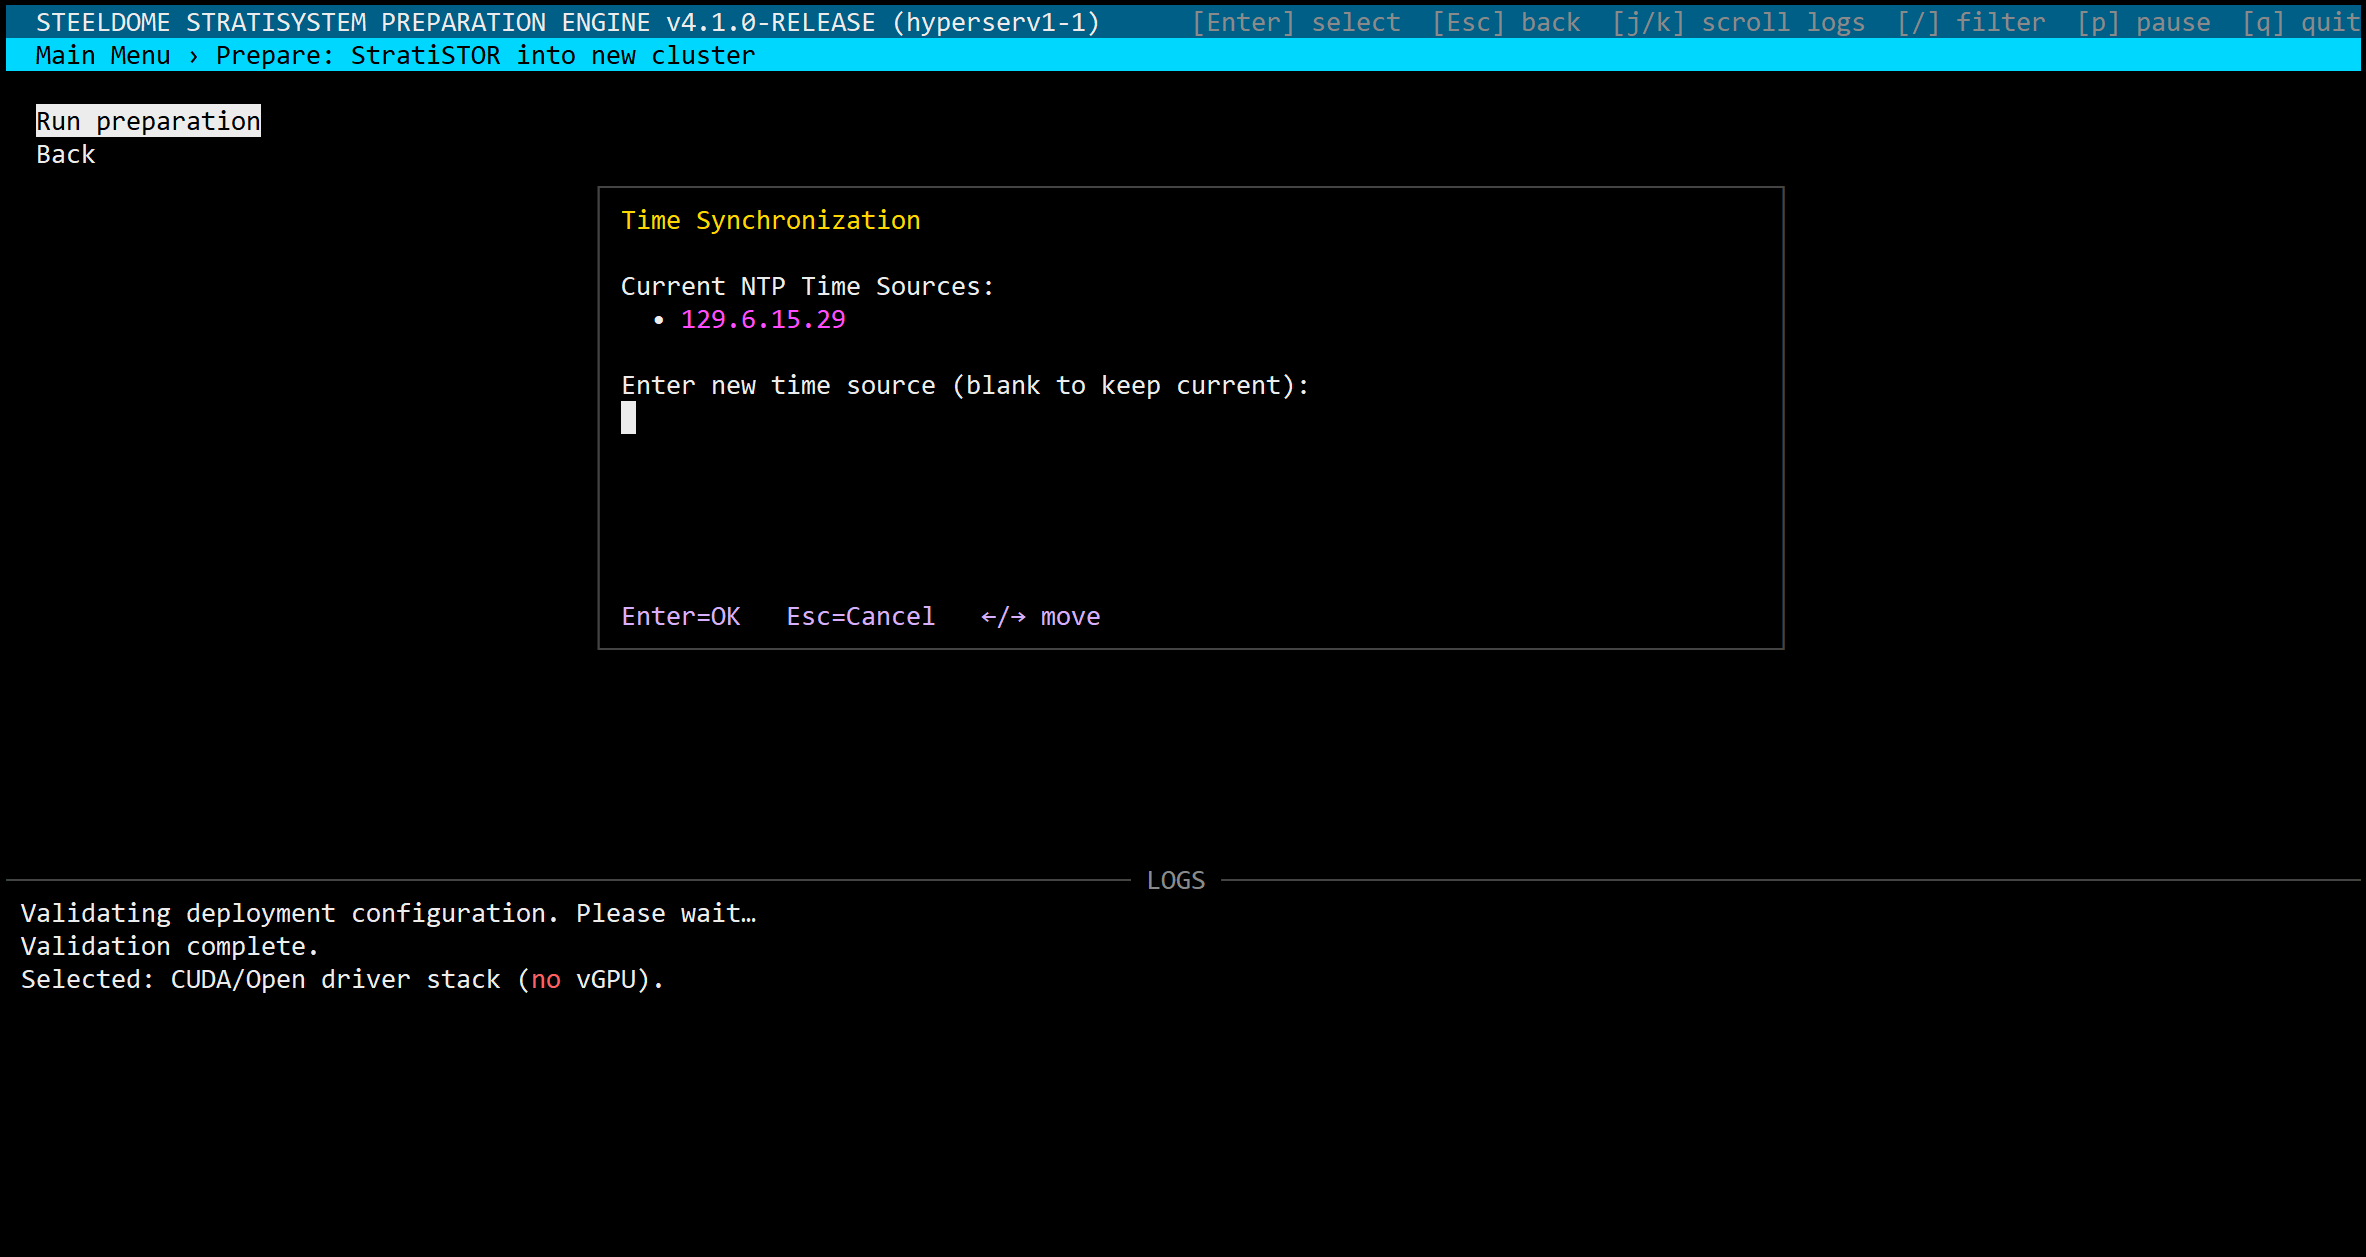
NTP TIME SOURCE SELECTION
The next prompt will be for a valid network NTP time source. Enter the DNS or IP address of the internet or intranet based time source or simply press ENTER to accept the default show in the list.
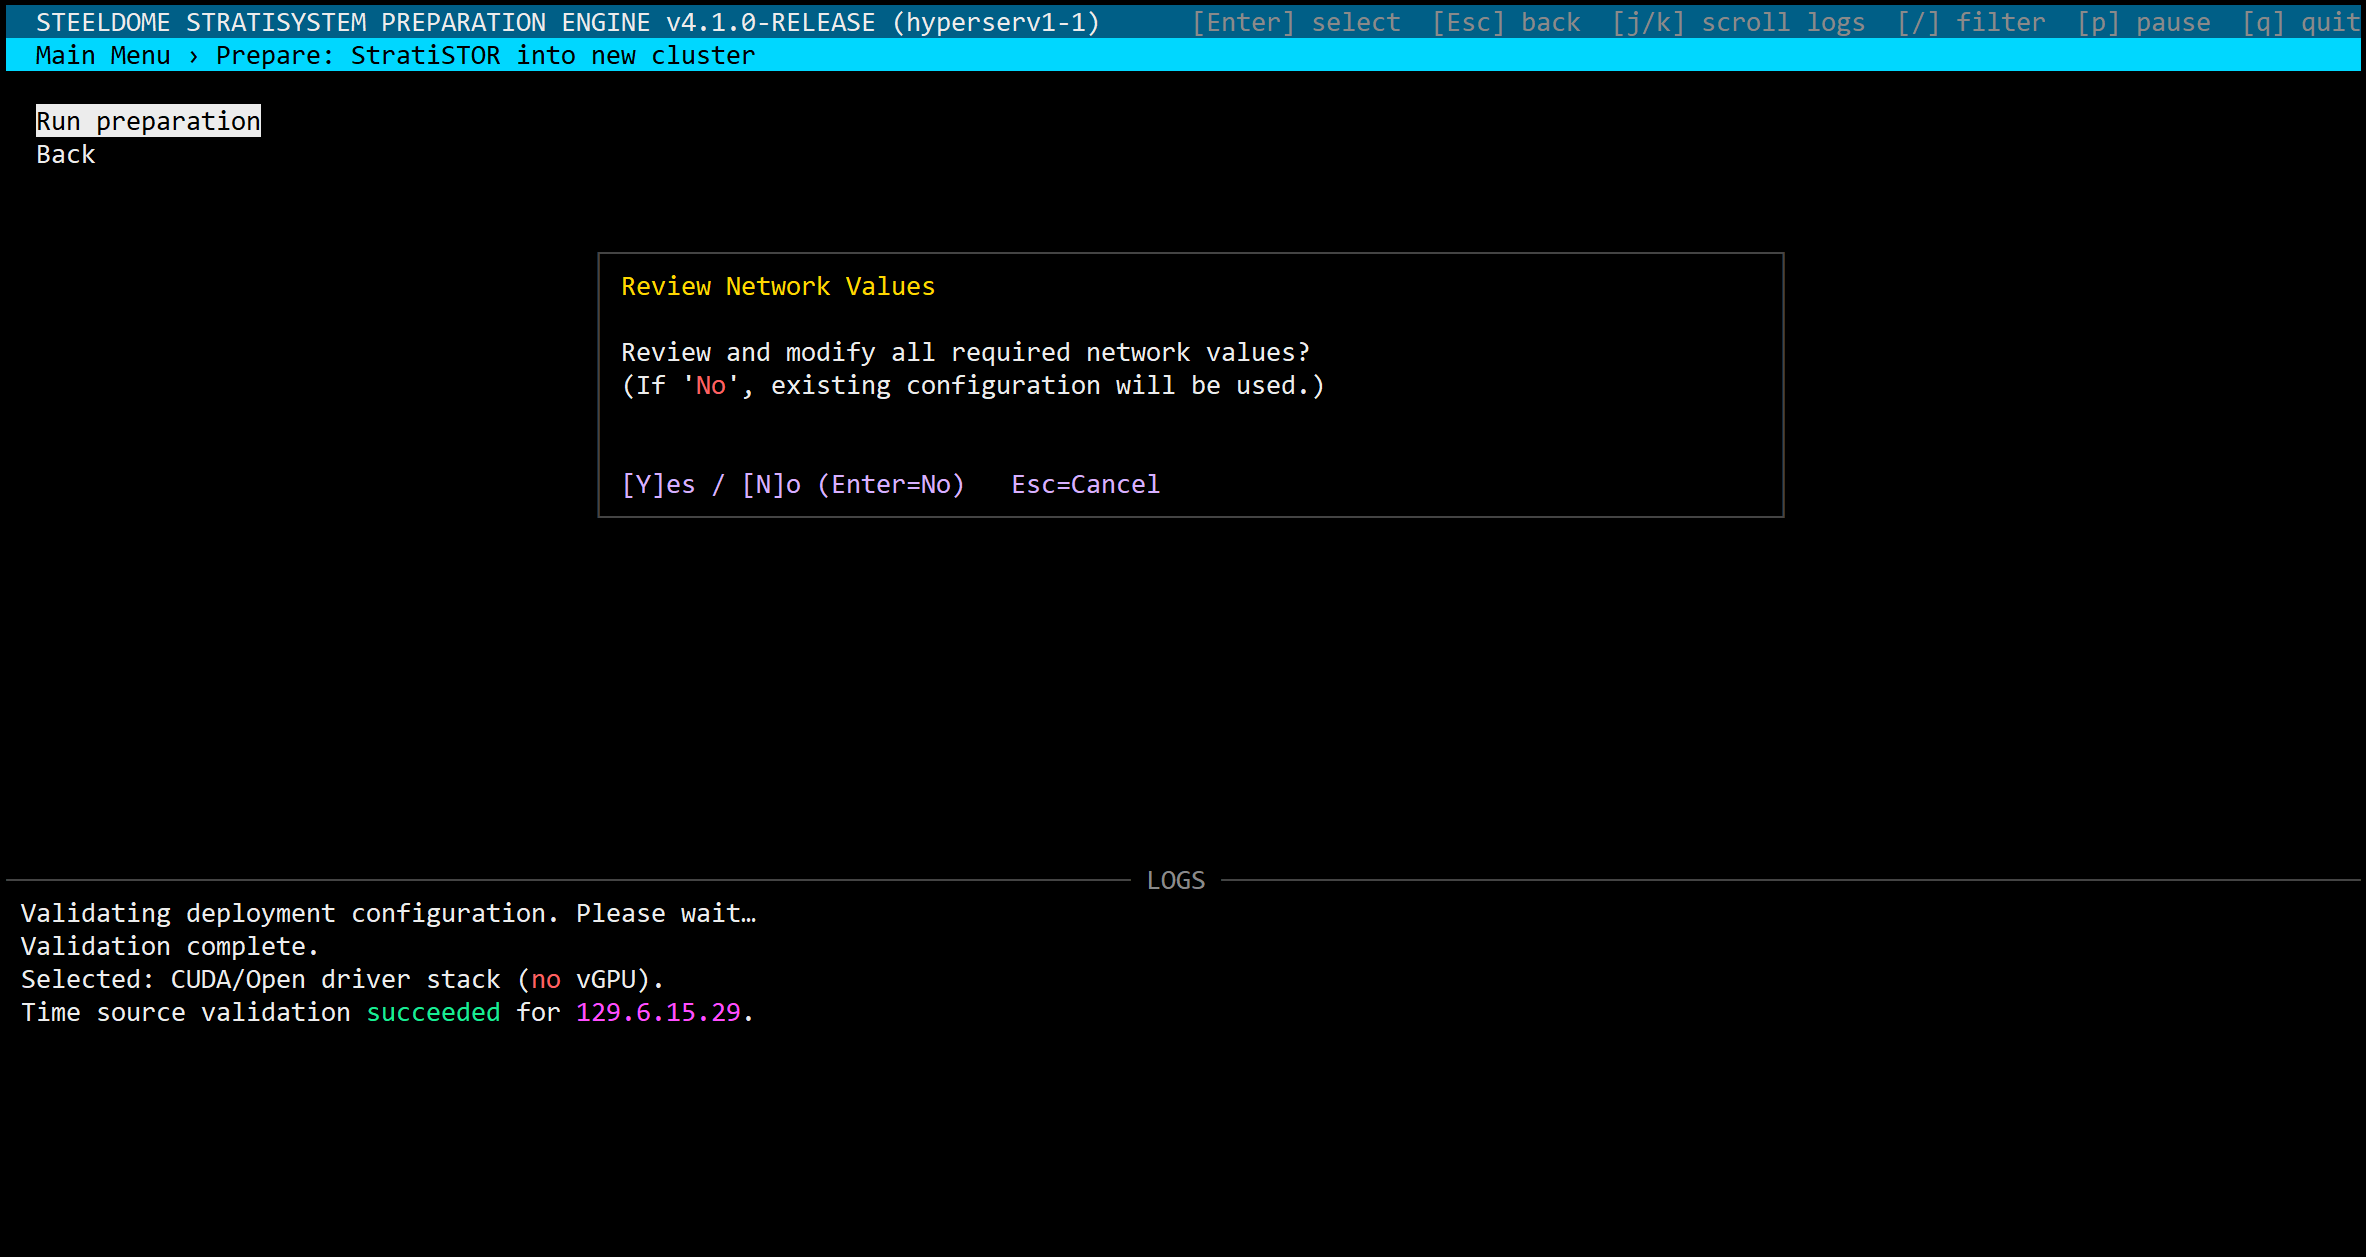
NETWORK CONFIGURATION REVIEW
This section will confirm all network configuration settings based on the values currently contained within the deployment configuration file. Values can be accepted or overridden if necessary from this screen.
Type a new value to override the current value or press ENTER to proceed with the current value.
DRIVE WIPE (NON-BOOT DISKS ONLY)
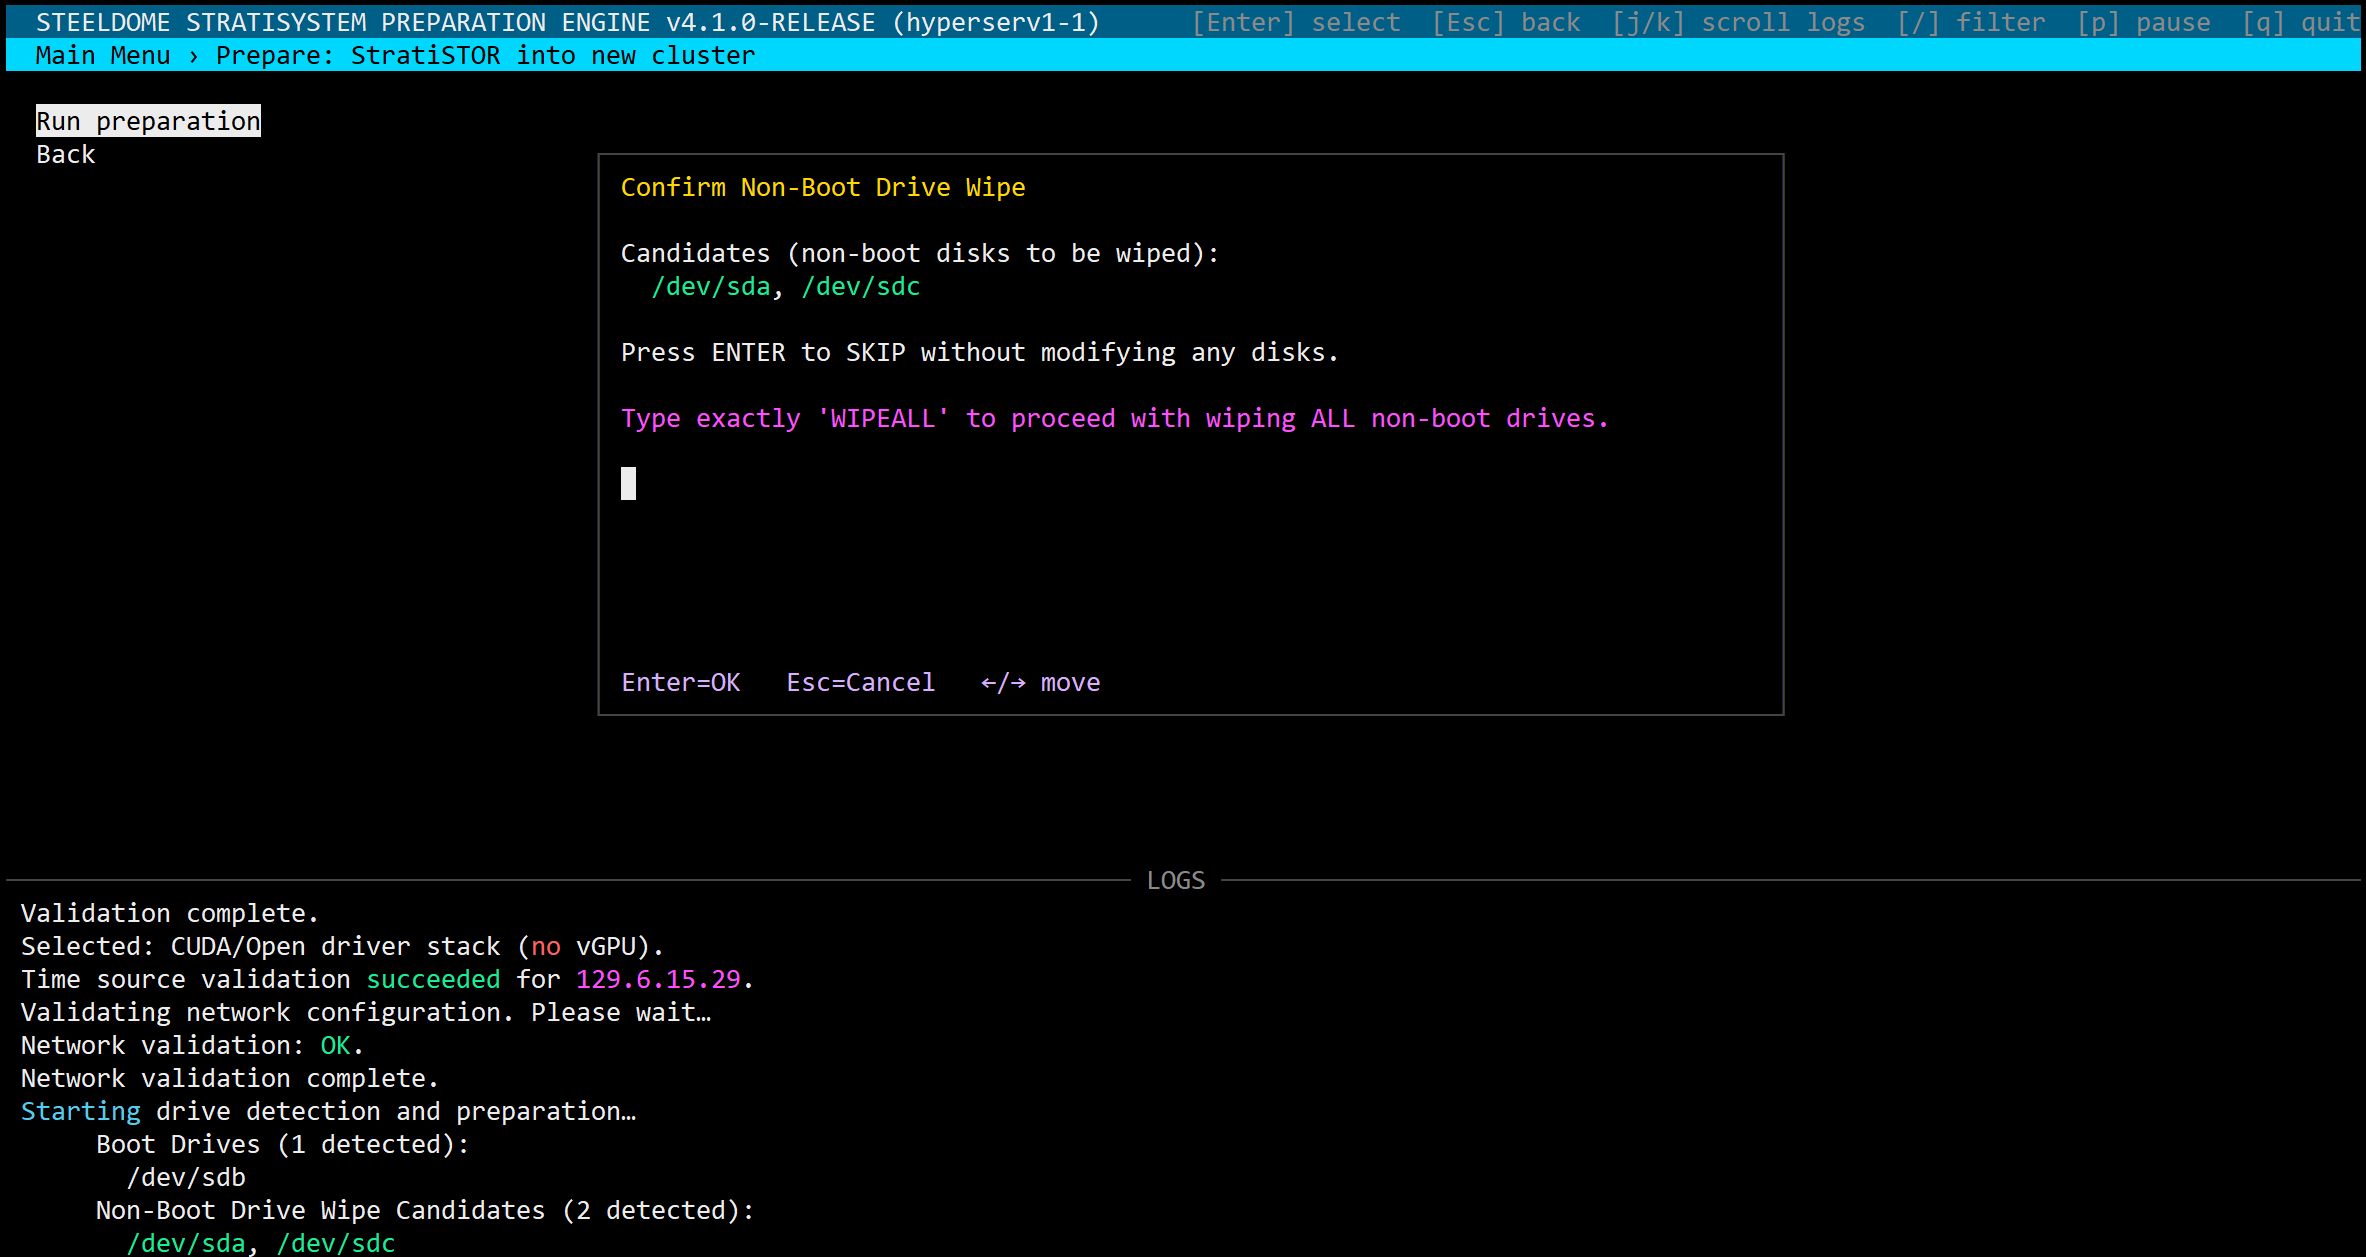
If encryption was enabled during the operating system installation phase you will be prompted for the passphrase used.
All connected physical block devices will appear in the list. Boot drives and non-boot drives will appear in the list. You will only be offered to wipe non-boot drives.
IMPORTANT: Wipe the non-boot disks only if you are sure you do not need the data contained on them. Do not wipe them if you are reintegrating a previously operational node back into the cluster.
IMPORTANT: Be aware, connected back-end block devices such as Fibre-channel SANs may appear on this list. If this is the case and you want to preserve this data, skip the wipe operation. Specific drive wiping can be performed after this installation phase.
BEGIN SYSTEM PREPARATION
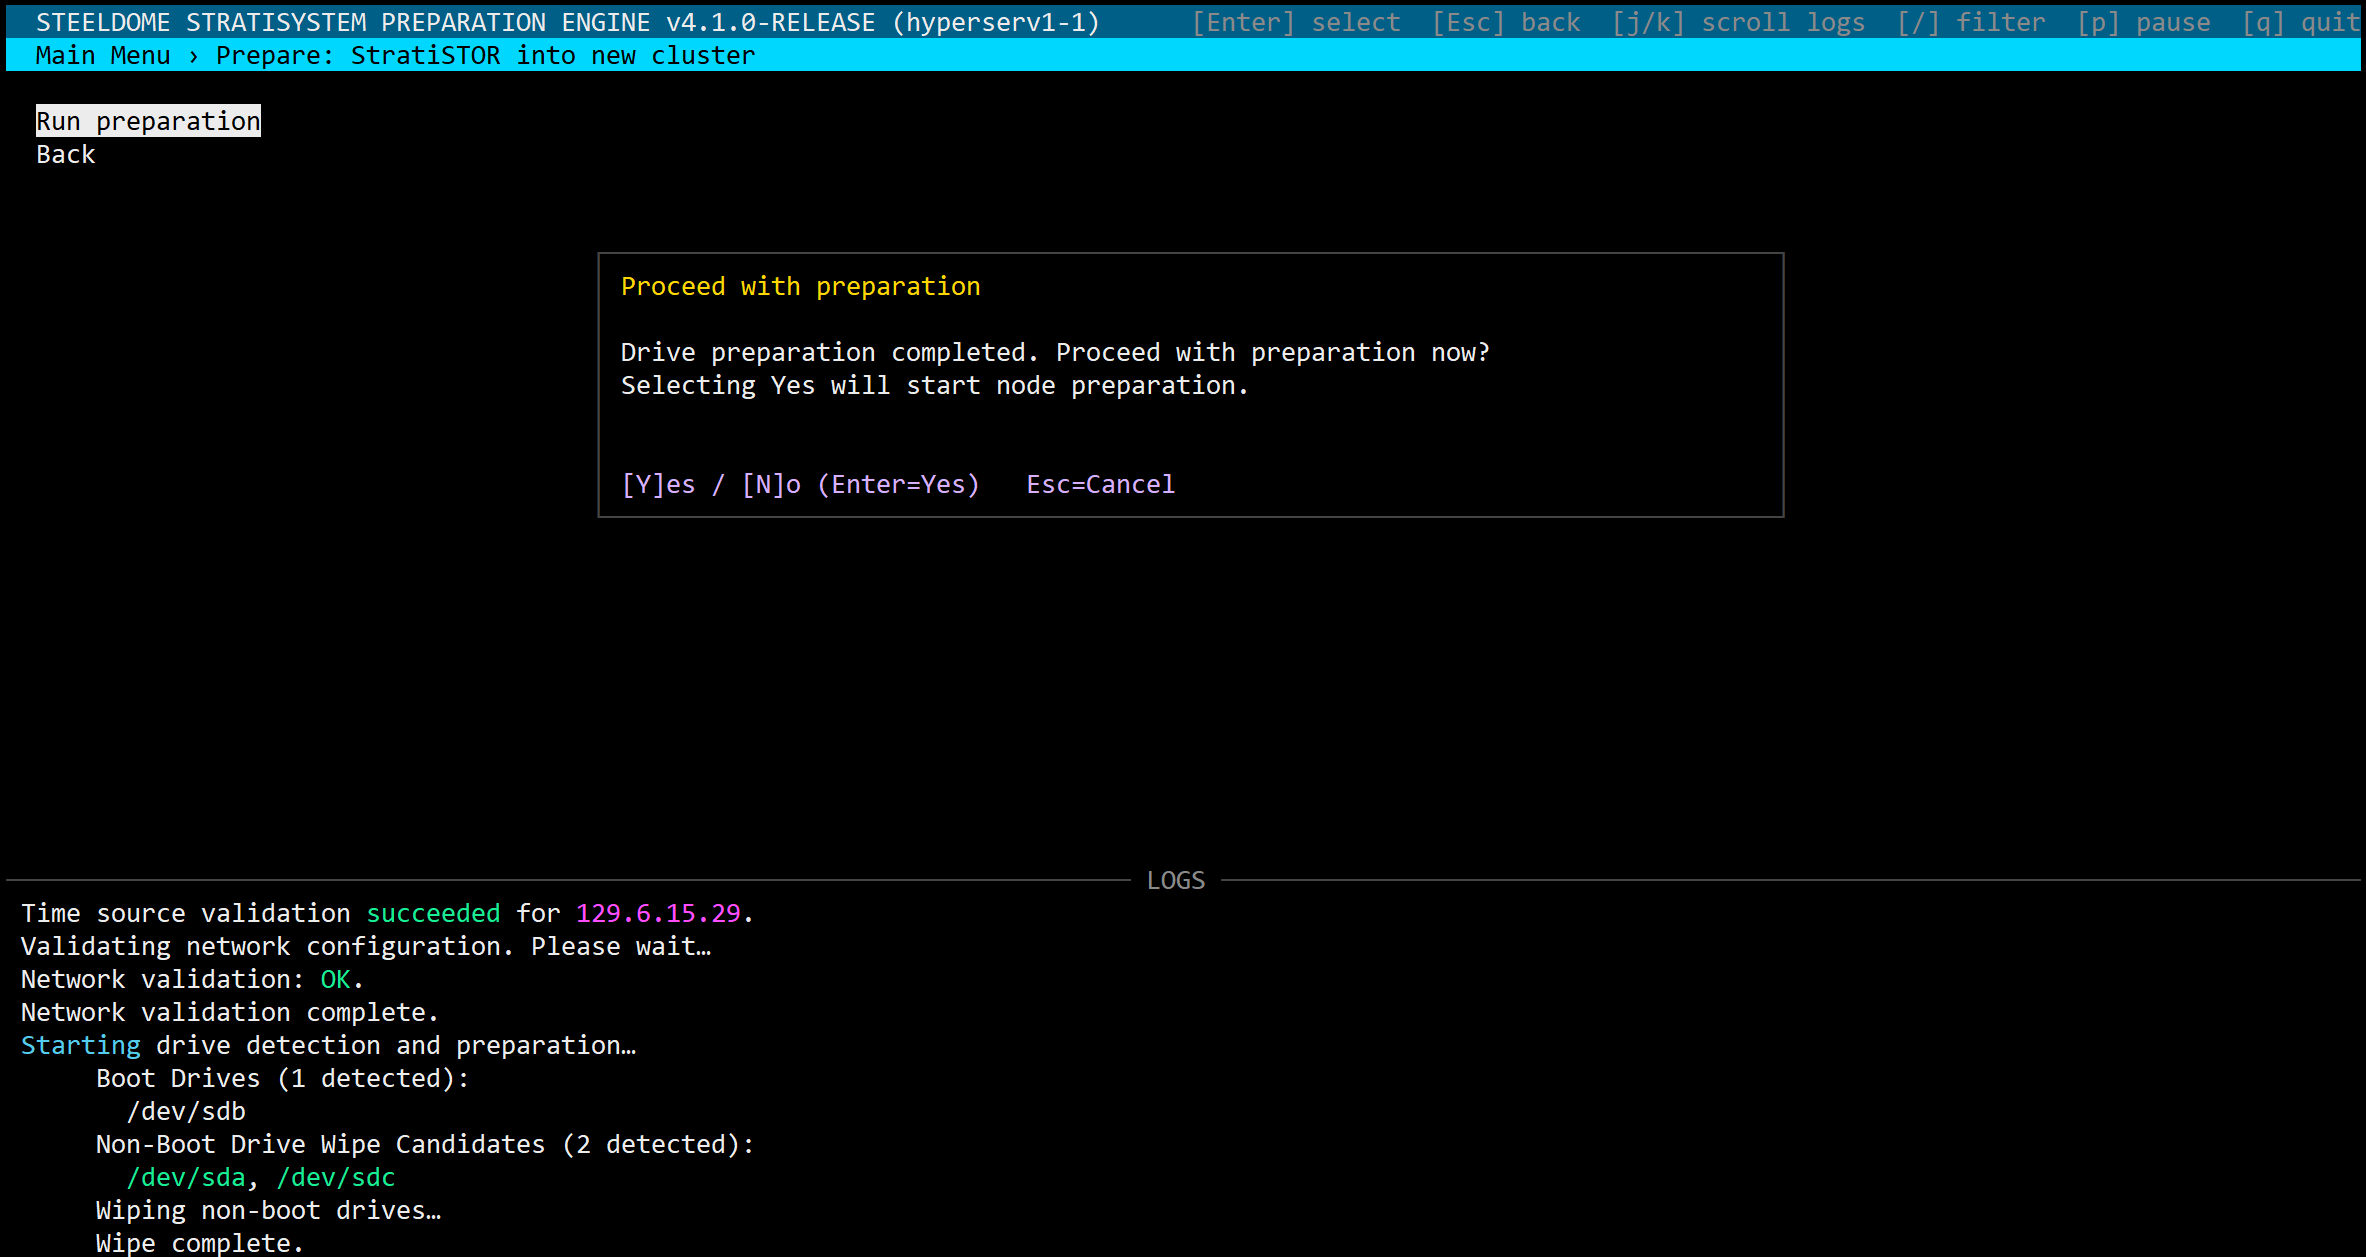
The preparation phase will take approximately 10 minutes depending on internet connectivity. When completed, the node will reboot. Do not proceed to the next phase until all nodes have completed this phase of the installation.
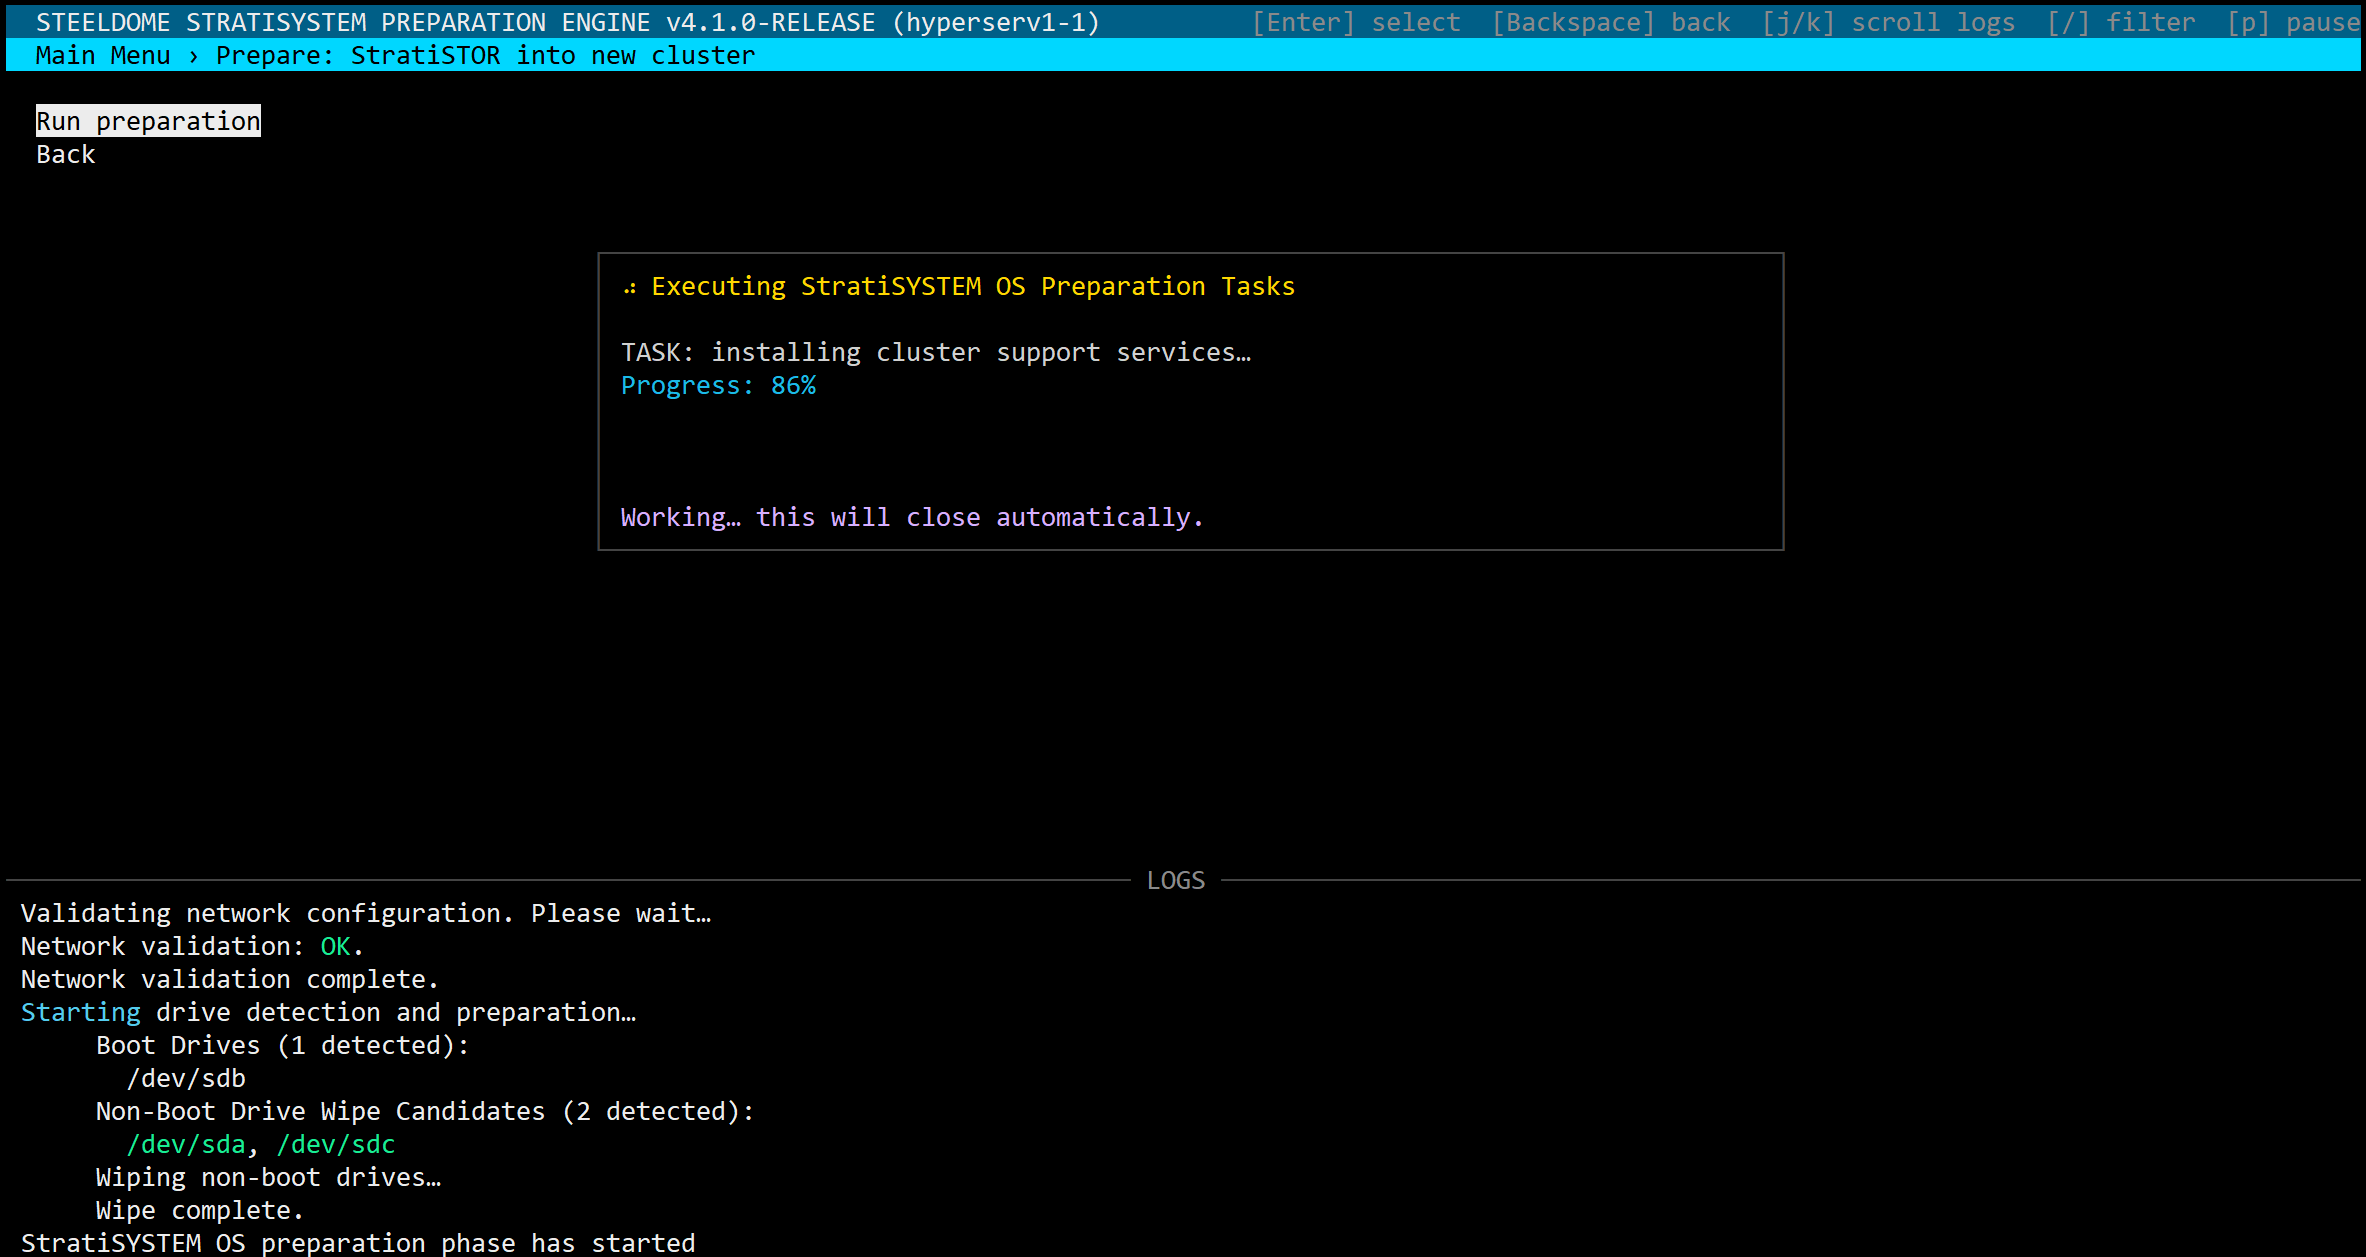
IMPORTANT: After the reboot, the system will complete additional background preparation steps. This will take another 5-10 minutes depending on the system performance. Once completed the system will reboot once more automatically. Do not proceed with the next step until the second reboot has completed.
After the second reboot, a hidden file named: /.prepcomplete will be placed in the root filesystem. This will indicate that the system is ready for the installation phase.
¶ INSTALLATION PHASE
This phase will consist of the final installation of the StratiSTOR operating system and supporting services to bring the cluster to full operational readiness.
First, log back into each node using PuTTY or equivalent SSH terminal program. You will now be automatically placed into the /stratistor folder where the core system is located.
Type the following command on each node to open the StratiSTOR Provisioning Engine Menu:
./start.sh
The provisioning engine menu will appear.
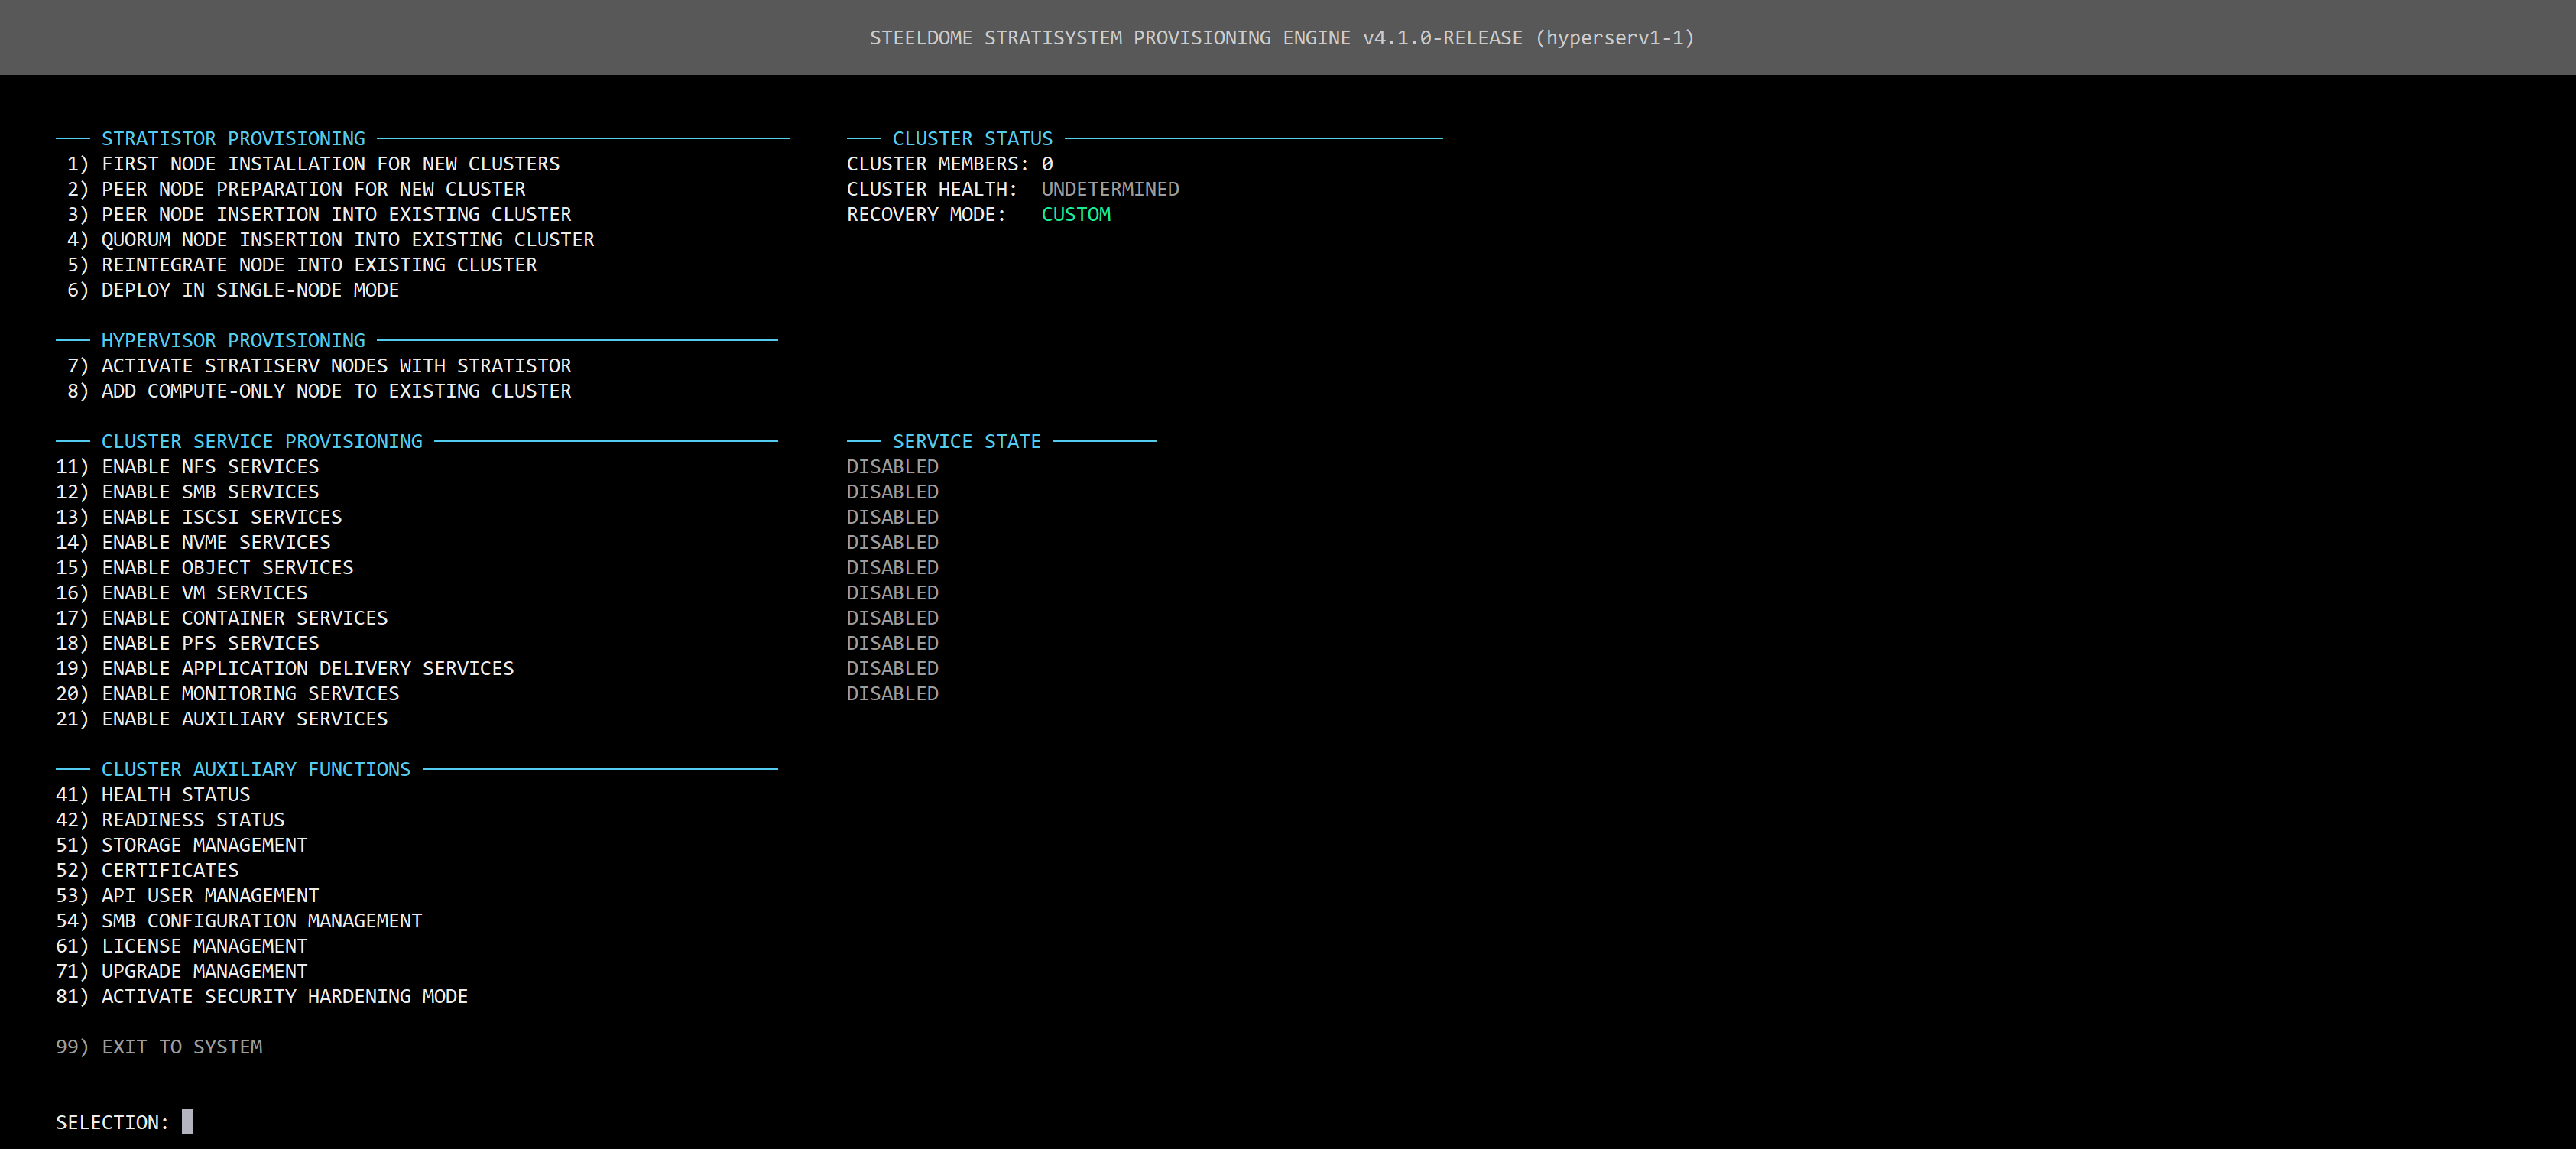
For a standard cluster deployment:
On Node 1: Select option 1
On all remaining nodes: Select option 2
For other deployment modes:
If you are adding additional nodes to the cluster: select option 3.
If you are adding a quorum to an existing cluster: select option 5.
If you are reintegrating a previously operational node: select option 6.
If you are performing a single-node deployment: select option 7.
If you need to connect existing StratiSERV nodes to the cluster: select option 8.
If you are adding HyperSERV compute-only nodes to the cluster: select option 9.
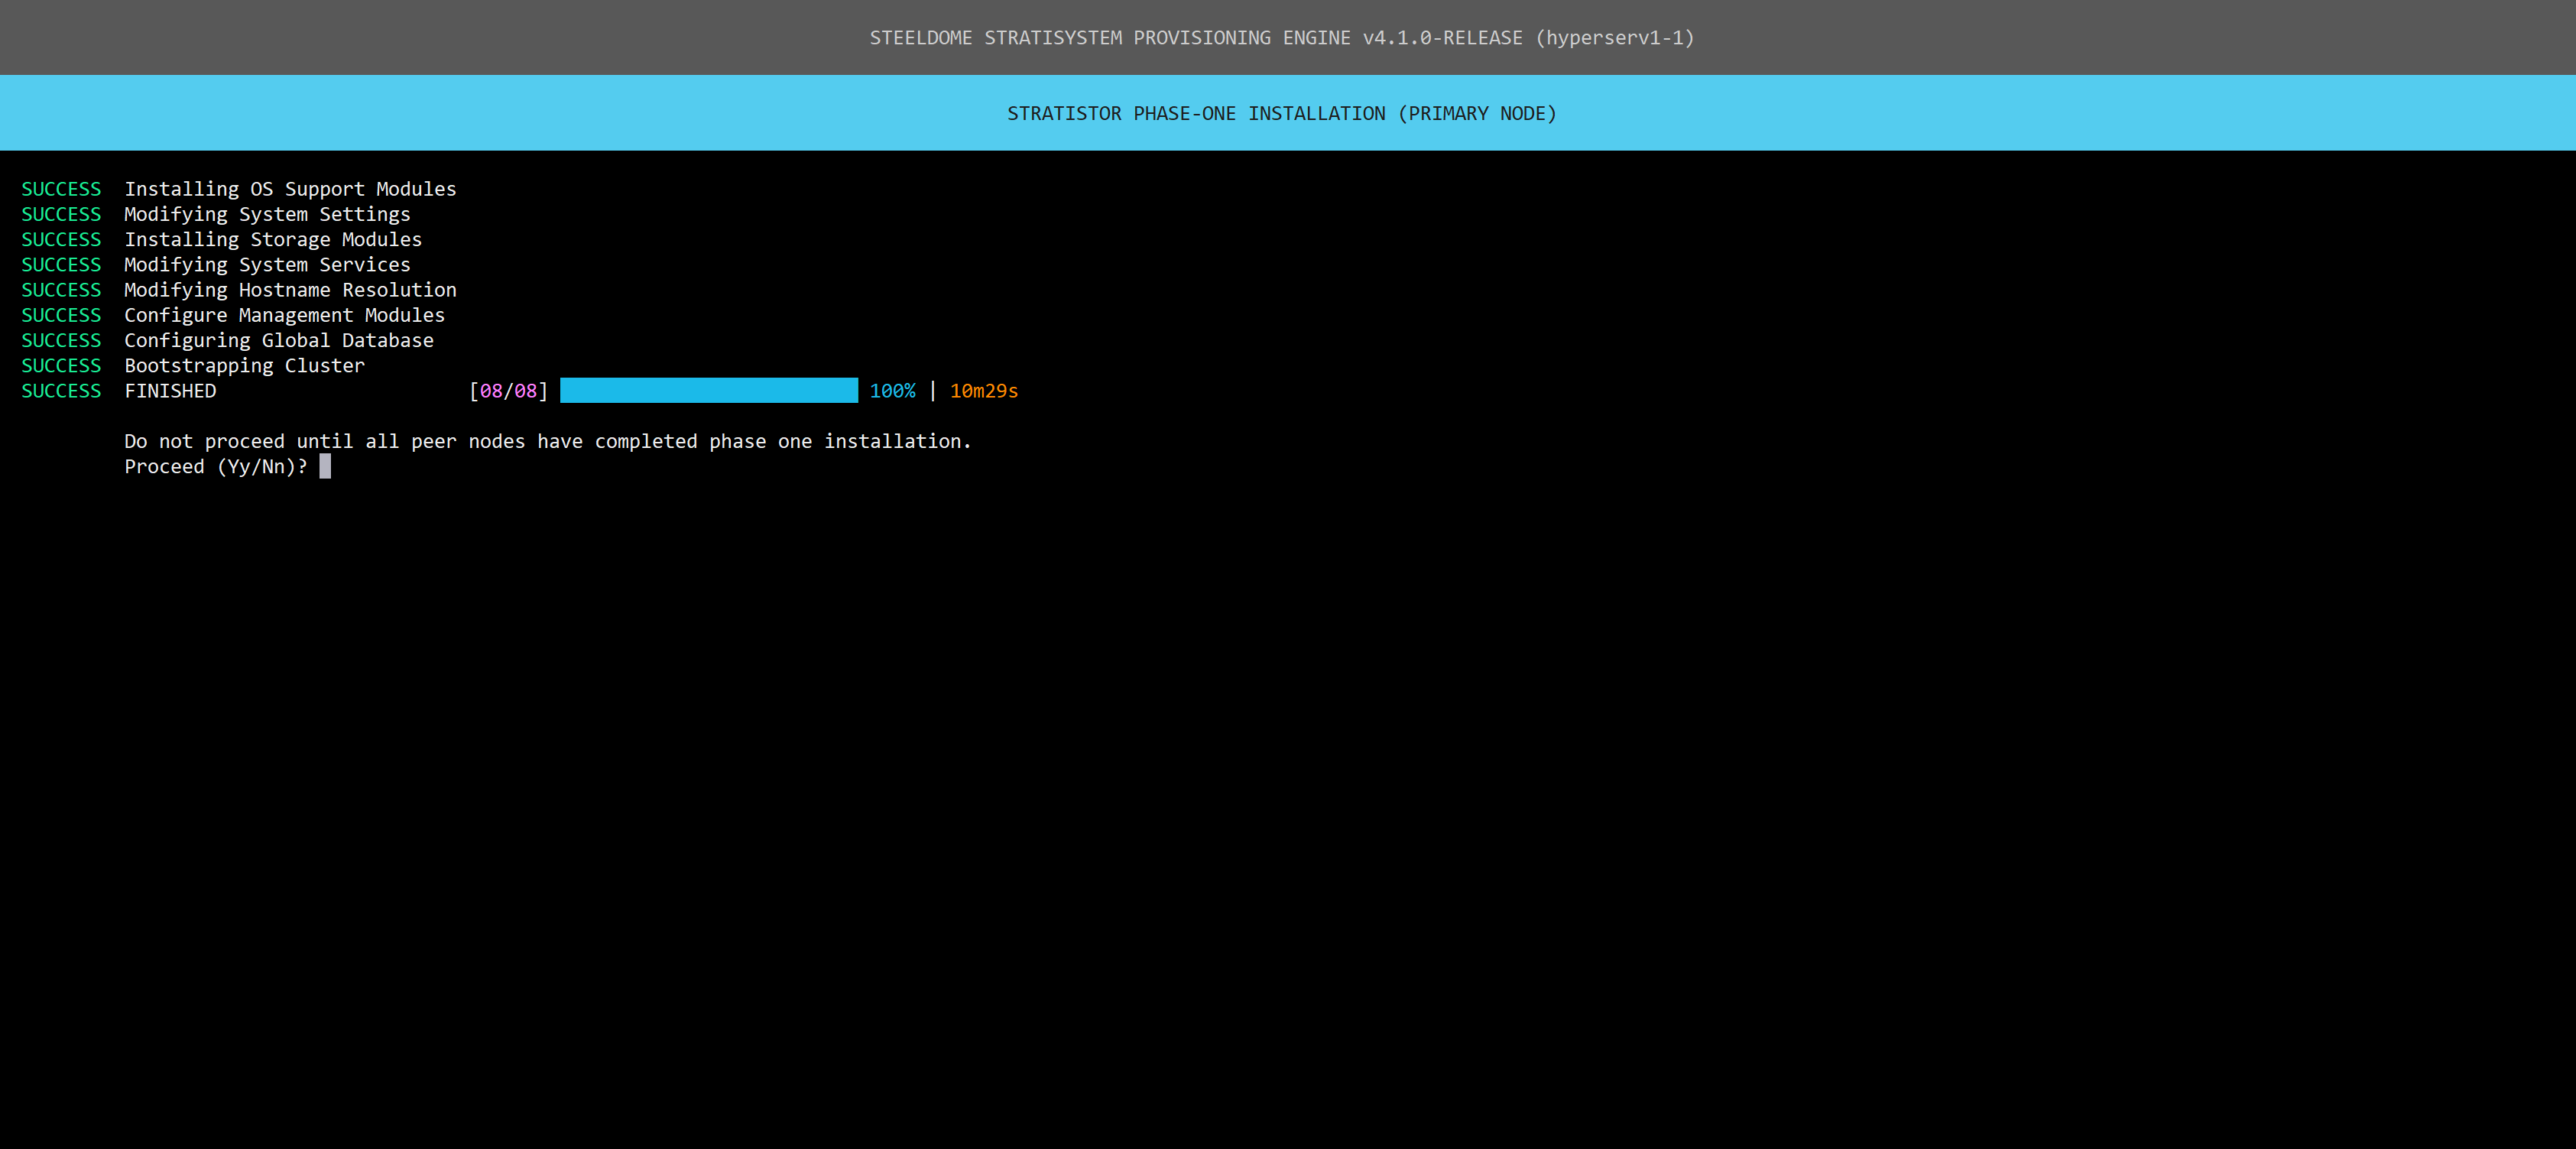
After validating the configuration, you will see the following screen:
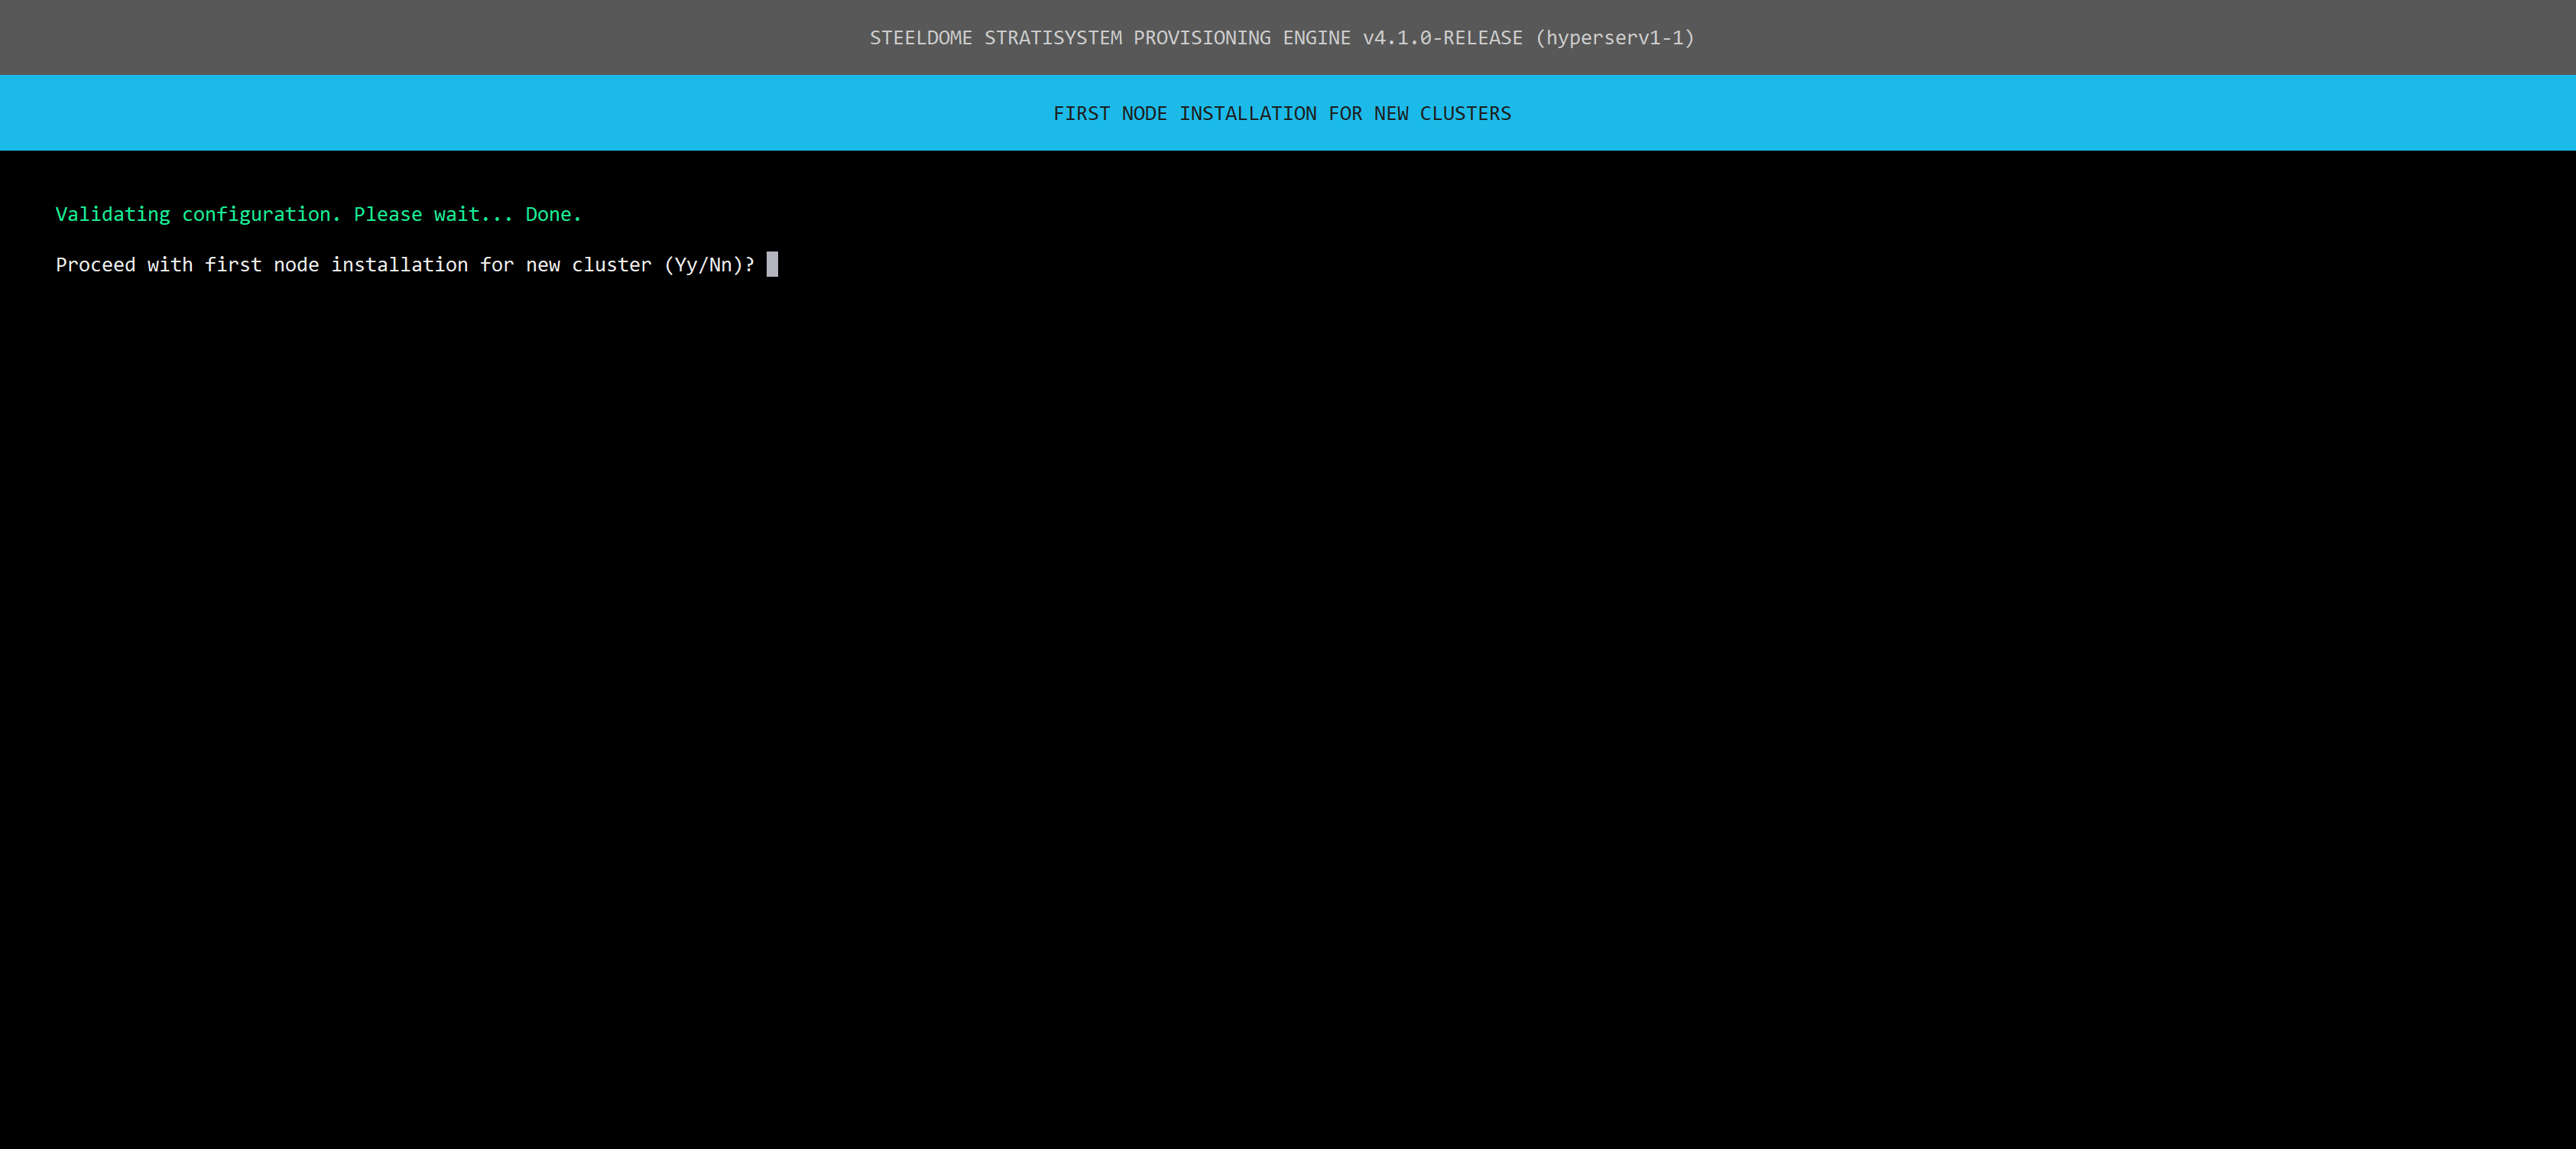
When ready, click Y/y and press enter to proceed.
All nodes will generally follow the same installation steps during this phase, which will take approximately 10 minutes. All nodes must complete this phase before proceeding to the final phase, which only takes place on node 1.
Once all nodes have completed this phase, proceed with the final phase on node 1. Type Y/y and press ENTER.
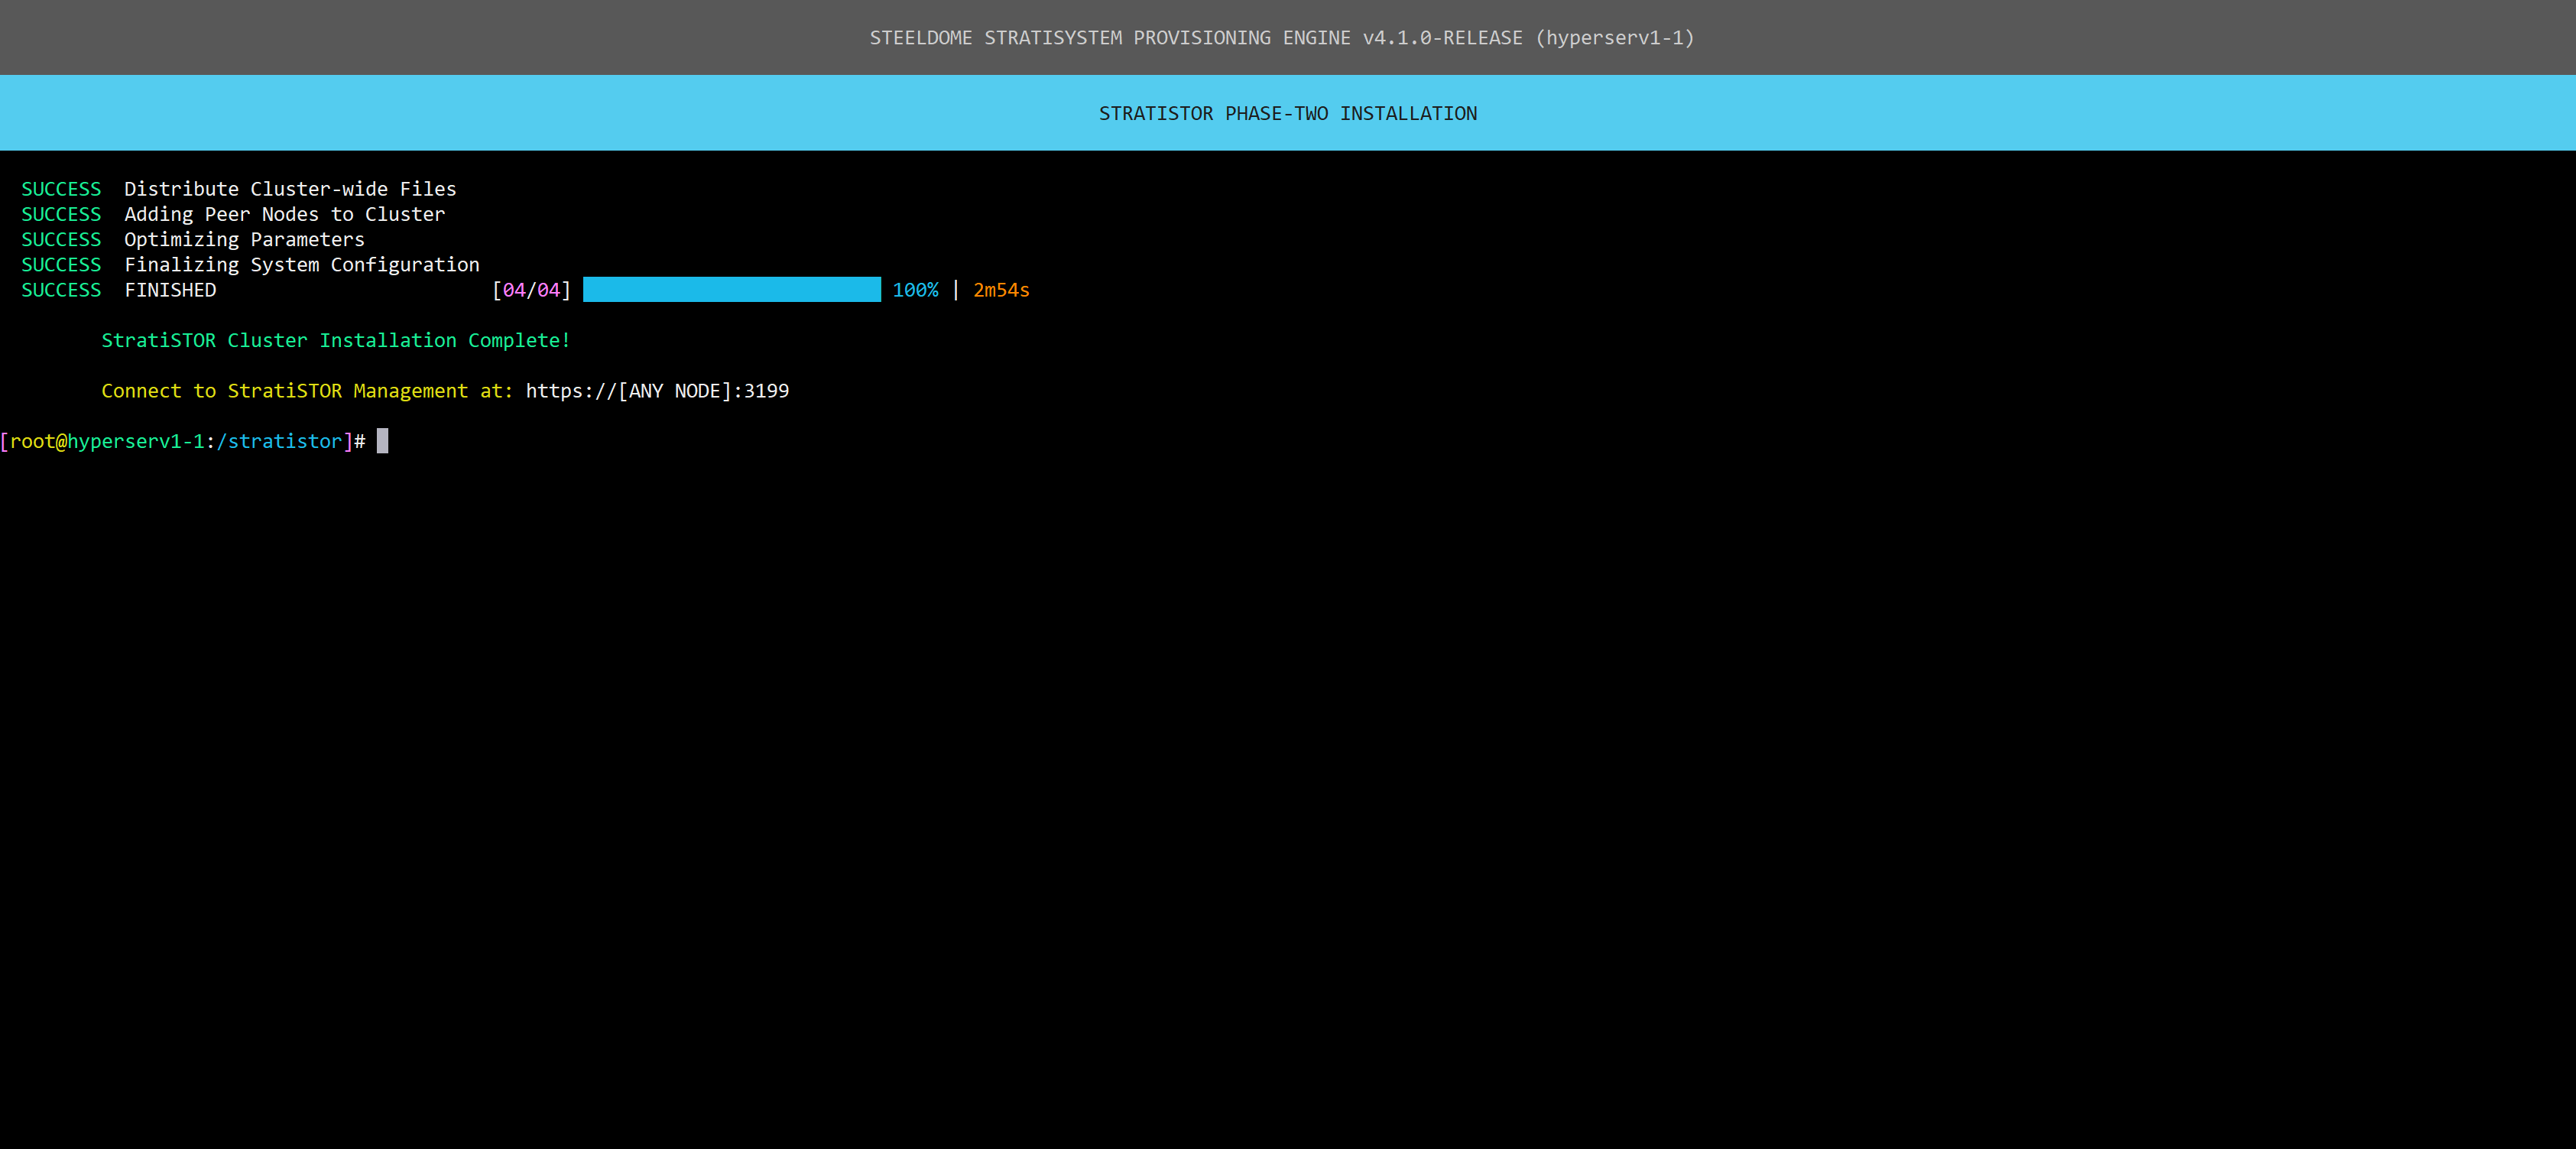
When the installation is complete, you will see confirmation followed by credentials to the web portal.
¶ SDCACHE ACTIVATION PHASE
The SDCache is a mechanism which provides RAM or disk-based I/O acceleration for any class of disk available within the cluster. This is particularly useful for HDDs which are considerably slower than SSD or NVMe class disks. However, all device classes can benefit from SDCache depending on the hardware configuration and the SDCache mode chosen.
Use the SDCache Generator Tool to generate the configuration for your particular hardware configuration. The tool is located under the Storage Management menu option 51, then 4, then 2.
IMPORTANT: the configuration file is intended for new devices. After activating devices with SDCache, the configuration file will be invalid. To use it again, typically when activating more devices, you’ll need to update it to reflect the new devices before proceeding with activation.
From the main menu select option 51, then 4, then 3. Validation of the configuration file will occur and if any misconfiguration is detected, the activation will not be allowed to proceed.
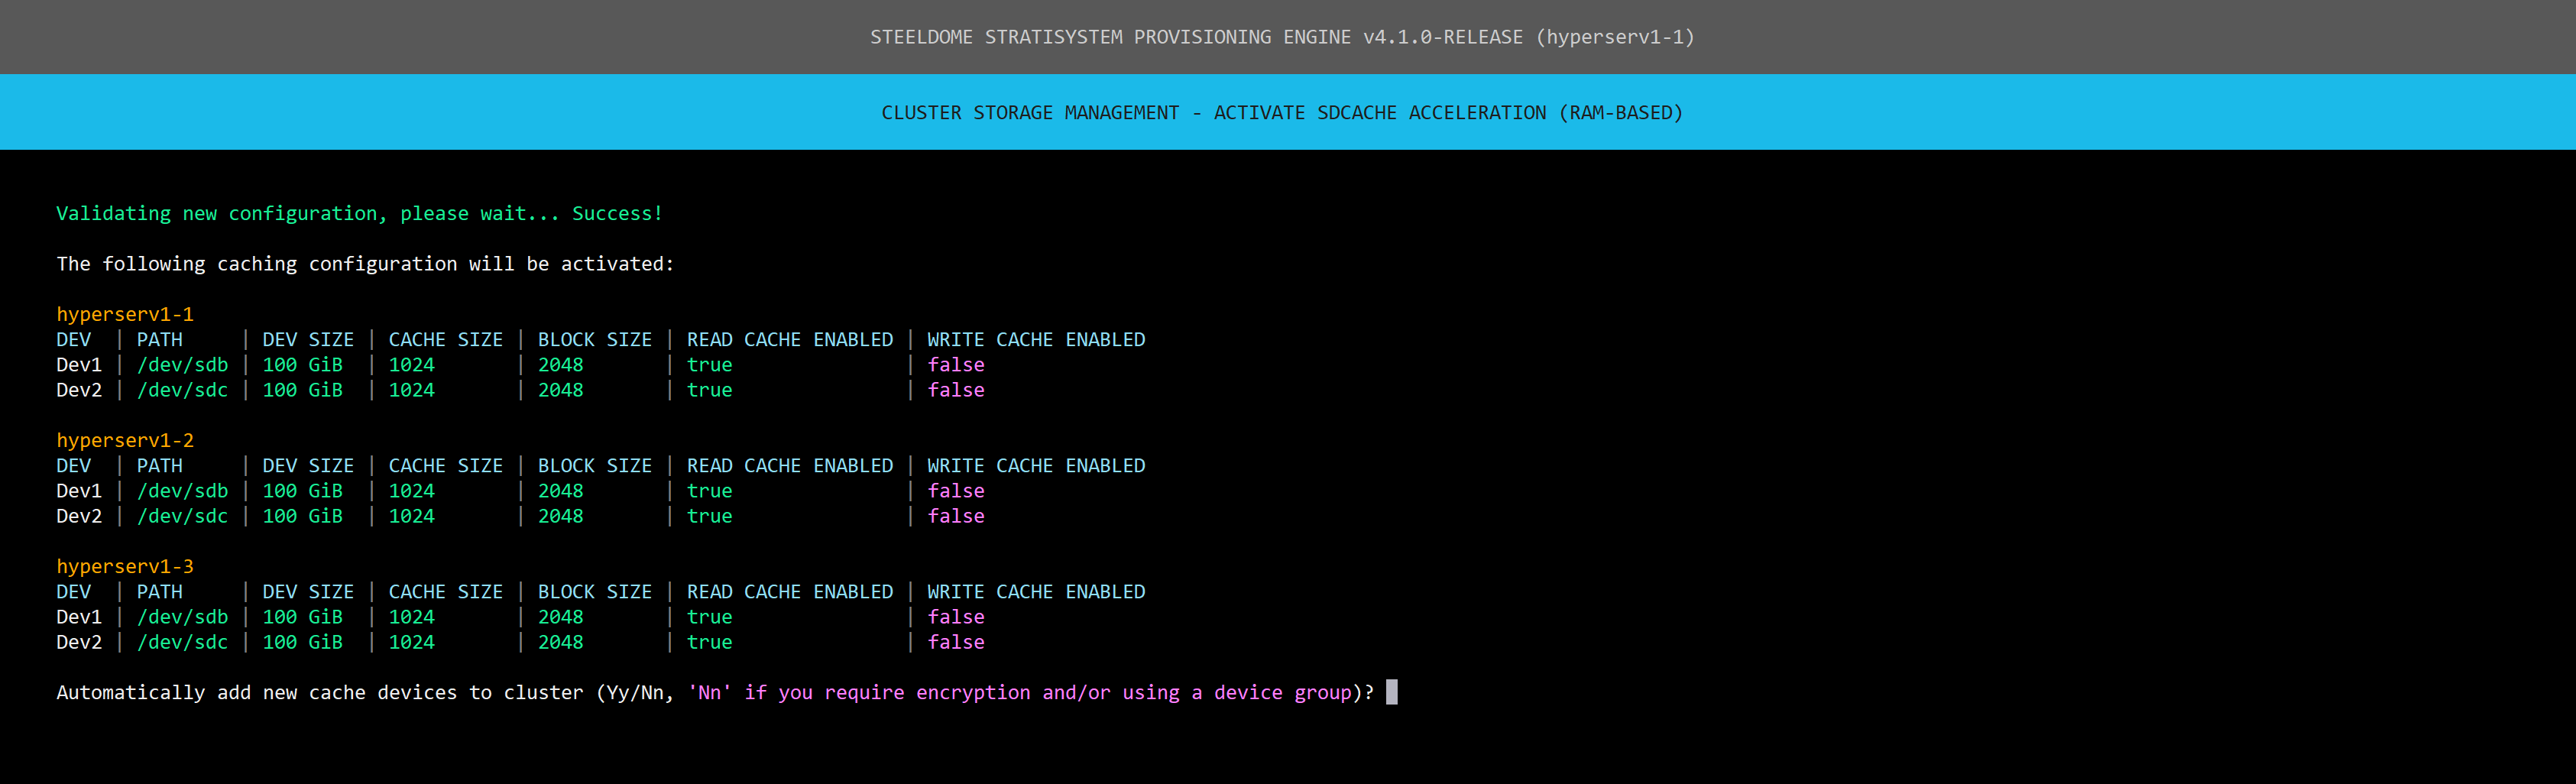
If validation is successful, confirm that the configuration is correct and type Y/y and click ENTER to proceed.
NOTE: If you are intending on using encryption or device groups, do not automatically add the new cache devices to the cluster. This will be done using a different process.
Once activation is complete on all nodes, the cluster storage is now fully operational.
The main menu will now display the total number of cluster nodes along with the health status of the cluster.
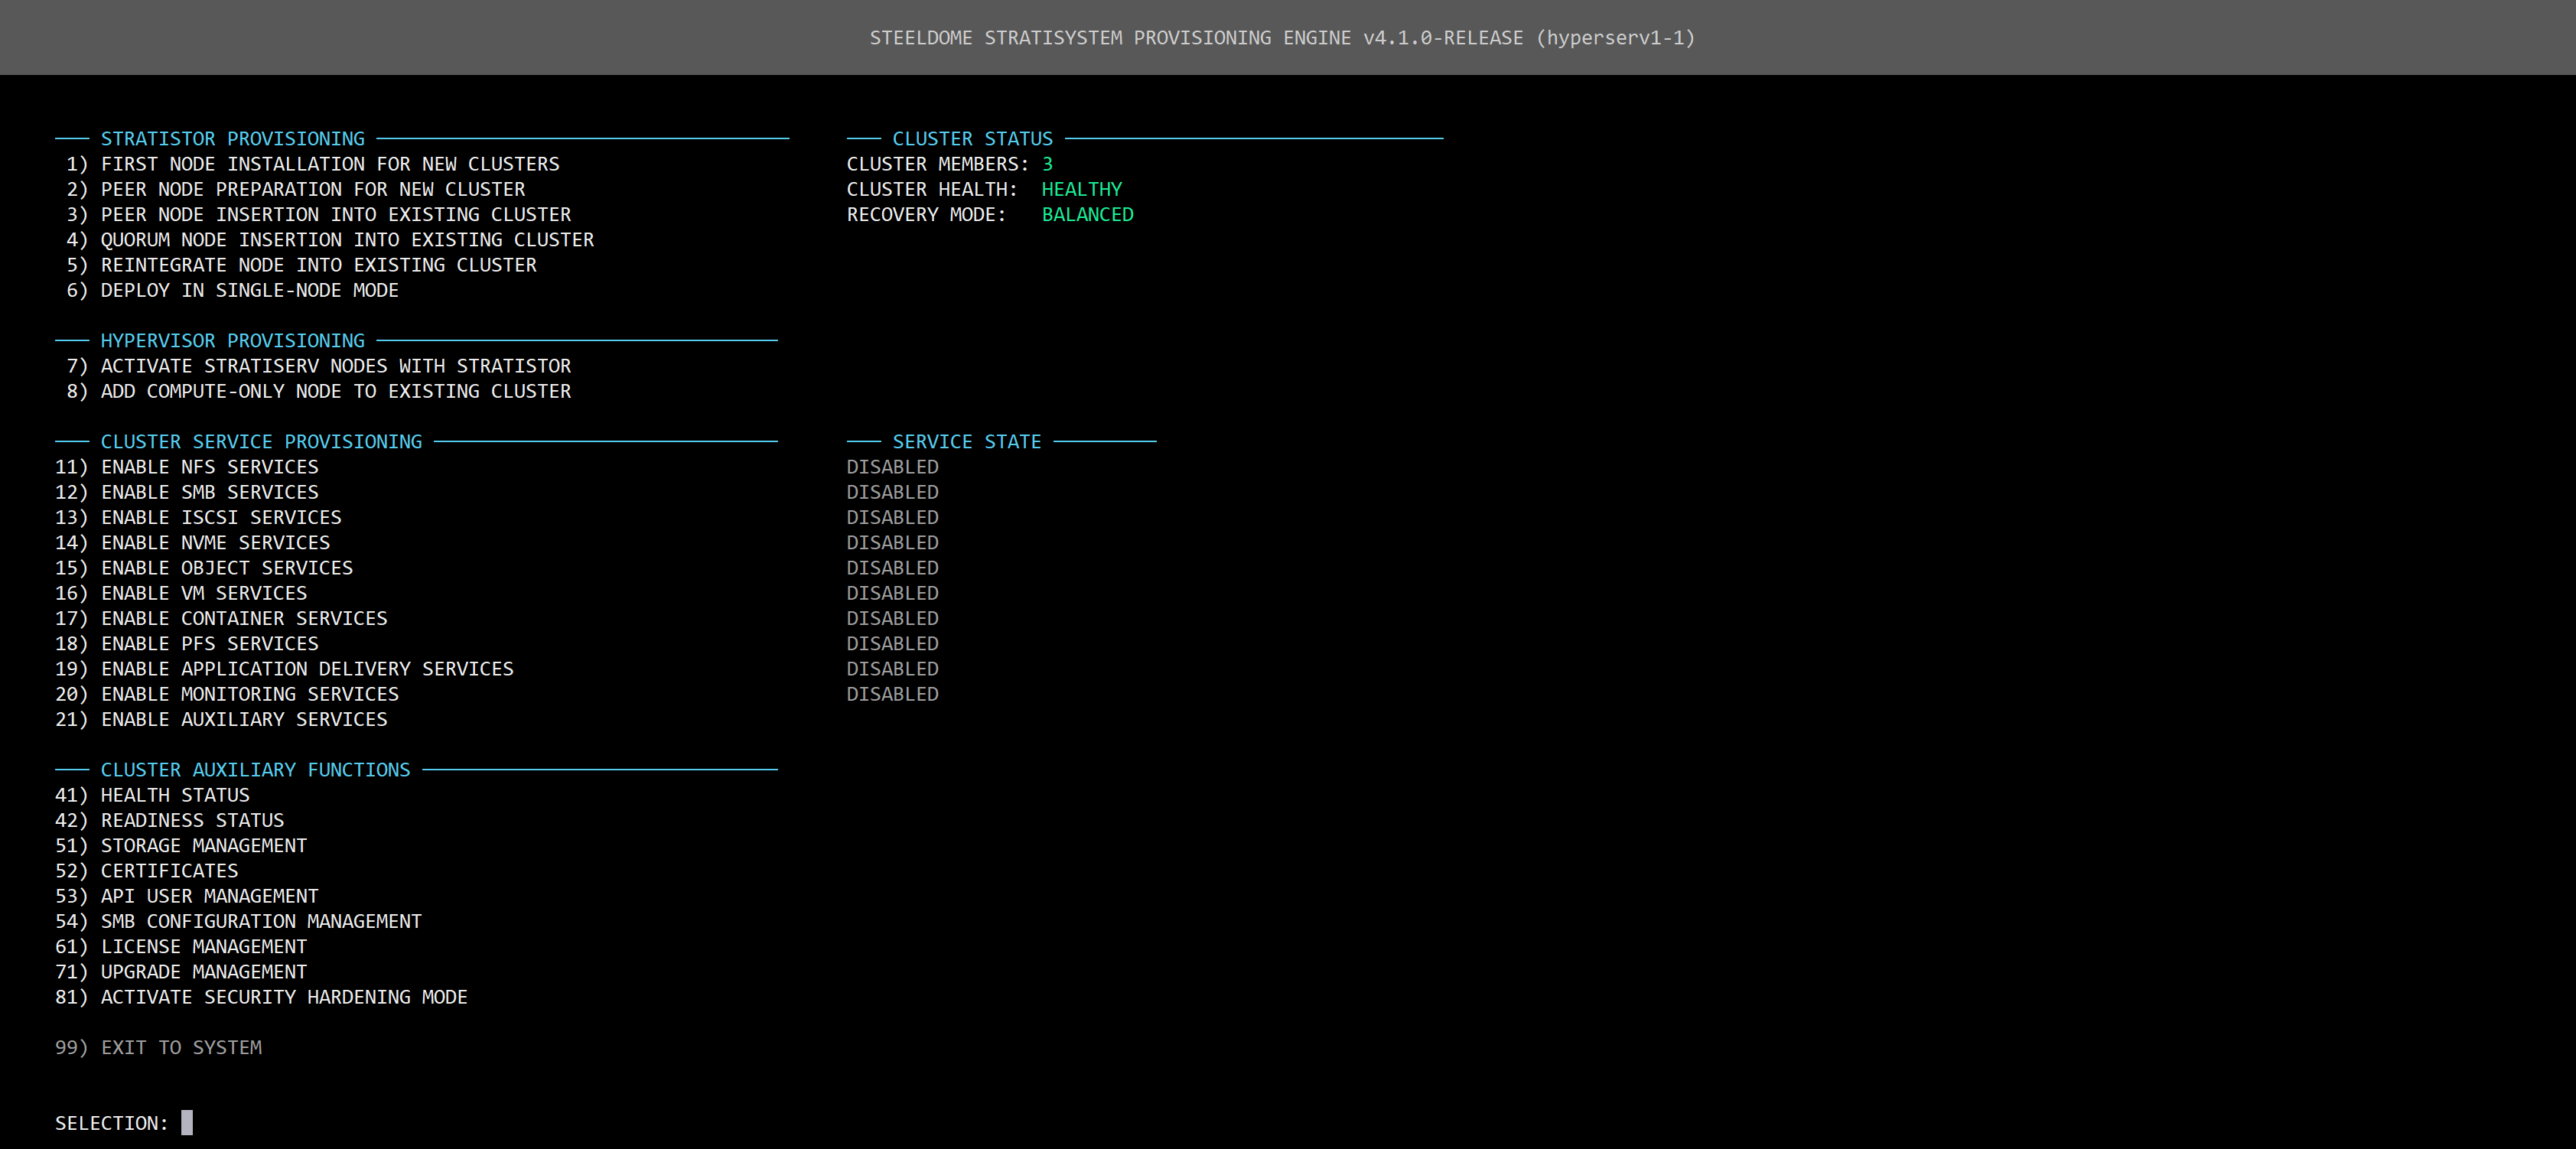
¶ ACTIVATING ADDITIONAL SERVICES
Additional services can now be activated from the main menu such as:
- NFS file services
- SMB file services
- iSCSI block storage services
- S3 object storage services
- VM services
- Kubernetes container services
- Parallel File System (PFS) services
- Application Delivery (VDI) services
- Monitoring services
- Auxiliary services such as:
- SteelDome's High Performance Base OS Template
- SteelDome's InfiniVault Data Protection Appliance
- ProphetStor Federator.ai
- CISEN Post-Quantum Cryptography Gateway
- Nextcloud Collaboration Services
- LogicalDOC Document Management Services
- Netgate pfSense Firewall Services
- Talos Kubernetes Services
- Portainer Container Management Services
- Technitium Network Services
- ElasticSearch Services
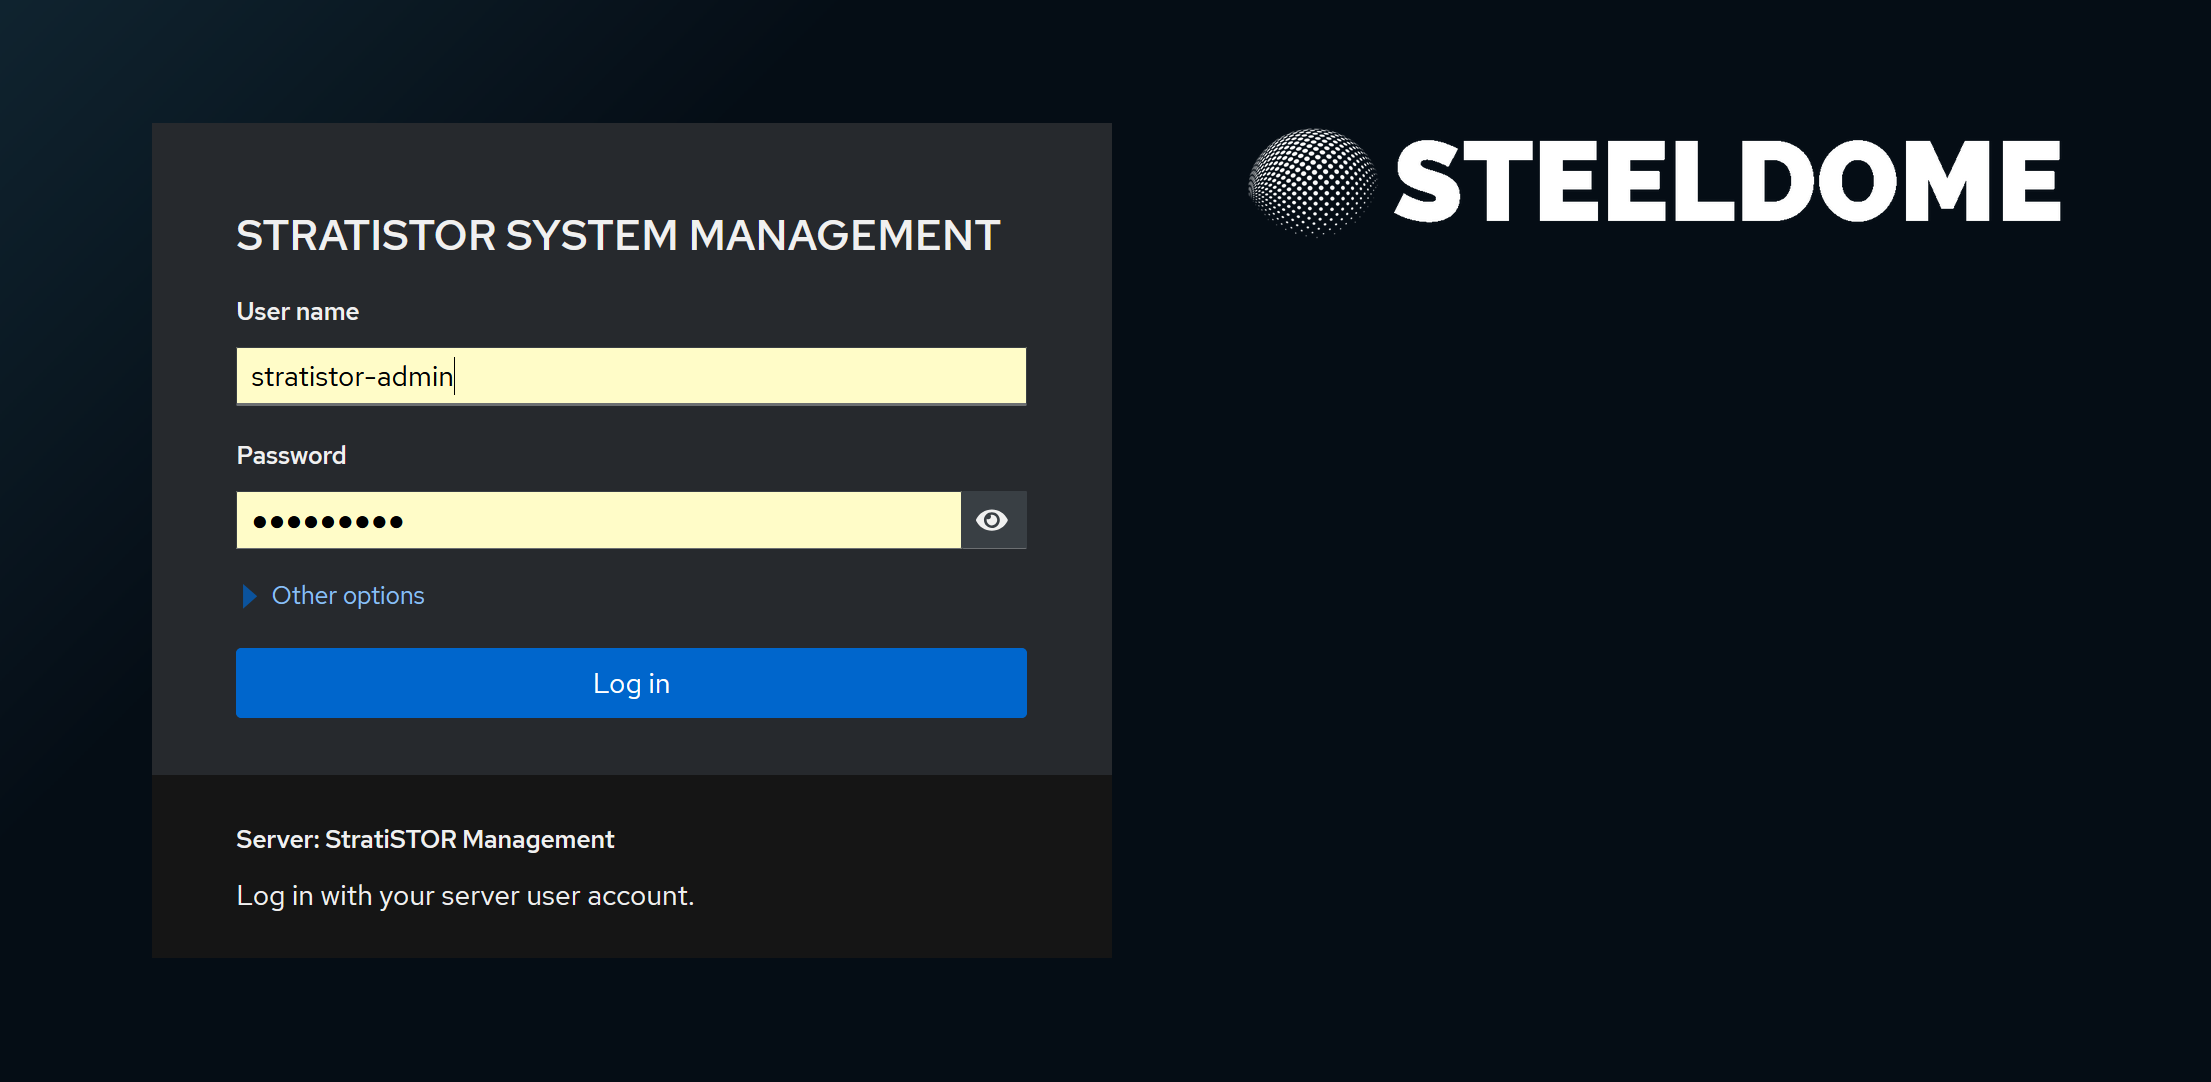
¶ MANAGEMENT CONSOLES
StratiSYSTEM has various management interfaces depending on which services are enabled on the platform.
Main StratiSTOR / StratiSERV Management Console
This can be located on any node at: https://[IPADDRESS]:3199. This console will allow access to all other activated services as applicable.
The credentials for this console are:
Username: stratistor-admin (for StratiSTOR) / stratiserv-admin (for StratiSERV)
Password: SteelDome (or the password designated in the deployment json file)
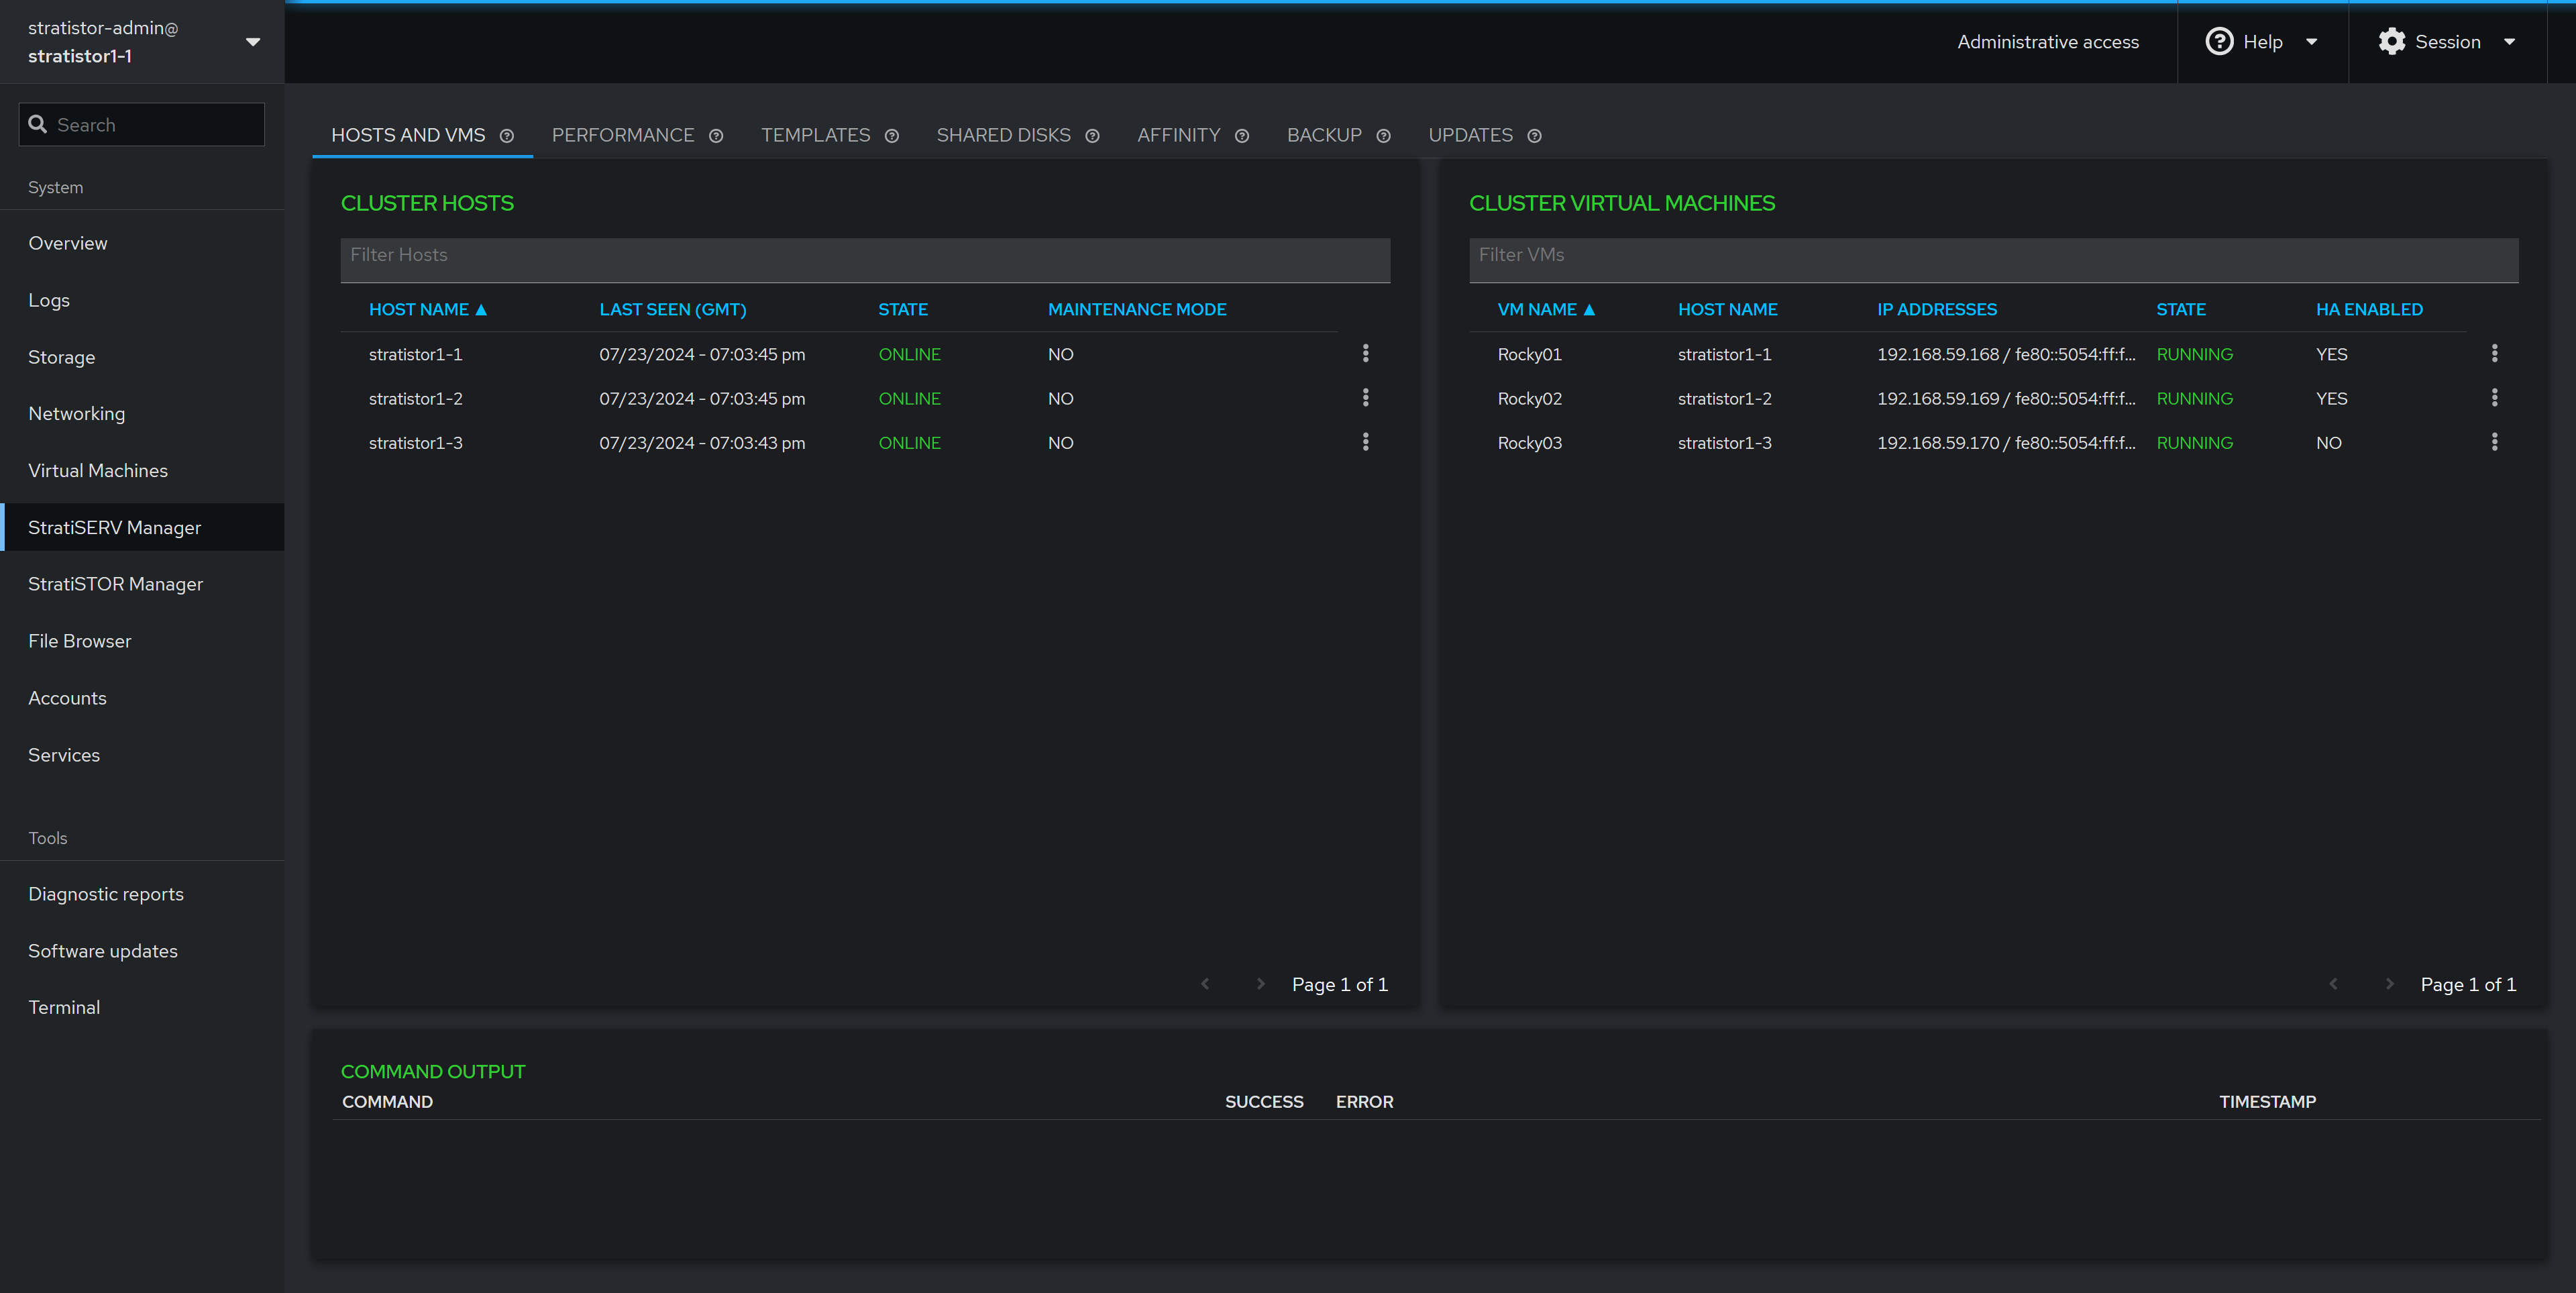
The main dashboard will show the current state of the cluster and provide access to other management areas within the platform. The tabs along the left-hand side will reflect the services installed during the deployment phase.
¶ MANAGEMENT CONSOLE PORT ASSIGNMENTS
For reference, all interfaces are embedded within the main StratiSYSTEM administration console, but if direct access is required, they can be accessed as follows:
- StratiSTOR / StratiSERV Administration
- https://stratistor1-1:3199
- stratistor-admin / SteelDome (or as defined in current_deployment.json)
- https://stratiserv1-1:3199
- stratiserv-admin / SteelDome (or as defined in current_deployment.json)
- StratiSTOR Storage Administration
- https://stratistor1-1:3198
- admin / SteelDome (or as in current_deployment.json)
- StratiSTOR / StratiSERV VM Administration (if enabled)
- https://stratistor1-1:3199/stratiserv/stratiserv
- stratistor-admin / SteelDome (or as defined in current_deployment.json)
- https://stratiserv1-1:3199/stratiserv/stratiserv
- stratiserv-admin / SteelDome (or as in current_deployment.json)
- StratiSTOR Container Administration (if enabled)
- https://stratistor1-1:3197
- Set at initial login (must be done within two minutes of activation)
- StratiSTOR Monitoring
- https://stratistor1-1:30443
- Admin / SteelDome
- StratiSTOR Global Scheduler
- https://stratistor1-1:3013
- admin / admin
- StratiSTOR VDI Administration (if enabled)
- https://stratistor1-1:12443
- Admin / SteelDome (or as defined in current_deployment.json)
¶ ADDITIONAL NOTES
¶ CREATING A BOOTABLE USB DRIVE
The StratiSYSTEM OS can be transferred to a USB drive for use with systems lacking enterprise out-of-band management such as IPMI, iDRAC, or iLO.
Using a tool such as Rufus, ensure the following settings are enabled before initiating the copy operation:
- Target System: BIOS or UEFI
- Partition Scheme: MBR
- Quick Format: enabled
- Cluster Size: 16 KB (default)
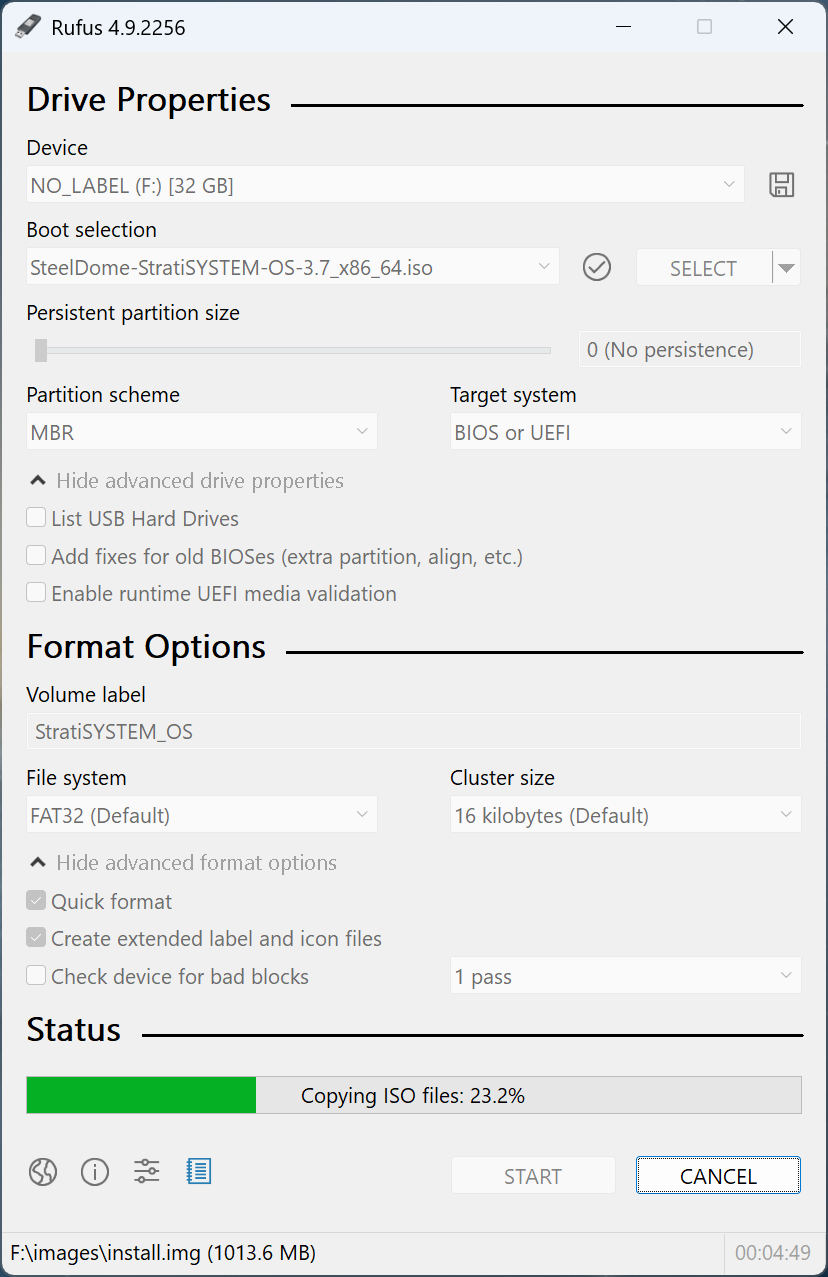
The process will take 5-10 mins depending on the speed of the USB drive. Once completed, safely unmount the USB drive from the system. The drive is now ready to use in any USB-based system or server.
NOTE: You may need to change the boot order on the system prior to booting to the USB drive.
¶ NETWORKING CONSIDERATIONS
Best practices for networking include redundant front-end and private cluster communications channels in the form of bonds. The StratiSYSTEM supports round robin, active-backup, adaptive transmit load balancing, general adaptive load balancing, and 802.3ad ether-channeling.
With 802.3ad, it is highly recommended to enable the layer 3+4 scheme where supported by the switching environment. This will evenly distribute the traffic based on socket connections made between the nodes in the cluster. This can be enabled by issuing the following command on each node:
nmcli connection modify [BOND NAME] bond.options "xmit_hash_policy=layer3+4,miimon=100,mode=802.3ad,lacp_rate=fast,downdelay=0,updelay=0"